3D Printed Points

GAP

G Scale Trains, HO Trains, 1:1 Sugar Cane trains
14 Jun 2011
4,063
947
Bundaberg Queensland, Australia
Country
Australia
ringbalin-light-railway.blogspot.com
Best answers
0
Country flag
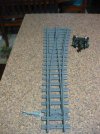
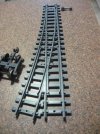
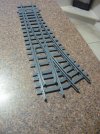
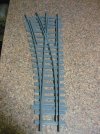
I have been messing around with my new 3D printer and have printed these.
Printed in PLA+ they are one of many sets that are planned to be used when I finally get around to build my storage tracks inside the shed.
Only thing I can fault is that the flange depth at the frog is to shallow but that can be overcome with a bit of filing.

Going to team them with some of these

First up I might put this set outside on the layout and stress test them to see if any wagon or loco doesn't like them and how they wear.
P1080265.JPG

P1080264.JPG
 
Last edited:
  • Like
Reactions: 1 user

dunnyrail

DOGS, Garden Railways, Steam Trains, Jive Dancing,
Staff member
GSC Moderator
25 Oct 2009
26,235
5,001
75
St.Neots Cambridgeshire UK
Best answers
0
Country flag
I have been messing around with my new 3D printer and have printed these.
Printed in PLA+ they are one of many sets that are planned to be used when I finally get around to build my storage tracks inside the shed.
Only thing I can fault is that the flange depth at the frog is to shallow but that can be overcome with a bit of filing.

Going to team them with some of these

First up I might put this set outside on the layout and stress test them to see if any wagon or loco doesn't like them and how they wear.

View attachment 320147

View attachment 320146
I rather like those levers as they do show which way the point is orientated. They do have to be carefully located to ensure no oversize stock gives they a sideswipe.
 

PhilP

G Scale, 7/8th's, Electronics
5 Jun 2013
33,649
3,532
Nottingham
Best answers
0
Country flag
They look the business.. Though I wonder about the position of the joint? - Look's to be near the frog.
Be interesting to see how this stands up to the stresses of use?

PhilP
 

GAP

G Scale Trains, HO Trains, 1:1 Sugar Cane trains
14 Jun 2011
4,063
947
Bundaberg Queensland, Australia
Country
Australia
ringbalin-light-railway.blogspot.com
Best answers
0
Country flag
They look the business.. Though I wonder about the position of the joint? - Look's to be near the frog.
Be interesting to see how this stands up to the stresses of use?

PhilP
That's why they are destined to go the outside, I have a set of points that were removed for refurbishment but haven't been put back so that where I'll put these.
Right on one of the main loops where they'll get a fair bit of traffic.
As they going to be on storage lines the wear should be significantly less that outside.
The joint through the frog shouldn't be an issue as all my track is mounted on boards, plus putting them together required some persuasion with a small hammer a bit of wood to get the dovetails to fit, so there is no movement at the joint at all.
 

GAP

G Scale Trains, HO Trains, 1:1 Sugar Cane trains
14 Jun 2011
4,063
947
Bundaberg Queensland, Australia
Country
Australia
ringbalin-light-railway.blogspot.com
Best answers
0
Country flag
I rather like those levers as they do show which way the point is orientated. They do have to be carefully located to ensure no oversize stock gives they a sideswipe.
I'm looking at printing a mount for the lever and running a piece of Mig welding wire between the lever and the throw bar to give clearance.
I have already tested the lever out on a set of refurbished brass points using the Mig wire and it worked perfectly. I set it up so it stood straight up for through and laid flat for curve, any combination can be achieved by changing the length of the wire.
 

mickb

Registered
11 Nov 2009
66
3
winmalee
Best answers
0
Country flag
That's why they are destined to go the outside, I have a set of points that were removed for refurbishment but haven't been put back so that where I'll put these.
Right on one of the main loops where they'll get a fair bit of traffic.
As they going to be on storage lines the wear should be significantly less that outside.
The joint through the frog shouldn't be an issue as all my track is mounted on boards, plus putting them together required some persuasion with a small hammer a bit of wood to get the dovetails to fit, so there is no movement at the joint at all.
Be careful if they will be in full sun, they will likely distort.
Mick
 

GAP

G Scale Trains, HO Trains, 1:1 Sugar Cane trains
14 Jun 2011
4,063
947
Bundaberg Queensland, Australia
Country
Australia
ringbalin-light-railway.blogspot.com
Best answers
0
Country flag
Be careful if they will be in full sun, they will likely distort.
Mick
That's one of the objectives of the experiment to see how long they last in the sun. Will paint one side and leave the other as printed to see if there is a difference
The others are destined for use inside a steel shed which can be hot when left closed up, so hot in fact that I found some heatshrink had actually shrunk on one side.
The other objectives are to observe the wear on the frog and how my locos and wagons navigate it.
 

GAP

G Scale Trains, HO Trains, 1:1 Sugar Cane trains
14 Jun 2011
4,063
947
Bundaberg Queensland, Australia
Country
Australia
ringbalin-light-railway.blogspot.com
Best answers
0
Country flag
I was not real happy with some of the features of the first set of points I printed;
  • Sleeper height to low for my track
  • Flange depth at frog way to shallow
  • Join right through the frog
I found these on the net and decided to print out one to see how it went.

They look to be the spitting of an LGB R5 point; the site only gives stl's for right hand points but I imported the files into Tinkercad and used the "mirror" function to get stl's for left hand ones.
I could have used the mirror function in Cura which would have given me G Code files but no stl's.

To assemble I will need some 2.75mm rod as alignment dowels and some small screws, for the dowels I'll try 2.75mm knitting needles (gauge 12) and for the screws a search of the net will be required probably screws used in electronics/robotics will be the place to look.

The print was a long one 92.5 hours, according to Octoprint for the 4 parts (I combined the point rails and change bar into one print), but it certainly did not go that long.
I started Sunday morning and the last print was done on Tuesday morning, I only printed during the day and not overnight,
I think it might be worth printing some more to get some points for the inside the shed job I am planning.
Couple of small issues
  • the change bar in the file measures 4.6mm high but the slot it goes through is 4.4mm so I imported it into Tinkercad and when I did I had the option to change the dimensions so I changed to 4.4mm "length" and it went through easily.
  • The alignment slot where the point blades go into are a tight fit that require opening up a bit for the rails to slide into the slot, this lets the pivot screw holes to line up.
All this is really minor stuff that is easily fixed with a little application of modelling skill.

This is what I was looking at price wise if I went down the tailor made brass track route.

I could have rolled my own but that would take just as much time if not more by the time I cut sleepers and rail, plus shaping the rail so I think and economical alternative.
I really didn't use a lot of filament in the scheme of things, probably get 4 or 5 sets per roll maybe more, the electricity came from the solar panels and the printer did the work while I was doing something else.

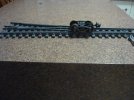
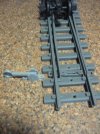
Some pictures of a rough assembly (no dowels or screws) showing what the finished article should look like. Again the points lever will get a look in (might even bash it in Tinkercad so the fits the point)
P1080269.JPG
P1080270.JPG
P1080271.JPG
P1080274.JPG
 
Last edited:

dunnyrail

DOGS, Garden Railways, Steam Trains, Jive Dancing,
Staff member
GSC Moderator
25 Oct 2009
26,235
5,001
75
St.Neots Cambridgeshire UK
Best answers
0
Country flag
I was not real happy with some of the features of the first set of points I printed;
  • Sleeper height to low for my track
  • Flange depth at frog way to shallow
  • Join right through the frog
I found these on the net and decided to print out one to see how it went.

They look to be the spitting of an LGB R5 point; the site only gives stl's for right hand points but I imported the files into Tinkercad and used the "mirror" function to get stl's for left hand ones.
I could have used the mirror function in Cura which would have given me G Code files but no stl's.

To assemble I will need some 2.75mm rod as alignment dowels and some small screws, for the dowels I'll try 2.75mm knitting needles (gauge 12) and for the screws a search of the net will be required probably screws used in electronics/robotics will be the place to look.

The print was a long one 92.5 hours, according to Octoprint for the 4 parts (I combined the point rails and change bar into one print), but it certainly did not go that long.
I started Sunday morning and the last print was done on Tuesday morning, I only printed during the day and not overnight,
I think it might be worth printing some more to get some points for the inside the shed job I am planning.
Couple of small issues
  • the change bar in the file measures 4.6mm high but the slot it goes through is 4.4mm so I imported it into Tinkercad and when I did I had the option to change the dimensions so I changed to 4.4mm "length" and it went through easily.
  • The alignment slot where the point blades go into are a tight fit that require opening up a bit for the rails to slide into the slot, this lets the pivot screw holes to line up.
All this is really minor stuff that is easily fixed with a little application of modelling skill.

This is what I was looking at price wise if I went down the tailor made brass track route.

I could have rolled my own but that would take just as much time if not more by the time I cut sleepers and rail, plus shaping the rail so I think and economical alternative.
I really didn't use a lot of filament in the scheme of things, probably get 4 or 5 sets per roll maybe more, the electricity came from the solar panels and the printer did the work while I was doing something else.

Some pictures of a rough assembly (no dowels or screws) showing what the finished article should look like. Again the points lever will get a look in (might even bash it in Tinkercad so the fits the point)
View attachment 320369
View attachment 320370
View attachment 320371
View attachment 320374
Have you thought about Brazing Rod rather than Knitting Needles? I have just measured some I have which is 2.4mm dia.

THREAD DRIFT ALERT
Used my TCM (Tochibo anyone remember them? Sad loss from the UK High Street but still around in Germany last time I was there) digital callipers, they do not often see the light of day but very good when they are used.
 

JimmyB

Now retired - trains and fishing
23 Feb 2018
6,982
926
69
Weston-super-Mare
www.tumble-down-falls.co.uk
Best answers
0
Country flag
THREAD DRIFT ALERT
Used my TCM (Tochibo anyone remember them? Sad loss from the UK High Street but still around in Germany last time I was there) digital callipers, they do not often see the light of day but very good when they are used.
Had to buy a new set this year, had my first set for a long time, but the battery connection had corroded over the years and gave up the ghost. My old one was metal bodied, and I wanted similar, in the end bought a "Silverline", look very similar, and a 3 year guarantee.
 

Rhinochugger

Retired Oik
27 Oct 2009
36,822
4,246
North West Norfolk
Best answers
0
Country flag
I have been messing around with my new 3D printer and have printed these.
Printed in PLA+ they are one of many sets that are planned to be used when I finally get around to build my storage tracks inside the shed.
Only thing I can fault is that the flange depth at the frog is to shallow but that can be overcome with a bit of filing.

Going to team them with some of these

First up I might put this set outside on the layout and stress test them to see if any wagon or loco doesn't like them and how they wear.

View attachment 320147

View attachment 320146
Be interesting to see how stock runs through the frog - the check rails still look a bit short on the blade side - a bit like LGB R3s
 

GAP

G Scale Trains, HO Trains, 1:1 Sugar Cane trains
14 Jun 2011
4,063
947
Bundaberg Queensland, Australia
Country
Australia
ringbalin-light-railway.blogspot.com
Best answers
0
Country flag
Be interesting to see how stock runs through the frog - the check rails still look a bit short on the blade side - a bit like LGB R3s
The test bogie (1 steel and 1 plastic wheel) rolled freely through the frog albeit with a bit of bumping and I think it is too shallow, that's why I sent with the other set in post #8.
They look exactly like an LGB point; I think an LGB point has been 3D scanned then worked into parts to fit a print bed using a CAD program.
When I put it next to a brass one I have there is no difference in any profiles.
I may put a bit of metal shimming on the frog to reduce wear from metal wheels similar to what is done in HO scale.
 
Last edited:

GAP

G Scale Trains, HO Trains, 1:1 Sugar Cane trains
14 Jun 2011
4,063
947
Bundaberg Queensland, Australia
Country
Australia
ringbalin-light-railway.blogspot.com
Best answers
0
Country flag
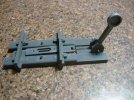
This is a picture of my attempt to incorporate the points lever into the change bar area of the points using Tinkercad.
This is a proof of concept print, I still have to work out a rod from the lever to the change bar, fitting it this way the lever should be clear of any carriages but I can move it further away if needed.
A bit more tinkering I think.
P1080275.JPG
 
  • Like
Reactions: 1 user

GAP

G Scale Trains, HO Trains, 1:1 Sugar Cane trains
14 Jun 2011
4,063
947
Bundaberg Queensland, Australia
Country
Australia
ringbalin-light-railway.blogspot.com
Best answers
0
Country flag
Have you thought about Brazing Rod rather than Knitting Needles? I have just measured some I have which is 2.4mm dia.

THREAD DRIFT ALERT
Used my TCM (Tochibo anyone remember them? Sad loss from the UK High Street but still around in Germany last time I was there) digital callipers, they do not often see the light of day but very good when they are used.
I found these and they should work

Thread drift
I have a set of digital vernier calipers that I got from ALDI, cheap but do the job.
In a past life back in the service we were equipped with micrometers and vernier calipers made by Starret; good quality but I can't justify the expense.
We also had optical micrometers for checking pits and dents on rotor blades and wings.
When I move into calibration field if I had $1 for every set of micrometers or calipers that I checked and certified I would be a very rich man.
 

JimmyB

Now retired - trains and fishing
23 Feb 2018
6,982
926
69
Weston-super-Mare
www.tumble-down-falls.co.uk
Best answers
0
Country flag
I found these and they should work

Thread drift
I have a set of digital vernier calipers that I got from ALDI, cheap but do the job.
In a past life back in the service we were equipped with micrometers and vernier calipers made by Starret; good quality but I can't justify the expense.
We also had optical micrometers for checking pits and dents on rotor blades and wings.
When I move into calibration field if I had $1 for every set of micrometers or calipers that I checked and certified I would be a very rich man.
I have a 0 - 1" Moore & Wright mic, bought second hand, so cheap, I think I paid £1.00 for is and it is zeroed with nil play in the thread, so more than good enough for my modelling :)
 

Paul M

Registered
25 Oct 2016
11,945
1,709
61
Royston
Best answers
0
Country flag
When I move into calibration field if I had $1 for every set of micrometers or calipers that I checked and certified I would
Calibration of micrometers was one of my duties whilst working in a laboratory. Why I was lumbered with it, is any one's guess.
 

David1226

Registered
24 Oct 2009
7,941
7,937
74
Abingdon, Oxfordshire
Country
United-States
Best answers
0
Country flag
Calibration of micrometers was one of my duties whilst working in a laboratory. Why I was lumbered with it, is any one's guess.
They'd obviously got your measure.

David
 

GAP

G Scale Trains, HO Trains, 1:1 Sugar Cane trains
14 Jun 2011
4,063
947
Bundaberg Queensland, Australia
Country
Australia
ringbalin-light-railway.blogspot.com
Best answers
0
Country flag
This is a picture of my attempt to incorporate the points lever into the change bar area of the points using Tinkercad.
This is a proof of concept print, I still have to work out a rod from the lever to the change bar, fitting it this way the lever should be clear of any carriages but I can move it further away if needed.
A bit more tinkering I think.
View attachment 320407
I have moved the lever 10mm to the left to give extra clearance.
I have yet to test this with any of my locos but I'm going to try with my 2 largest ones then I'll know if I have clearance.
Plus I am going to install this set in one of my main lines outside, it is coming into summer down here so a stress test is in the wings. If they survive that then they should be fine for inside.
 

justme igor

Registered
17 Apr 2020
682
64
Netherlands Westwoud
Country
Netherlands
Best answers
0
Country flag
market_square__neg9525_neg9525__81872_25858__2024_01_06_1521_57.png
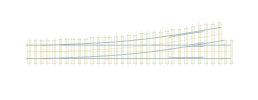
This is how a turnout has to look prototypical correct, regarding his sleepers/ties.
I can make anything you want if you are willing to go this route.
Regarding to the check/safety rail, your print is in good order.
For what i have found out is flange baring frogs do not work for me.
If printing is what you want, i would also like to suggest to make the space between the safety rail and your headrail a bit deeper.
A grain of sand can do some harm to your wheels.

Advice regarding pla: it will shrink in the sun, paint or no paint.
The pivoting point is above 30C shade, in sun the material temp is playing a big part, 60C is easy done.
At this temp pla can shrink up to 5%. it will also harden and get brittle over time.
When hot it will be very soft.
This is my experience.
I never tried pla+
Basically after my testing with pla, i did all in abs.

i think you will find a good starting point here.
i also think you want to dip your toe into 3d modeling.
Search in your windows computer for "3d builder".
This program is very easy, but o so difficult.
Why you have 3 choices, make a choice and you have again 3 choices, make one..... a n d ...you have again three choices.
You can make the ties higher or lower, you can adapt very easy the chars, even add very simple your wanted distance between the ties.

Scale this up to your scale.

I hope this was/is helpful.


ps here you go: i will delete this one in a couple of days, the chairs i dont had the time for it.