3D power transformer printing and associated transport wagon

ARIA31

Registered
3 Oct 2017
250
54
74
Toulouse - France
Best answers
0
Country flag
Hello all,

The story started with this picture made by a G scale railroader "Vibrocop" on another french forum dedicated to US trains.

1597332040922.jpeg

I was willing to have such a transfo on my indoor railroad.

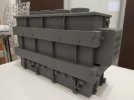
This transfo is quite big : 250 x 172 x 100

I have a good friend Joël living close to my home and mastering very well his 3D printer.

Accordingly I asked to "Vibrocop" if he would send me the 3D files to get the same transfo printed by Joël.

Vibrocop immediately accepted and transferred the stl files.

However the parts were a little bit too big for the Joël printer.

So Joël who is mastering as well the Autodesk Fusion software cut the affected parts in 2 pieces.

Joël started the printing in PLA.

Was not an easy task as you can imagine, but at the end the parts are perfect.

1597332128219.jpeg

1597332192204.jpeg

Joël is not a large scale railroader , but was keen to finalize the transfo construction.
So he made the assembly , surface sanding, and finally air brush painting..
To make it short , the assembly and sanding were not easy tasks as well.

1597332247833.jpeg

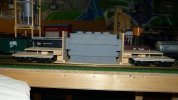
The transfo is now ready for delivery by train:

1597332356916.jpeg

Comparison with the LGB transfo which is already quite big

1597332395984.jpeg

Here is the first video with the wagons I already have.


There is no existing wagon to carry this load.
The Usa trains depressed center flat cars are too small in length.
As you can see the transfo is very high so a new suitable transport wagon is needed.

That's another story to come........ stay tuned !!!
 

Attachments

  • 1597332287350.jpeg
    1597332287350.jpeg
    122.1 KB · Views: 0
  • Like
Reactions: 1 users

PhilP

G Scale, 7/8th's, Electronics
5 Jun 2013
33,559
3,521
Nottingham
Best answers
0
Country flag
Gosh! The clearance on the bridge looked very tight! :eek:

Thank you for sharing..
PhilP.
 

PhilP

G Scale, 7/8th's, Electronics
5 Jun 2013
33,559
3,521
Nottingham
Best answers
0
Country flag
what is inside ?

A half-sphere of Plutonium, and a Russian trigger-mechanism, for a 'dirty-bomb'.. :lipssealed::wondering::nerd::mask::mask:

Oh! Sorry!!! Wrong Forum!!! !!! :tmi::giggle:
 

JimmyB

Now retired - trains and fishing
23 Feb 2018
6,946
921
69
Weston-super-Mare
www.tumble-down-falls.co.uk
Best answers
0
Country flag

PhilP

G Scale, 7/8th's, Electronics
5 Jun 2013
33,559
3,521
Nottingham
Best answers
0
Country flag
Ok..

6 bottles of Beaujolais Nouveau? :blush::nod:
 

ARIA31

Registered
3 Oct 2017
250
54
74
Toulouse - France
Best answers
0
Country flag
Thanks to those who responded and tried ... !!! :)

No.... this is not bottles !

p1210114.jpg

it's a protection against too curious little hands, while waiting for the appropriate transport wagon .............
 

PhilP

G Scale, 7/8th's, Electronics
5 Jun 2013
33,559
3,521
Nottingham
Best answers
0
Country flag
Ah-Ha! .. .. .. .. .. Lego!! :rofl::rofl::rofl::rofl::rofl:

Now we see.. I bet there are gauging issues on many lines? :eek::wondering:
 

ARIA31

Registered
3 Oct 2017
250
54
74
Toulouse - France
Best answers
0
Country flag
20200713_121617.jpg

I have no link with those 2 Companies !!!

" there are gauging issues on many lines? "
If I understand well your question, I can already confirm there are issues with such big loads.
I have a tunnel and R1 everywhere .
That are the reasons why there is a suitable wagon under construction.
I choose not a simple depressed center flat car with increased length : but something like a so called Schnabel car.
 

PhilP

G Scale, 7/8th's, Electronics
5 Jun 2013
33,559
3,521
Nottingham
Best answers
0
Country flag
Having done a little research:
If you are going to build the nine-bogie (to each car) version, I do hope you have deep-pockets! :eek:
Especailly, if you intend to use metal wheels..

Thank you for posting. - Really interesting.
PhilP.
 

ARIA31

Registered
3 Oct 2017
250
54
74
Toulouse - France
Best answers
0
Country flag
The wagon will have metal wheels, yes.... but not 6 bogies only 4 ...!!

A very good reference on this topic is Garden Railways Magazine dtd April 2014 which provided a lot of useful information and described how to build the following Schnabel car. Not my goal however !

1599579432550.jpeg

For me , the starting point is that I have to transport a load with large dimensions.

There are several known possibilities such as : (copyright Garden Railways Magazine 04/2014

1599579479265.jpeg

1599579515982.jpeg

We choose to build something like that :

1599579557562.jpeg

Here is a picture of a prototype similar to the one we are finally willing to build.

1599579600760.jpeg

Models of this wagon were also produced by MTH & Bachmann in various sizes On30 and HO.

1599579670839.jpeg

It has been supplied by them in several different liveries / colors for example:

1599579715094.jpeg

1599579733883.jpeg

As I have an indoor railroad of limited size, we reduced the length a little bit, so instead of having 3 bogies on each side there will only be 2.

The full wagon will be a little less than 90 cm! (3 feet)

Then the transformer will be placed on a cradle and is not integrated into the structure of the wagon.

This will easily allow to change the load being transported.

Here are the screenshots of the 3D draft as made by my friend Joël with Autodesk Fusion 3D

1599579872869.jpeg

1599579891824.jpeg

1599579911444.jpeg

1599579937781.jpeg

Then comes the choice of construction details.

At first it was considered to make 3D printed bogies, Joël was keen to print them, but for strength reasons and to make this wagon construction easier we decided
to use off-the shelves bogies from current G scale trains suppliers. Looking at the wagons I have choosen Piko ones.

The bogies are Piko 36051 (Bettendorf if I am right) and the wheels are Bachmann metal 92421.

The transformer alone is over a kilo so with the transport chassis we will probably reach more than 2 kg leading to 250 grams per axle.

My personal standard is 150 grams per axle for loads on my wagons from G scale brands.

Accordingly this will be quite high, but somebody on this forum told me much higher loads are acceptable so let us see.

The next concern was to check if such a long wagon might run well on my indoor railroad.
We had also concerns about the location of the 2 pivots points

We decided to build the "Template checking wagon".

See next post.
 
  • Love
Reactions: 1 user

PhilP

G Scale, 7/8th's, Electronics
5 Jun 2013
33,559
3,521
Nottingham
Best answers
0
Country flag
The Bachmann interpretation is interesting.. The two outer bogies may help with 'steering' but do not appear to be configured to carry any appreciable weight?

I am finding this most interesting. :nerd::)
 
8 Mar 2014
7,806
972
San Diego
Country
Armenia
www.elmassian.com
Best answers
0
Country flag
I see bearings (weight) for the inner truck, and one for the 2 outer trucks. the main load is applied in the middle of the first structure.

Sure looks like it is pretty much shared between the inner truck and the assembly of the outer 2 trucks.

Greg
 

Paul M

Registered
25 Oct 2016
11,875
1,696
60
Royston
Best answers
0
Country flag
Something like that would be ideal for a realistic looking rail cleaning wagon, low enough to hide the cleaning bits and enough room to put ample weight inside
 

ARIA31

Registered
3 Oct 2017
250
54
74
Toulouse - France
Best answers
0
Country flag
Template was the word chosen by Google to translate the french word "Gabarit".

Afterward "Gauge" might be a better word.


The targets of this "Template checking wagon" were to :

a) check where should we have the pivot points

b) check if the wagon can easily run on my railroad

c) check compatibility with my small tunnel, with my Howe truss bridge, ....

This "Template checking wagon" was quickly built in wood and assembled on the final selected Piko bogies as stated before. The interest of using wood were that it was very quickly made and allowing to bore, screw, nail, .... to adjust the shape.

The assembly was made on the bogies assemblies we designed and produced initially in 3D.

P1210180.jpg


One of the first thing to be fixed was the lowest height to be kept between the head of rail and the wagon bottom. As I have USA trains depressed center flat cars I choose the same heigth12 mm.

Then to evaluate the best pivots place we used the vertical shafts made by the bogies screw attachment.

This might looks quite simple to decide, but we were stressed to have the shorter wagon length between pivot to limit the overhang on R1 curve.
Quite obviously the best place is on each side, on the middle of the 2 bogies assemblies.

The achieved rolling tests shown that the weight, dimensions, and sway are paramount parameters

So as to avoid damages to the transformer some of the rolling tests were carried out with an equivalent weight !

P1210182.jpg

A one kilo sugar packet.....

The overhang was as expected

P1210186.jpg

However this showed how the sidewise rocking was important, due to the pivots free play, leading us to special cares on the pivot design later on.

Then the tunnel doors were a quite no-go items.

P1210189.JPG

P1210192.JPG

The solutions are
a) to extend the door positions to keep away from R1 curves inside the tunnel
b) to cancel the tunnel !
For the time being , the so called "Plan B" is selected.
When you have an indoor railroad you have always space constraints.

The rolling tests were made with the following train :

P1210193.jpg

For sure I was keen to see what it will look like at the end.

P1210195.jpg

As explained, the design of the chassis used to connect the bogies had several versions. Here is the one finally selected.

IMG_20200224_183328.jpg

The Joël's printer has a limitation in length, so this chassis is made of 2 parts which are glued together. As they are printed in PLA to get a suitable strength they features two interior tubes in which two rods are slid in inside. Yes it works fine !

1601127355590.jpeg

The bogies with wheels we use:

IMG_20191018_174153.jpg

In the next post we shall describe the pivot design and the parts manufacturing.

Believe me, there will be some fun in the manufacturing process.
 

Attachments

  • P1210180.JPG
    P1210180.JPG
    320.6 KB · Views: 0

Zerogee

Clencher's Bogleman
25 Oct 2009
17,351
1,723
North Essex
Best answers
0
Country flag
Fascinating stuff! That's going to be an impressive piece of rolling stock. :)

Re the pictures in post 13, can we really let big signs saying "DO NOT HUMP" go by without comment on here.....? :rofl::rofl::rofl:

Jon.
 

ARIA31

Registered
3 Oct 2017
250
54
74
Toulouse - France
Best answers
0
Country flag
Thank you for your post Jon.

With your eagle eyes you have seen someting I did not noticed !
Even I don't understand what it means !!

Does this mean in other words : do not bump ! ... ?