Wisbech and Upwell Coach Kit.

dunnyrail

DOGS, Garden Railways, Steam Trains, Jive Dancing,
Staff member
GSC Moderator
25 Oct 2009
26,171
4,993
75
St.Neots Cambridgeshire UK
Best answers
0
Country flag
I
Jon I use this, and find very little if any bleed is used according to the instructions, only use the paper stuff for general masking:

I used Tamiya Tape (similar to what you show) at the joints where the white and red joints are. I expected a small amount of bleed at the windows anyhow so was not that bothered about the cheepo stuff being used inside.
 

dunnyrail

DOGS, Garden Railways, Steam Trains, Jive Dancing,
Staff member
GSC Moderator
25 Oct 2009
26,171
4,993
75
St.Neots Cambridgeshire UK
Best answers
0
Country flag
Pretty much on the home straight now, thank goodness says Matt!

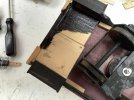
Couplings have given me much pause for thought as I mentioned in one of my earlier posts. The simples option would have been to fit LGB bogies with LGB couplings as those are my chosen couplings. But as I had built the kit bogies I decided to tough it out. Here you can see I have fitted 2 pieces of 11/44 40 mm long and with one piece cut to give an 82mm width. This was deliberate (I can sometimes think ahead) so that the steps would be able to butt up to these bits when glued in place, thus giving these vulnerable parts a more secure hold.F9429FA4-AF4C-4BCF-AE7C-AF7C1BC1115E.jpeg
Below I have cut some 4x18mm strip to act as the buffer beam. Though there 2x 3d printed ones included in the kit as these have fittings for 2 buffers as can be seen on Matt’s build, referred to earlier this was not for me. Incidentally the Timber are standard sizes available in the timber moldings section found in Wicks or BnQ. Note how I have cut out a slot for the coupling to allow for sharpe Tramway (LGB R1) curves.
8452DC21-FF68-4BF3-9A04-07BB71BDB0AC.jpeg
I did some test holes to temporarily fit the couplings to see how much I needed to adapt things.
2585AE66-C5D6-4EB5-A393-910AA31C9219.jpeg
Here I have used an LGB coupling in the hole seen above and you can see that I am pretty much spot on. As can be seen the footstepps have also been fitted with sundry bits of scrap wood to help hide joints.
4F0BFAFF-1488-4405-A925-46DBE484658D.jpeg
Thus I could move to the next stage which was to cut some wood for the coupling to be mounted in place. This was a strip of the 4x18mm cut to 7 wide by 50 long thus fitting inside the LGB coupling. The holes were drilled out and LGB screws used to hold the coupling hook/loop assembly and spring in place as seen. The other hole was for the mount but this gave too much droop. So the wood was thinned further to match the depth of the LGB coupling groove and a hole drilled nearer the coupling. While this was being cut with a razor saw the screw was also shorted in situ thus ensuring that it did not drag on the base wood. Another mounting hole was drilled in the base wood so that the coupling could swing nicely left and right. This was then tested out and washers used to give perfect height, one was also mounted next to the screw head to give smooth swing left and right with the screw just on interference fit.
FC969AAF-A35A-4A11-A635-93EA834965D8.jpeg
In the end as you can see below the pivot was made closer to the actual coupling.
766BE35B-04A1-4815-90B6-31E488A400C4.jpeg
Next up was to fit the roof pots, eight are supplied and these are not ventilators as they are sometimes called but roof lamp ventilators and on the bogie car you can clearly see that one is mounted over the platform each end. Why would you need fresh air in that location? Clearly light is the priority. So they have been mounted at 3/8 and 15.5cm positions from each end. But first I drilled a hole in the centre to glue in a small pin to give extra holding when glued in place. Holes were then drilled at the marks for glueing in place. Oh yes the nail heads were also cut off.
57579861-A56B-4350-BF48-F0A7C4E24995.jpeg5AE20D87-F907-43E5-BF1F-84109EBBB982.jpeg
C914DD38-F982-43AF-AE1E-6C4966FE3D1A.jpeg
I have also fitted the end Roof Support Wires and 3d printed Balcony Ends. The wires go through holes each side of the flat base into the platform to give a more secure hold. The holes were drilled in my pillar drill. These will get a hidden soldered top to keep them neat and fit inside the additional roof end that I mentioned earlier. I have also elected not to use the 4 Window fill ins that are present in the mould for each side. I suggest that these be left in place when you remove the sides from the frets should you wish for them to be present.
76430849-F1B8-44B4-BFBA-8A6344ECED16.jpeg4CB04CB2-BBCB-4888-9E3C-A9E6BB0BA5C5.jpeg
I am not to happy with the roof fit as yet but hope that a screw will keep things in place once fitted.

Left to complete are central end buffers, Hand Brakes (supplied in the kit), Glazing (supplied in the kit), lettering and that wire just mentioned.

All in all I am very happy with the kit, whilst I have made many alterations to suit my personal needs I think that you can see from what has been done thus far that this is a rather nice kit that I wish Matt well with production of.
 

Attachments

  • 540BF79F-D4D4-401C-AB70-EEEFFFD4B921.jpeg
    540BF79F-D4D4-401C-AB70-EEEFFFD4B921.jpeg
    520.2 KB · Views: 0
Last edited:

Paul M

Registered
25 Oct 2016
11,881
1,696
60
Royston
Best answers
0
Country flag
Smashing model and thanks for the build log, it's always interesting to see how someone goes about their modelling, and a good chance to borrow their techniques
 

3 minutes of fame

3d printing, electronics and trams
14 Dec 2020
574
154
Lincolnshire
www.mgnr.uk
Best answers
0
Country flag
Thanks Jon. It's been very satisfying for me to see you bring the kit to life. This is my first stab at designing a full model, and I really enjoyed the experience.

My plan is to make the various modifications to the kit in line with your suggestions and make it commercially available. Unless anyone is desperate for one for Christmas, I will look to take any orders for the new year.

Price will be around £80 for the full kit, including the 3d printed parts.

Initially this will be for the kit as shown, but I'll look into a more accurately scaled 1/32 version of both the rigid and longer bogie version.

If anyone is interested, please drop me a PM and we can discuss further.
 

dunnyrail

DOGS, Garden Railways, Steam Trains, Jive Dancing,
Staff member
GSC Moderator
25 Oct 2009
26,171
4,993
75
St.Neots Cambridgeshire UK
Best answers
0
Country flag
So the final report on this build. Having discarded the supplied double buffers I needed to fit some central single buffer ones. Despite having a few PM cut offs and some other odd ones none fitted right. They need to reach about to the extremity of the loop on the LGB couplings. So scratch build was the way to go, this utilises off cuts from this kit, some off cuts of rocket stick and the ends of PM coupling faces. At least PM has seen use yet again.
400FA267-121A-43F9-96CD-1BB26BAE1864.jpeg
The Brake Wheel has also been fitted, I elected to fit only 1 despite 2 being in the kit, logic says how would on each end work where there is a turning action to create a pulling action on levers. The real thing was Vac Fitted, thus likely only 1 handbrake would be fitted. Oh heck something else needed Vac Pipes.

There was some brass tube in the kit so this has been utilised for an up-stand and some offcuts of thin copper contact strip used to fit bottom and towards the top. The bottom is soldered to the brass tube and fitted to drilled holes in the buffer beam whereas the top is glued to the tube and wire end detail.

The upwards wires have also been soldered up to a cross piece with some rather nasty bending to get it all fitted.
A67A80DF-7EF2-4B1F-B051-D25EDA33D525.jpeg00EA6C35-7F7A-4091-ACDD-3FD0B14FD84E.jpeg
Here you can see where the screw goes in at each end to hold the roof in place.
4E4A0CA1-81A4-4605-8FF7-C750153022DE.jpeg
Finally at Magdesprung out on a slightly sunny line today.
21BBB0E4-9781-48E7-88F3-9EA9D8550041.jpeg
Looking at the coach it appears that with my revisions I have made a HSB lookalike bogie coach, not quite what the kit designer or myself intended. But I think the livery pushes that view strongly. Still all in all I rather like how it has all gone in the end and that in part is the enjoyment of a kit. The end result and the journey to get there.

Well done Matt for this kit and I hope that many from the forum enjoy it as much as I do.
 

3 minutes of fame

3d printing, electronics and trams
14 Dec 2020
574
154
Lincolnshire
www.mgnr.uk
Best answers
0
Country flag
Thanks Jon, a fantastic model and thank you for investing the time to build it. I wish it a very happy life on your railway and I look forward to visiting at some point.
 

dunnyrail

DOGS, Garden Railways, Steam Trains, Jive Dancing,
Staff member
GSC Moderator
25 Oct 2009
26,171
4,993
75
St.Neots Cambridgeshire UK
Best answers
0
Country flag
Thanks Jon, a fantastic model and thank you for investing the time to build it. I wish it a very happy life on your railway and I look forward to visiting at some point.
When you do there are some bits I never used, wheels, axles, buffers bearings side detail, 1 brake wheel etc in a bag for you.