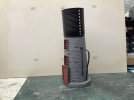
I think I may have hinted at this project some time back, well in the current lock-down it’s day has come.
A few years back I like many on here bought one of those Solar Light Houses, mine came from BnM. Though very nice when working I did not have a suitable place for it so plonked it up near my pond. And very nice it looked too at night when working. But as is the way of many of these imports, the lifespan was not that long perhaps 18 months at best. So the working flashing light section was dumped for recycling, ah but the base this was far too good to chuck out. In Voi Libre some time back there was a great article on Water Towers and I thought that the Light House base had potential. This was fully confirmed when I saw in issue 96 a drawing that provided some inspiration. So base with a corrugated Dog Food Tin in pristine condition were temporarily married. I had already done some work on the base to give it a more G Scale door (whatever “G” may be), I think the original was nearer 0 Scale. Below you can see the basis for the job.


Having got thus far and things looking acceptable I moved on to the detail, I could have plonked it out as it was and as Rust took hold of the Tin a better than nothing would have entailed. But that is not my way, an Operating Wheel with attachments, Water Level Indicator and Filler Pipe are required. To say nothing of some more paint though as you can see the base had already been blown with Halfords Matt Grey Undercoat. So in order of making:-
OPERATING WHEEL
This required a soldered up Wheel, I had a roll of .9mm Nickel Silver Wire so this was used, I had tried something smaller but this was melted by the Cooks Micro Torch. I made the curve by winding some of the wire round one of my Pin Vices. Then an L was pushed into the Heat Base and a V to make up the 3 spokes.

Here you can see the bit that will disappear into the Tower and to be soldered to some pipe that (would in real life) Controls the Water Flow.

Soldered up to some sundry KS Pipe you can see how it is connected to the Exit Flow. Note that this is well below the bottom of the Water Tank Inside the Tower.


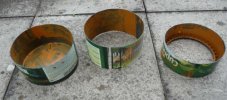
WATER LEVEL INDICATOR
This caused a little head scratching, I think I coped out a little here but some square KS appeared appropriate when soldered top and bottom of the Tank.

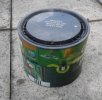
By now it seamed appropriate to give the Tank a blast of Matt BLack Halfords rattle can, it was a mildish day so I could at least do it out side and bring it in quickly to dry out. Sundry Pliers and Tweezers were used to bring the freshly painted parts indoors. Once good and dry the Indicator Pipe was masked up for some white paint.

I made the Indicator out of a piece of scrap N/S filing the point and folding it round my pliers to get the shape I wanted. It was planned to just press in place behind the pipe. This turned out just fine as it happens as the square pipe was only soldered top and bottom allowing the indicator to be just shoved into place.


A few bits of touching up to resolve odd bit of White Paint bleed through and we had a satisfactory indicator System.

FILLER PIPE
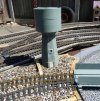
This as ever turned out to be one of those jobs that Heat Shrink was not supposed to have been invented for. Two sizes shrunk with some Lead inside at the bottom to hold it straight had the main work completed. A quick touch up of some Red Paint, Windows painted Glossy Black which tends to work quite well for non glazed non see through windows. Some of the Bricks have been picked out in a darker grey.

All that remains is perhaps some more picking out of Brickwork, Rust and general Weathering to complete the job. Oh and yes to decide where it will go outside!,
A few years back I like many on here bought one of those Solar Light Houses, mine came from BnM. Though very nice when working I did not have a suitable place for it so plonked it up near my pond. And very nice it looked too at night when working. But as is the way of many of these imports, the lifespan was not that long perhaps 18 months at best. So the working flashing light section was dumped for recycling, ah but the base this was far too good to chuck out. In Voi Libre some time back there was a great article on Water Towers and I thought that the Light House base had potential. This was fully confirmed when I saw in issue 96 a drawing that provided some inspiration. So base with a corrugated Dog Food Tin in pristine condition were temporarily married. I had already done some work on the base to give it a more G Scale door (whatever “G” may be), I think the original was nearer 0 Scale. Below you can see the basis for the job.
Having got thus far and things looking acceptable I moved on to the detail, I could have plonked it out as it was and as Rust took hold of the Tin a better than nothing would have entailed. But that is not my way, an Operating Wheel with attachments, Water Level Indicator and Filler Pipe are required. To say nothing of some more paint though as you can see the base had already been blown with Halfords Matt Grey Undercoat. So in order of making:-
OPERATING WHEEL
This required a soldered up Wheel, I had a roll of .9mm Nickel Silver Wire so this was used, I had tried something smaller but this was melted by the Cooks Micro Torch. I made the curve by winding some of the wire round one of my Pin Vices. Then an L was pushed into the Heat Base and a V to make up the 3 spokes.
Here you can see the bit that will disappear into the Tower and to be soldered to some pipe that (would in real life) Controls the Water Flow.
Soldered up to some sundry KS Pipe you can see how it is connected to the Exit Flow. Note that this is well below the bottom of the Water Tank Inside the Tower.
WATER LEVEL INDICATOR
This caused a little head scratching, I think I coped out a little here but some square KS appeared appropriate when soldered top and bottom of the Tank.
By now it seamed appropriate to give the Tank a blast of Matt BLack Halfords rattle can, it was a mildish day so I could at least do it out side and bring it in quickly to dry out. Sundry Pliers and Tweezers were used to bring the freshly painted parts indoors. Once good and dry the Indicator Pipe was masked up for some white paint.
I made the Indicator out of a piece of scrap N/S filing the point and folding it round my pliers to get the shape I wanted. It was planned to just press in place behind the pipe. This turned out just fine as it happens as the square pipe was only soldered top and bottom allowing the indicator to be just shoved into place.
A few bits of touching up to resolve odd bit of White Paint bleed through and we had a satisfactory indicator System.
FILLER PIPE
This as ever turned out to be one of those jobs that Heat Shrink was not supposed to have been invented for. Two sizes shrunk with some Lead inside at the bottom to hold it straight had the main work completed. A quick touch up of some Red Paint, Windows painted Glossy Black which tends to work quite well for non glazed non see through windows. Some of the Bricks have been picked out in a darker grey.
All that remains is perhaps some more picking out of Brickwork, Rust and general Weathering to complete the job. Oh and yes to decide where it will go outside!,