Under 5s and G scale

alasdair555

Registered
7 May 2020
61
2
38
UK
Best answers
0
Made some progress on the layout today, cut some supports for the railway from a chimney pot, but used up 2 angle grinder cutting disks in the process, so I'll need to wait a little while before I can do much more on that front. On the plus side the remainder of the line now has profiles, and so I'll be hauling rock around for the next week or so to get it roughly at the right level!

Apart from that the loco went on a tumble over the viaduct, more handrails gone! But mechanically fine, had a discussion with the children! :)
 

Paul M

Registered
25 Oct 2016
11,875
1,696
60
Royston
Best answers
0
Country flag
Made some progress on the layout today, cut some supports for the railway from a chimney pot, but used up 2 angle grinder cutting disks in the process, so I'll need to wait a little while before I can do much more on that front. On the plus side the remainder of the line now has profiles, and so I'll be hauling rock around for the next week or so to get it roughly at the right level!

Apart from that the loco went on a tumble over the viaduct, more handrails gone! But mechanically fine, had a discussion with the children! :)
Might be worth putting some hand barriers on the viaduct before you do much more work
 
  • Like
Reactions: 1 user

dunnyrail

DOGS, Garden Railways, Steam Trains, Jive Dancing,
Staff member
GSC Moderator
25 Oct 2009
26,164
4,990
75
St.Neots Cambridgeshire UK
Best answers
0
Country flag
Made some progress on the layout today, cut some supports for the railway from a chimney pot, but used up 2 angle grinder cutting disks in the process, so I'll need to wait a little while before I can do much more on that front. On the plus side the remainder of the line now has profiles, and so I'll be hauling rock around for the next week or so to get it roughly at the right level!

Apart from that the loco went on a tumble over the viaduct, more handrails gone! But mechanically fine, had a discussion with the children! :)
Not sure what size of Angle Grinder you have but I got hold of a Diamond Bladed disk in Wicks and it has lasted for some years and that has included lots of paving slabs cut and even like you last year cut up an old chimney pot in half.
 

alasdair555

Registered
7 May 2020
61
2
38
UK
Best answers
0
Might be worth putting some hand barriers on the viaduct before you do much more work
The issue with that is the viaduct is semi temporary at present, it'll need some mortar to give a nice smooth top surface for permanent running, yet dear children expect to be able to run the train today.

From what I can tell the train actually derailed in the station area, and they then allowed it to run onto the abutment of the viaduct.

The solution for now is closer supervision, although that means less building time...
 

alasdair555

Registered
7 May 2020
61
2
38
UK
Best answers
0
Not sure what size of Angle Grinder you have but I got hold of a Diamond Bladed disk in Wicks and it has lasted for some years and that has included lots of paving slabs cut and even like you last year cut up an old chimney pot in half.
The disks started at about 100mm diameter, although not sure what these discs were, I borrowed from a friend. Given our location Amazon is the only source of replacements at present, so I'll see what they have to offer. From my time in Civil engineering I know that there's a big difference between diamond cutting disks so maybe I just had some rather weak ones.
 

alasdair555

Registered
7 May 2020
61
2
38
UK
Best answers
0
Having had discussions with Jonathon at G-bits and reading some topics on the forum regarding gradients and curves. I thought I could give a bit more detail on the track layout.

The intention is that the loading gauge, radii and gradients were to be the maximum possible to allow live steam, assuming someone was able to bring their pride and joy round! :D I don't think I will be flavour of the month if I return home with one myself.

The track plan for the garden allows for up to 3m radii, and at present I have 5ft radii as a minimum, except for the one point I have at present with is 4ft radii.

The reason for going for less than the maximum was that I was able to get some secondhand pre curved track at a reasonable cost. I also got an exceptional deal on new flexi track (£10 per metre),and while I could have theoretically used this to complete the curves at the radii possible, given this is my first garden railway I didn't feel like mangling several metres of brand new track learning how to bend it correctly.

The track is a mixture of Accucraft and Aristocraft brass.

The gradients are ~1:50 throughout with a climb starting at the old wild flower area, then becoming a descent as it enters the bare earth area and continuing down at that gradient to the end nearest the patio.

Given the terrain I'm dealing with and the structures I've had to build/demolish, to change the radii or gradients at a later stage would involve significant rebuilding of bridges or cutting into walls further, so I think these will be permanent.

In terms of where the track is complete to it runs from the old wild flower area, to just before the chimney pots. Total length is approx 60m.

The theme of the railway is likely to be West Highland, and industrial with quarrying and timber likely to be the main goods.

Happy to answer any questions regarding plans, as I'll probably need some inspiration as to how to complete the rest.
 

Attachments

  • Garden update map 200420.png
    Garden update map 200420.png
    1.5 MB · Views: 0

alasdair555

Registered
7 May 2020
61
2
38
UK
Best answers
0
So it's felt like not much has been going on recently, many kilos of stone moved around, the stone platform is built and roughly at level, but things are not quite ready for actually running trains on.

On the plus side we have a new cargo for the hopper wagons, catkins!

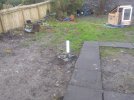
The biggest block to running any further was a 90 degree 10ft diameter bend that needed to fly over a water feature / river.

I'd mocked this up with a chimney pot per a previous post and just resting track directly onto the chimney pot and some concrete blocks, but given the water below and the uneven gradients this was never going to be suitable for running, especially given the prior fall.

So as I had some plywood and some 3 by 3 inch lengths I thought I should be able to put together a temporary bridge which would be sufficiently safe/durable to allowing running onto the next length across the stone platform.

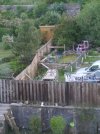
The bridge was made by cutting the plywood into rectangular segments, laying the track over these as a template, removing the track and then gluing these to short lengths of the 3 by 3. This was left for two days to dry and then was turned over and screwed together to make the finished bridge.

To allow the chimney pot to fit under the bridge two 3 by 3 chunks were removed and back wall added to transfer the load across the gap. On the front face a couple of thin off cuts were screwed to ensure there wasn't front to back twist. My hope is that if a train is driven too fast it should fall to the back, and perhaps in time I can add a fence of sorts to the front so the trains are visible but safe.

The bridge is not perfectly level just yet, and I'll likely need to paint it as I suspect that temporary might mean a year or two. But I'm hoping be the weekend I'll be able to run to a new terminus on the stone platform itself.

As for final designs I'm considering a modern stressed concrete style design, potentially cable stayed, (Erasmusbrug - Wikipedia) the thinking is that the current chimney pot is not centred on the span, I could add a second pot, but that would involve more cutting, levelling and I feel that two pots would end up with the bridge being more supports than actual spans. Moving the current pot would be a pain, and I actually like the current visual effect.
P1030901.JPGP1030897.JPGP1030893.JPG
 

Paul M

Registered
25 Oct 2016
11,875
1,696
60
Royston
Best answers
0
Country flag
Looks like you've been working hard! Where did you get so many chimney pots from?
 

alasdair555

Registered
7 May 2020
61
2
38
UK
Best answers
0
Thanks, the were hidden in the back of the garden area, along with the boat trailer, acrowprops, some very nice ceramic garden edging and a whole host of other rubbish!
 

Attachments

  • IMG_20190401_170642 _2_.jpg
    IMG_20190401_170642 _2_.jpg
    924.5 KB · Views: 0

Paul M

Registered
25 Oct 2016
11,875
1,696
60
Royston
Best answers
0
Country flag
Thanks, the were hidden in the back of the garden area, along with the boat trailer, acrowprops, some very nice ceramic garden edging and a whole host of other rubbish!
There's never "rubbish" just stuff you've not found a use for.......yet
 
  • Like
Reactions: 1 user

alasdair555

Registered
7 May 2020
61
2
38
UK
Best answers
0
I've been 'cheating' yesterday, I looked at the size of the stone wall I needed to build up next and decided it was a little unmotivating. So I used a 6" by 2" by 11ft treated pine plank which had been donated by a plaster some years ago and used this to bridge the gap. It kind of spoils the rough and ready look, but it rapidly gave me access to the final section into the proposed location of the main station.

I hope this is a 'temporary' solution until I find more stone, time and motivation to 'properly' finish this section.

I'm now using the stone I have to level the section between the curved bridge and the new plank section so it is useable.

Another randomn item that helps the build!
 

alasdair555

Registered
7 May 2020
61
2
38
UK
Best answers
0
So we've managed to get to the main station area now, hopefully have some pictures later today or tomorrow :)
 

Paul M

Registered
25 Oct 2016
11,875
1,696
60
Royston
Best answers
0
Country flag
Good use of old pallets, have they been treated at all?
 

alasdair555

Registered
7 May 2020
61
2
38
UK
Best answers
0
Good use of old pallets, have they been treated at all?
None of the pallets are treated, however they are all pretty much brand new from my work, I'd hope to get 5 years out of them.

The decking is the interior planking from a public swimming pool. My thinking is if it's lasted without rot in that environment, I should be good for quite a few years. Let's just say it smells resiny!

Thanks for the comments Paul, could you point me in the direction of some good posts on reversing loops? I'm considering adding one, but I need some very basic instructions, and the finished solution needs to be either fully automatic, or capable for a 5 year old to use.

So far it looks like there needs to be a bunch of diodes, and remembering to reverse direction at exactly the right point in time.
 

Paul M

Registered
25 Oct 2016
11,875
1,696
60
Royston
Best answers
0
Country flag
Thanks for the comments Paul, could you point me in the direction of some good posts on reversing loops?
I'm not sure if you meant me, but i really dont know the answer. But to be honest there's lots of real experts on here so you'll get all the advice you need on your other post
 

alasdair555

Registered
7 May 2020
61
2
38
UK
Best answers
0
I'm not sure if you meant me, but i really dont know the answer. But to be honest there's lots of real experts on here so you'll get all the advice you need on your other post
I did :) But thanks for the reply.
 
8 Mar 2014
7,806
972
San Diego
Country
Armenia
www.elmassian.com
Best answers
0
Country flag
The first thing to know is that "reversing loop" is a lousy term, from history unfortunately.

A reversing loop is used for a configuration that basically causes a short circuit, where one rail connects to the opposite rail.

A simple loop that returns to itself causes this issue, but there are other configurations that can cause this too.

To solve this issue, you have to isolate the "offending" track, and connect that isolated track to an autoreverser.

I would search the web for explanations, there are many good ones, and you don't need me to just copy/parrot the excellent articles that already exist.

Regards, Greg
 

alasdair555

Registered
7 May 2020
61
2
38
UK
Best answers
0
The first thing to know is that "reversing loop" is a lousy term, from history unfortunately.

A reversing loop is used for a configuration that basically causes a short circuit, where one rail connects to the opposite rail.

A simple loop that returns to itself causes this issue, but there are other configurations that can cause this too.

To solve this issue, you have to isolate the "offending" track, and connect that isolated track to an autoreverser.

I would search the web for explanations, there are many good ones, and you don't need me to just copy/parrot the excellent articles that already exist.

Regards, Greg
Thanks Greg, I'm reading the LGB manual at present.
 

alasdair555

Registered
7 May 2020
61
2
38
UK
Best answers
0
In summary it looks like you need the LGB units 10151 (or a diode bridge), for non-automatic operation. Fully automatic operation requires additional sensing systems to reverse the polarity of the controller at the opportune moment.

For the time being I'll continue with the straight end to end operation with a passing loop, the thinking is that changing points is an added attraction for the children, even if I find it a little tedious! :)