An alternative to mortar would be to use a 'builders' type of adhesive from a cartridge to hold any blocks and slabs in position. Gravity and friction alone work well without making it more complicated and hard work by mixing cement.
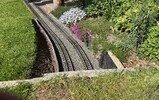
I use building blocks and paving slabs as seen here when I widened the single track tunnel to a double track, no mortar used-
View attachment 349495
Because the tunnel is on a curve I had to use an angle grinder with a diamond blade to cut the roof slabs to size.
The side blocks that form the tunnel walls are merely placed on the ground, slightly embedded and a paving slab used as a base for the track. I made sure that the ground for the side blocks is consolidated by pounding with an old fence post and adding stones to obtain the correct height for the new track bed.
If you zoom in you will see that I used aluminium tubes into the tops of the side blocks to stop them from being pushed inwards by the soil. I regard the soil in my garden as a very thick liquid that always wants to flow sideways and downwards. The slabs on top are bedded on some 'builders' adhesive but I added the tubes as an extra precaution while the adhesive sets.
I have always avoided the use of concrete or mortar for my railway because it adds a permanence that restricts changes and dismantling when the time comes.
In the case of this tunnel, changing from a single to a double width was straightforward because no concrete or mortar was used.
AL
View attachment 349496
View attachment 349498


")

