JimmyB
Now retired - trains and fishing
So the next step was re-wiring the four points in the crossover, again the power was run from the external junction box:

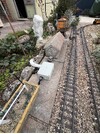
Cable initially buried, then over the bridge, and then hot glued "P" clipped to sleeters:


Sheathing to protect the wires out of the harness:

The last job was re-wiring the three points to the siding, the main cable connected to the external junction box remained unchanged, but new wires from the switches:

The switch box concealed in a signal box, which needed a small amount of repair:

The signal box roof will require a repaint!!

Cable initially buried, then over the bridge, and then hot glued "P" clipped to sleeters:
Sheathing to protect the wires out of the harness:
The last job was re-wiring the three points to the siding, the main cable connected to the external junction box remained unchanged, but new wires from the switches:
The switch box concealed in a signal box, which needed a small amount of repair:
The signal box roof will require a repaint!!

")


")


