I got this beastie from Glendale this Wednesday from Glendal who got one in for me. I have to say that it is a a Superb Machine, better in fact than the Black one though very similar. I am most impressed with the Zimo Sound Chip, the sound being so much crisper and true to the Prototype than the Massoth Chip on the Black one, not that that is bad. The Smoke Unit is great too, having some kind of Pumping action. I am not so sure if this is only on the Green one as I have never tried it out on the Black one except when it was being demonstrated to me when I got it. Running is prefect with Slow crawl easily achieved and a typical Steam overrun. This engine has to be Driven. It even has a Bump Up when the Coupling Clank is enacted, perfect for well Uncoupling. I did a quick trawl round the net to find English Chip Instructions:-
http://www.zimo.at/web2010/documents/MX695-Eng-V1-07-20-11.pdf
As is usual for me I just could not keep my hands off it. My chosen era for the Locomotive is dated to my first visit to the line in February 1981. Yes there was a Green one back in the Dark days of the old East Germany. In fact there were two 995903-2 and NWE11 present that day, though only 5903 was running together with the Black one 995902-4 and 996001-4 the 2-6-2. So the Green one completes my stud of running Locomotives that day. However just my luck the Current Locomotives appear to have the Colour revised and 5902 is currently Green (2011). The Trainline ones (Black and Green) also represent the Locomotives as they are today and perversely the colour Schemes are exactly the reverse of how they were in 1981. Thus there are a few jobs to do for me on both of my Mallets, including Number Swops.
For reference I have been using my own pictures taken in 1981 (wish I had known that I would be modifying a Trainline one back then, more pics of detail would have been taken!) plus the Dirk Endisch Book on the Harz Mallets and his Two Tome Bible of the Harz Lines. For easy access to these Picture when working, I have taken Pictures of the relevant Pictures and loaded them onto the iPad. This being ideal for reference when on the workbench. I frequently do this when carrying out projects.
So I have created a job list as follows:-
1 Renumbering to 995903-2 4 Points plus Works Number wrong also, HSB to be DR on Cabsides.
2 Rebuild Coal Bunker to replicate fall plate on Boiler and reduce the Height of the main bin. This was also Metal at my period.
3 Rehash High Piping on both sides.
4 Water Warning Transfer
5 Lettering at bottom of Side Tank (? Both sides)
6 Weathering
7 Fire Irons including Shovel on Left Tanks.
8 Piping Run Front Left ? Vac Pipe.
9 Pump Assembly below Cab on Left Side
10 Vac Pipes incorrectly placed at Rear of Locomotive.
11 Small Box with Pipes on front of Cab
12 Bell Dinger Rod points to side, should be facing forwards.
12a Remove Buffer Hook
14 coal Load in Bunker
15 Fix Tank Foot Steps (keep falling off)
16 Driving Crew
This may appear a daunting list of things to do to a Brand New Locomotive, however please be aware they are not a criticism of the beast, just my list of Jobs to back date her.
Thus far I have done Jobs 1, 12 and 12a (I never use the next number in lists for obvious reasons) with some of Job 6 carried out too, plus a start made on Job 3. No doubt as I carry out the work this list will be added to.
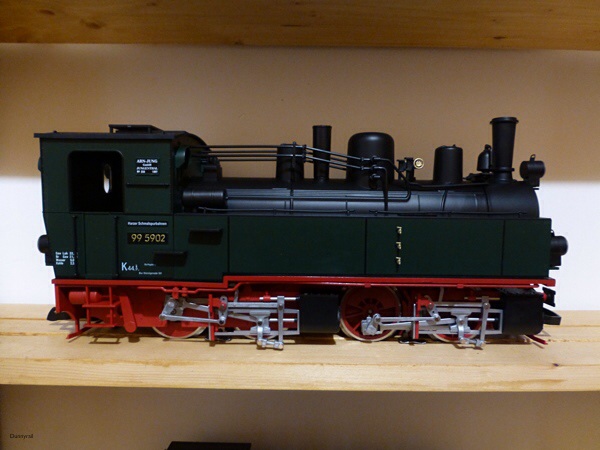
First 3 Pics show Loco as bought, wrong Works Number and Raised Lettering to be removed.


Next shows raised Numbering removed and replacement Sticky Paper Printout. I did this with a Flat Ended Craft Knife and some Wet and Dry wrapped round a Coffee Stirrer.
Not quite the correct Number Font, but it will do for now. Can always remove and reprint it I get the correct Font.

The next two pictures show the New Plates as applied and a start on the Weathering Process.


Final pic shows the new Printed Plates that have been applied.

Ignore the small picture it has somehow got Duplicated.
JonD
http://www.zimo.at/web2010/documents/MX695-Eng-V1-07-20-11.pdf
As is usual for me I just could not keep my hands off it. My chosen era for the Locomotive is dated to my first visit to the line in February 1981. Yes there was a Green one back in the Dark days of the old East Germany. In fact there were two 995903-2 and NWE11 present that day, though only 5903 was running together with the Black one 995902-4 and 996001-4 the 2-6-2. So the Green one completes my stud of running Locomotives that day. However just my luck the Current Locomotives appear to have the Colour revised and 5902 is currently Green (2011). The Trainline ones (Black and Green) also represent the Locomotives as they are today and perversely the colour Schemes are exactly the reverse of how they were in 1981. Thus there are a few jobs to do for me on both of my Mallets, including Number Swops.
For reference I have been using my own pictures taken in 1981 (wish I had known that I would be modifying a Trainline one back then, more pics of detail would have been taken!) plus the Dirk Endisch Book on the Harz Mallets and his Two Tome Bible of the Harz Lines. For easy access to these Picture when working, I have taken Pictures of the relevant Pictures and loaded them onto the iPad. This being ideal for reference when on the workbench. I frequently do this when carrying out projects.
So I have created a job list as follows:-
1 Renumbering to 995903-2 4 Points plus Works Number wrong also, HSB to be DR on Cabsides.
2 Rebuild Coal Bunker to replicate fall plate on Boiler and reduce the Height of the main bin. This was also Metal at my period.
3 Rehash High Piping on both sides.
4 Water Warning Transfer
5 Lettering at bottom of Side Tank (? Both sides)
6 Weathering
7 Fire Irons including Shovel on Left Tanks.
8 Piping Run Front Left ? Vac Pipe.
9 Pump Assembly below Cab on Left Side
10 Vac Pipes incorrectly placed at Rear of Locomotive.
11 Small Box with Pipes on front of Cab
12 Bell Dinger Rod points to side, should be facing forwards.
12a Remove Buffer Hook
14 coal Load in Bunker
15 Fix Tank Foot Steps (keep falling off)
16 Driving Crew
This may appear a daunting list of things to do to a Brand New Locomotive, however please be aware they are not a criticism of the beast, just my list of Jobs to back date her.
Thus far I have done Jobs 1, 12 and 12a (I never use the next number in lists for obvious reasons) with some of Job 6 carried out too, plus a start made on Job 3. No doubt as I carry out the work this list will be added to.
First 3 Pics show Loco as bought, wrong Works Number and Raised Lettering to be removed.


Next shows raised Numbering removed and replacement Sticky Paper Printout. I did this with a Flat Ended Craft Knife and some Wet and Dry wrapped round a Coffee Stirrer.
Not quite the correct Number Font, but it will do for now. Can always remove and reprint it I get the correct Font.

The next two pictures show the New Plates as applied and a start on the Weathering Process.


Final pic shows the new Printed Plates that have been applied.

Ignore the small picture it has somehow got Duplicated.
JonD

")

")
.JPG")


