Timer switch experiment for toddler proof control.

ThomasDadDurham

Really Useful Engine
16 Jul 2023
25
5
County Durham
Best answers
0
Country flag
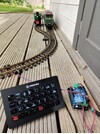
I want to make a box with two timers activated by buttons, so that if my toddler and a friend are in the garden, I can let them 'run' the layout by just setting the speed controllers and hiding them away where only I can get to them, and leaving the kids with a chunky tactile button on an enclosed unit, that will make a train run for roughly long enough to clear that section/loop. They can then run around the garden following the trains, hammering the buttons to their hearts contents each time it stops. When I want to play with it, I just bypass or remove this box, and its back to controlling it myself with the speed controller.

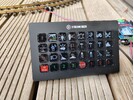
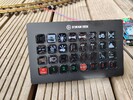
So this was just an initial experiment using a timer switch that was on clearance at Toolstation. Not a final design. As per the video description its not ideal - I reckon its because this had a minimum input of 5w, and cranked up to full speed, a 0.5a starter handset only just about puts that out. Theres surely no 'off the shelf, readymade unit timer buttons' that would work for this purpose - fair enough I guess - I just need to find a timer module for low enough amperage/wattage, that I can link up to an IP65 rated control button. Preferably something big and tactile for toddler appeal, or that even lights up. Forgive the mess, its a rainy day and he'd been a sicky boy for the last 24hrs so more cuddling and calpol than tidying was done!

Feel free to point me at components on RSCompenents or CEF etc. Otherwise Im not averse to researching and working it out. Its just been a long time since A level D&T lessons and Im not an electrician!

The other thought I had is could I wire the switch before the controller (after the adaptor)? Its not an idea I like tbh, as having it between the controller and the track is what makes it removable. As I say it'd be the kind of thing I'd connect if we were having a BBQ or toddler play date in the garden.
 
Last edited:

PhilP

G Scale, 7/8th's, Electronics
5 Jun 2013
33,640
3,532
Nottingham
Best answers
0
Country flag
Don't wire in before the controller!

Keep it on the low voltage side of things, and fit fuses everywhere.
Kids have no fear, and no knowledge of the dangers of electricity.

PhilP
 

ThomasDadDurham

Really Useful Engine
16 Jul 2023
25
5
County Durham
Best answers
0
Country flag
As I say this was just a proof of concept with parts I had to hand. Hes only exposed to track current here, which we know cant shock you (unless you've just got out the bath and lie across it or something), and Im watching him. Im absolutely not throwing something this onto an outdoor layout as shown. It'd be an IP65 rated box, with a button like this, but with the text changed to 'track 1' etc :

products_image2-15955-d_298_297_ffffff.jpg

Track wiring, along with garden lights etc will all be buried in ducting. Theres loads of little timer units out there between £5-£10, but I need to make sure I find one that does what I need, and fits in a box like [pictured] above. Not easy when Amazon is full of incorrect info / bad translations or outright shoddy stuff. God I miss Maplins!
 

Paul M

Registered
25 Oct 2016
11,943
1,707
61
Royston
Best answers
0
Country flag
Have you tried Rapid Electronics at Colchester?
 

dunnyrail

DOGS, Garden Railways, Steam Trains, Jive Dancing,
Staff member
GSC Moderator
25 Oct 2009
26,231
5,000
75
St.Neots Cambridgeshire UK
Best answers
0
Country flag
Playmobil battery controlled trains would be very appropriate in such circumstances, though they are out of production but can be sourced from Ebay. Pretty near indestructible and easy to use.
 

The Shed

Citizen of the Republic of the North East.
8 Mar 2020
1,073
239
Darlington, County Durham.
Country
England
Best answers
0
Timer Control.jpg

Manual Control.jpg
 
Last edited:

ThomasDadDurham

Really Useful Engine
16 Jul 2023
25
5
County Durham
Best answers
0
Country flag
Thanks, this is the kind of answer I was hoping for: I appreciate this but Im having trouble wrapping my head around it - for one Im going to stick with branded speed controllers. Probably Gaugemaster as my mum reckons my late Grandads is still in the attic. Failing that any readily available LGB/GM/Piko one thats a bit beefier than the 0.5A starterset one Im 'practicing' with. - so hopefully I can ignore most of the lower right? That manual control switch is just bypassing the timer right?

So if Ive read this right (maybe I havent?) the relay and timer need their own power supply, hence the 5V regulator? so rather than an 'in line' solution like my off-the-shelf button there (which doesnt work as the train has so little power it cant haul a single truck), this timer is connected to the relay, which is, Im guessing, a thing that opens and closes the circuit from-the-speed controller-to-track?

Can I simplify it all by having the [button/timer/relay] part have its own power supply? Is that how it works?
What timer module and relay could I use for this? Doesnt it need one where the relay is able to handle the up-to-18v-and-5a power going to the track? Im guessing that the relay shown as 5v here means its powered by 5v, not thats how much it can handle on the circuit its open/closing?

[Edit]The Shed: You're only down the road from me in Durham! Just noticed! Hey if you fancy building me 'The toddler button' once I find a pair of dome pushbuttons and a 2gang IP66 housing I could pay you something :D - even meet you at one of the local shows if you're planning on going to any like Newton Aycliffe Rotary's ones? We're officially moving on 31st July now after a ~month delay so railwaying is going on hold, although this little circle with Thomas may be used to keep our little boy occupied/distracted during.
 
Last edited:

The Shed

Citizen of the Republic of the North East.
8 Mar 2020
1,073
239
Darlington, County Durham.
Country
England
Best answers
0
These are the parts used as in the links below, for reference only and a starting point for your own research.

Timer Module

Relay Module

Speed Controller

There are a number of different items available, only put together the above as examples of a proven workable solution, in that Timer and Manual Control could be combined as you had mentioned this in passing.

The choice of and type of Speed Controller needs to be selected carefully, preferably a PWM Type, do bear in mind that the youngster will be stopping and starting the Loco akin to hitting a brick wall, the Bachmann Motor and Gearbox will have a very short lifespan!
 

The Shed

Citizen of the Republic of the North East.
8 Mar 2020
1,073
239
Darlington, County Durham.
Country
England
Best answers
0
Thanks, this is the kind of answer I was hoping for: I appreciate this but Im having trouble wrapping my head around it - for one Im going to stick with branded speed controllers. Probably Gaugemaster as my mum reckons my late Grandads is still in the attic. Failing that any readily available LGB/GM/Piko one thats a bit beefier than the 0.5A starterset one Im 'practicing' with. - so hopefully I can ignore most of the lower right? That manual control switch is just bypassing the timer right?

So if Ive read this right (maybe I havent?) the relay and timer need their own power supply, hence the 5V regulator? so rather than an 'in line' solution like my off-the-shelf button there (which doesnt work as the train has so little power it cant haul a single truck), this timer is connected to the relay, which is, Im guessing, a thing that opens and closes the circuit from-the-speed controller-to-track?

Can I simplify it all by having the [button/timer/relay] part have its own power supply? Is that how it works?
What timer module and relay could I use for this? Doesnt it need one where the relay is able to handle the up-to-18v-and-5a power going to the track? Im guessing that the relay shown as 5v here means its powered by 5v, not thats how much it can handle on the circuit its open/closing?

[Edit]The Shed: You're only down the road from me in Durham! Just noticed! Hey if you fancy building me 'The toddler button' once I find a pair of dome pushbuttons and a 2gang IP66 housing I could pay you something :D - even meet you at one of the local shows if you're planning on going to any like Newton Aycliffe Rotary's ones? We're officially moving on 31st July now after a ~month delay so railwaying is going on hold, although this little circle with Thomas may be used to keep our little boy occupied/distracted during.
No probs, send a PM, (the envelope thingy top right) your welcome to peruse The Shed's Shed!;)
 

ThomasDadDurham

Really Useful Engine
16 Jul 2023
25
5
County Durham
Best answers
0
Country flag
[...]do bear in mind that the youngster will be stopping and starting the Loco akin to hitting a brick wall, the Bachmann Motor and Gearbox will have a very short lifespan!
Oh! See, as I was reading up on creating an automated passing loop in the hand-me-down LGB book I have, the trains in that setup are stopped by hitting an isolated track section. Also a 'brick wall' solution that is only mitigated by creating a 'slow section' leading up to the 'passing loop' station with its isolated sections. I'd hoped that simply running the trains at a medium to slow speed mitigated most of any excess wear and tear...

Im guessing a 'slow to stop' feature means even more complexity...

That makes me want to lean back towards the RRConcepts Stationmaster as a purchase - as that has a feature where the 'station stop time' can be set to 'infinite' and 'accelerate' activated by a button or switch instead (for either block control, or for exactly this, child interactivity - so rather than a 'timer' its 'press to start a complete loop') - I'd been thinking of doing it all with switches and timers etc because it'd be cheaper, but now Im thinking - 'by the time Ive created two circuits for two "toddler buttons", created a seperate controlled area for station approach, AND bought additional station stop modules around the line - AND take into account additional wear and tear on trains - perhaps I ought to drop a grand on a pair of stationmasters?'

I shall build a 'for now' 'toddler button' though, seeing as the parts are so cheap*. It will give him and his friend something to play with during any housewarming, if we're lucky enough to have the weather for it.
*I say cheap, I cannot find anywhere a chunky dome button that has no text, only 'press to exit' type ones.

These are the parts used as in the links below, for reference only and a starting point for your own research. [...]
I am picking things up and getting more confident as I go, so will do research. Were the guesses I made about the circuit you showed me correct then - or at least no total misunderstanding of 'whats doing what' on there?
 

The Shed

Citizen of the Republic of the North East.
8 Mar 2020
1,073
239
Darlington, County Durham.
Country
England
Best answers
0
I am picking things up and getting more confident as I go, so will do research. Were the guesses I made about the circuit you showed me correct then - or at least no total misunderstanding of 'whats doing what' on there?
Yep, you've more or less grasped the principles, now more a case of refinement to suit the scenario.
As with most things, trial and error, usually finds a common solution. :)
 
Last edited:

korm kormsen

Registered
24 Oct 2009
2,769
298
Country
Paraguay
Best answers
0
Country flag
Im guessing a 'slow to stop' feature means even more complexity...
there is a simple way.
in each side of the passing siding you have to have a "dead" section, where the locos stop. for the beginning, with the smaller locos a one-foot section should be enough.
the track between the entering turnout and this "dead" section needs on one rail a cut every foot. bridging these cuts with diodes (same type as for the beforementioned switching) as jumpers - and powering from the turnout - the loco gets slower every foot.
each diode lessens voltage by 0.7 V.

good enough for me. (with five cuts)
 

dunnyrail

DOGS, Garden Railways, Steam Trains, Jive Dancing,
Staff member
GSC Moderator
25 Oct 2009
26,231
5,000
75
St.Neots Cambridgeshire UK
Best answers
0
Country flag
Oh! See, as I was reading up on creating an automated passing loop in the hand-me-down LGB book I have, the trains in that setup are stopped by hitting an isolated track section. Also a 'brick wall' solution that is only mitigated by creating a 'slow section' leading up to the 'passing loop' station with its isolated sections. I'd hoped that simply running the trains at a medium to slow speed mitigated most of any excess wear and tear...

Im guessing a 'slow to stop' feature means even more complexity...

That makes me want to lean back towards the RRConcepts Stationmaster as a purchase - as that has a feature where the 'station stop time' can be set to 'infinite' and 'accelerate' activated by a button or switch instead (for either block control, or for exactly this, child interactivity - so rather than a 'timer' its 'press to start a complete loop') - I'd been thinking of doing it all with switches and timers etc because it'd be cheaper, but now Im thinking - 'by the time Ive created two circuits for two "toddler buttons", created a seperate controlled area for station approach, AND bought additional station stop modules around the line - AND take into account additional wear and tear on trains - perhaps I ought to drop a grand on a pair of stationmasters?'

I shall build a 'for now' 'toddler button' though, seeing as the parts are so cheap*. It will give him and his friend something to play with during any housewarming, if we're lucky enough to have the weather for it.
*I say cheap, I cannot find anywhere a chunky dome button that has no text, only 'press to exit' type ones.


I am picking things up and getting more confident as I go, so will do research. Were the guesses I made about the circuit you showed me correct then - or at least no total misunderstanding of 'whats doing what' on there?
Noting your possible use of a gaugemaster, for modest sized trains this should work just fine. Gaugemaster also do a shuttle unit that possibly may work forvyou by having your big button to make a train start up again. May be worth a delve into the Gaugemaster Instructions. Link to helpful article.
 

My45G

Registered
9 Nov 2016
59
26
Henley
Best answers
0
Country flag
Noting your possible use of a gaugemaster, for modest sized trains this should work just fine. Gaugemaster also do a shuttle unit that possibly may work forvyou by having your big button to make a train start up again. May be worth a delve into the Gaugemaster Instructions. Link to helpful article.
Why not use a simple 2 wire pneumatic timer? Time is easily adjstable from 5 to 300 secs. Will work with any voltage from 5 to 240
 

ThomasDadDurham

Really Useful Engine
16 Jul 2023
25
5
County Durham
Best answers
0
Country flag
OK so what Im now set on doing is knocking up a simple on-off timed-relay button for now, just so he has an oval he can play with indoors or patio while we move house. I'll run the trains slow. I know its bad for the loco but its just for him to play with for a few sessions and I'll no doubt use the components elsewhere in time.
Once I start building the planned layout, with its automated passing-loop station, Im going to go with a (bypassable) toddler button that starts a loop. Likely via the RRC Stationmaster as its about at the price point where, with components and soldering/build time, I may as well get their readymade option.


Why not use a simple 2 wire pneumatic timer? Time is easily adjstable from 5 to 300 secs. Will work with any voltage from 5 to 240
I had tried that route, as had one lying around, toddler couldnt push it hard enough.
there is a simple way.
in each side of the passing siding you have to have a "dead" section, where the locos stop. for the beginning, with the smaller locos a one-foot section should be enough.
the track between the entering turnout and this "dead" section needs on one rail a cut every foot. bridging these cuts with diodes (same type as for the beforementioned switching) as jumpers - and powering from the turnout - the loco gets slower every foot.
each diode lessens voltage by 0.7 V.

good enough for me. (with five cuts)
Thanks but I was on about the 'track power on/off' 'toddler button' having a slow-to-stop as part of the timer acticated relay, rather than the planned automation of the lines itself. I'd seen the diode thing for slow sections on RRConcepts manual and in one of my 2ndhand books - I didnt realise you could do multiple sections though, so thats useful to read!
 

PhilP

G Scale, 7/8th's, Electronics
5 Jun 2013
33,640
3,532
Nottingham
Best answers
0
Country flag
OK so what Im now set on doing is knocking up a simple on-off timed-relay button for now, just so he has an oval he can play with indoors or patio while we move house. I'll run the trains slow. I know its bad for the loco but its just for him to play with for a few sessions and I'll no doubt use the components elsewhere in time.
Once I start building the planned layout, with its automated passing-loop station, Im going to go with a (bypassable) toddler button that starts a loop. Likely via the RRC Stationmaster as its about at the price point where, with components and soldering/build time, I may as well get their readymade option.


I had tried that route, as had one lying around, toddler couldnt push it hard enough.

Thanks but I was on about the 'track power on/off' 'toddler button' having a slow-to-stop as part of the timer acticated relay, rather than the planned automation of the lines itself. I'd seen the diode thing for slow sections on RRConcepts manual and in one of my 2ndhand books - I didnt realise you could do multiple sections though, so thats useful to read!
Obviously, this only works on DC, and in one direction. - Unless you fit pairs of diodes..

PhilP
 

Cobalt6700

Registered
2 Jul 2020
125
33
UK - Oxfordshire
Best answers
0
Country flag
If you wanted to go down a simple (ish) timer and relay route, you could use one timer per relay to drop in / drop out diodes one after the other. Not quite fine control, but better to the loco than just on/off.


I would personally recommend an Arduino based solution, you could achieve what you want to do with 1 microcontroller, 1 motor driver, 2 switches, a potentiometer and how ever many 'GO' push buttons you wanted. Power the whole thing from your DC controller of choice. One of the switches is a changeover switch that connects your DC controller straight to the track or to this control box.

This would also solve the issue of starting and stopping - programming a 'soft' start in code is pretty easy. Plus you could have a feature like if the button is pressed before the end of the timer, don't stop and start the loco, keep going.
 

notofthiscenturyTim

Registered
14 May 2023
50
1
London, UK
Best answers
0
Country flag
Following this project with great interest as I have a toddler "assistant" too. I agree that physical buttons are the way to go - easier for toddlers than rotary speed knobs or touchscreens which need greater dexterity.

We run DCC so have gone a slightly different route in terms of toddler control. We have a device called an Elgato Stream Deck which has physical buttons with built-in mini LCD displays. This means that each button can be programmed to a different DCC command like X% throttle, sound the whistle or emergency stop. The button can display an icon rather than text which is good for toddlers who can't yet read. It can also display different sets of buttons to control different locos - see photos.
 

Attachments

  • IMG_20230713_154625.jpg
    IMG_20230713_154625.jpg
    595.3 KB · Views: 0
  • IMG_20230713_154522.jpg
    IMG_20230713_154522.jpg
    399.9 KB · Views: 0
  • IMG_20230713_154609.jpg
    IMG_20230713_154609.jpg
    574 KB · Views: 0