Right then, time to reveal all
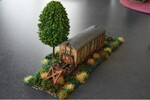
 . As I said there was a delivery from Amazon yesterday and part of it was some Vallejo weathering powders, the Rust & Corrosion set with 4 colours, iron oxide (the precursor to rust), dark rust, rust and new rust. Guess what I will be doing a lot of? Anyway I bought these to try out before buying more, although not cheap at € 17 for 4 x 35ml the amount of powder compared to how much is used means that one jar should outlast me. A sacrificial old wagon was selected for execution - of painting techniques I hasten to add - and the fun began. I was using four techniques on the wagon of which two are new to me, the processes were: airbrush, paint, washes and powders in that order. It is the washes and powders that are new to me, as far as the washes go I had previously painted then put thinner on a brush to create streaks. The airbrushing was very basic, a light coat of black to soften the overall colour of the wagon, a coat of dirt to the chassis and running gear then a very pale brown for the roof. Next up was the paint where I used a dark brown and black to deepen shadows and prepare for the rust powder. Next up was the washes, black and brown which were applied with a brush then all the streaks done by using the brush and a cotton bud dipped in Vallejo airbrush thinner along with putting black into panel lines like the door. Finally came the powders, which as I say are new to me. At first I was unimpressed with the result but then realised I was trying to apply it in strokes just as a paint. I changed to stippling and everything looked like I was expecting. Then came the problem, after I sprayed the finished model with matt varnish from an aerosol I found it had blown the powders off most of the spring / axlebox areas. A quick look at the pamphlet that came with the powders and it said brush the area to be powdered with Vallejo airbrush medium then apply the powders on top. I tried that and it worked a treat. The only thing I forgot was the wheels which I have done since the photo was taken. Now you may look and think I have somewhat overdone the weathering and you would be right, the whole point of the exercise was to try the new techniques and see what I could or should do or not before going on to decent stock. Just wait until I get to the locos.
Before and after:


As this was a wagon I had no intention of running I was going to bin it once finished but SWMBO came up with a bright idea for once, it is now going to sit forgotten and forlorn at the end of an overgrown siding.
Before and after:
As this was a wagon I had no intention of running I was going to bin it once finished but SWMBO came up with a bright idea for once, it is now going to sit forgotten and forlorn at the end of an overgrown siding.


 flock falling off.