Steamin plywood to shape & Yatton VoF build

maxi-model

UK/US/ROW steam narrow gauge railways 1:1
27 Oct 2009
5,673
661
Bucks/Oxon/Northants area
Best answers
0
Country flag
Not really trying to do a build log on this, honest. However, things are slowly progressing. Main chassis and bogies made up. Motors and gearboxes tested ready to go in (that is a story in itself). Colour coats starting to go on. 2 coats, rubbed back, sanding sealer on the chassis a bogies then a heavy shot of Simoniz filler primer, sprayed and "brushed in" to load open joints. Then some minor secondary filling and flatting back as needed.

Bit of masking on the chassis - there are 4 colours to go on there, red, matt black, grey, BR dark loco green. If you are wondering the reason the dark stuff is going on first it's that I am using enamels for the bright stuff, the dark stuff is auto acrylics from rattle cans. This way around it removes the risk of paints reacting and make localised cleaning up and touching in a doddle, sort of.

Body structure now on 3rd coat of sanding sealer, each flatted back with 400/800 grit, and I can still feel a little "grain". I really want to avoid the filler primer on here as there is some fine engraved detail on there. I'll give it a light coat of primer and if the grain is only localised I'll get some skim filler on it and then a proper coat of regular primer. Then some more masking fun, there are four colours on these structures as well - BR loco green again, Sherwood green, matt aluminium and yellow ends. There is a fair bit of detailing still to be added here, hatch hinges, handles, pipes, window surround, glazing, various steps and light housings. Oh, and the whole cab interior.

Starting to fit some of the light housings - it's going to have 6 LED's at each end. One to run at dusk then :) . Lady driver and assistant from Jon's. Accucrraft's ubiquitous choppers (counterweighted) replace the Yatton "magnabar" items. More to follow as and when. Max.
20210705_205611.jpg

20210706_071141.jpg
 
Last edited:

maxi-model

UK/US/ROW steam narrow gauge railways 1:1
27 Oct 2009
5,673
661
Bucks/Oxon/Northants area
Best answers
0
Country flag
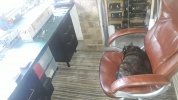
Part of the reason that output at the West Well MP & RS workshops can be a little slow and even sporadic. Please meet Jessie, the resident deity of this house. She has deemed her human servant's seat at his place of toil to be her morning nap location. Hence the resulting restricted or time shifted work schedules. Over the previous 35 years both her predecessors all had the same notion - it must be the nominated "Top Cat" seat. I really must have word with my union rep - myself :D Max

20210706_074810.jpg
 
8 Mar 2014
7,806
972
San Diego
Country
Armenia
www.elmassian.com
Best answers
0
Country flag
by the way I think we all welcome a "build log", I surely do, following from start to finish, and all the things learned and the progress.

My cat likewise tolerates his subordinate humans as long as they realize he can sleep wherever and whenever.

Greg
 

maxi-model

UK/US/ROW steam narrow gauge railways 1:1
27 Oct 2009
5,673
661
Bucks/Oxon/Northants area
Best answers
0
Country flag
Last edited:

PhilP

G Scale, 7/8th's, Electronics
5 Jun 2013
33,455
3,504
Nottingham
Best answers
0
Country flag
Never let the facts get in the way of a good story..
 

maxi-model

UK/US/ROW steam narrow gauge railways 1:1
27 Oct 2009
5,673
661
Bucks/Oxon/Northants area
Best answers
0
Country flag
by the way I think we all welcome a "build log", I surely do, following from start to finish, and all the things learned and the progress.

My cat likewise tolerates his subordinate humans as long as they realize he can sleep wherever and whenever.

Greg
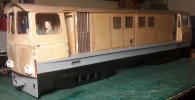
You win Greg, I'll do a build log, sort of. Below is an image of the loco with its electrics laid out and, finally, up on its wheels. There is an awful lot of detailing I am incorporating which is why it is taking some time for it to get to the stage its livery sprayed on. I'm also in the habit of doing quite a bit " codgitating" while working out how to do things and appraising the result. An acceptable (at least to me ;) ) fiinal finish and standards require proper preparation. I have just completed the LED's wiring loom - it's directional, so colour coded - there are 6 x 3 mm at each end, 4 x white, 2 x red. I might put a couple of 1.5 mm's on the control desk at each end for a bit of fun.

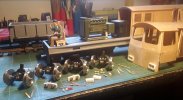
All the electrics on board. L-R Dummy engine and radiator, speaker, ESC, MLS large deisel sound card (hidden other side from ESC on show), up top RX, main fuse, switch gear and charging socket hidden below, sub C battery pack. A Seuthe smoke generator, not shown, is wired in for an exhaust effect, as is an external sensor for the MLS card. One or two bits of wiring have little 2 or 3 pin JST's to allow for access needs. The superstructure holding the RC and sound kit is removable by unscrewing the downward projecting switch gear. The various elements, including the battery pack are held in place by velcro. The batteries and balancing weights sit on platforms to clear the wiring and can be easily removed for access and maintainance. The dummy deisel simply lifts out to provide access to the weights and wiring underneath..

Each bogie has 2 motors driving through separate Markits 40:1 gear sets. The whole loco weighs 3 kg. Not that much more than a much smaller Roundhouse NDM-6. Most of the weight is concentrated over the bogies/axles to ensure good adhesion. There is weight equivalent to the battery pack, cut lead flashing, hiding under the dummy deisel to balance it all out. LED's shown up front of picture.
20210714_195835.jpg

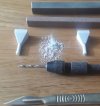
Prep of a 3D printed sand box, this loco has 8. Tools used shown. After prep work on the left, raw printed unfinished item on the right. Quite bit of material has to come off, shown from just one sandbox, if one wants to avoid a whole load of filler primer going on.
20210608_120806.jpg

Greg, in answer to your question (here/elsewhere) the gear sets are made by UK firm Markits Markits Model Railway Products. They are, specifically, their Romford 20 series 40:1 ratio. Other ratios and gearsets are available. I am toying with the idea of replacing the supplied 3D printed gear casings with a self penned fold up etch design. I have the critical measurements to hand. Drawing etch artwork is made a lot easier as my supplier (from slot car business days) Photo Etch Consultants are very helpful and can reduce down from 4/2 times actual size. But I will see how I get on with the supplied casings for now.

Til next update, Max.
 
Last edited: