Some work on Mountains and a Concrete Viaduct

dunnyrail

DOGS, Garden Railways, Steam Trains, Jive Dancing,
Staff member
GSC Moderator
25 Oct 2009
26,164
4,989
75
St.Neots Cambridgeshire UK
Best answers
0
Country flag
I have a very good friend that lives in Somerset and have helped him over the years with his varying Garden Railways, not least in demolishing 2 or them. Hopefully this latest one will get completed as it is in his retirement home and a super start has already been made by both he and his lady with assistance from me when on Holiday(!) at their place. The last two weeks have seen at long last the start of Mountains and the building of a Concrete Viaduct. With his permission I am penning a few words on the work that I have been doing. Mike’s input will be credited in the notes here.

The Garden was a blank sheet when Mike moved in January 2017. First year was not that much though the site for Sheds and Line were based out in Concrete During that Summer by an external contractor. Since then Sheds have arrived and been fitted out plus a lot of work between by Mike tidying up and sorting out some of my Dodgy Brick Laying, he was an Engineer by Trade so straight lines have to be straight lines Even in Garden Walls! Still a semblance of Railway had been made up by Mike using 8 shaped Blocks and for a track the flat surface the old concrete panels from a demolished grotty Garage.

The following pictures show some of the super work that has been carried out by Mike and Mady, not all of the Brickwork was relaid by Mike!
32DB90E4-A82C-40D3-B76D-596D706619B1.jpeg8A7E7868-77FA-41CC-B0A1-5A8A35452038.jpeg
1BC6A667-8998-42DA-9926-3E12BEE3ECAA.jpeg
Above you can see where 2 lines exit the Shed and the one in the foreground cannot now be seen from this viewpoint. Note that when the base was put down a space was allowed for a walkway behind the Railway. The wall is a crib from a long time 16mm guy by using broken concrete reclaimed when recycled bricks are cleaned off (by me), Mike did this work and it is glued with No Nails or Gripfill works just as well. I recommend a backfill with Concrete just to finish the job off as those glues cannot be relied on to have a ling life through frost, beasts from the east etc when used in the Garden.
E7120AC9-C5D0-4830-B7DA-59731FCBFD60.jpeg
Another shot in a different location showing how Mike has supported the old Shed Panels, they were originally supported at each end but a central pier was deemed necessary after walking on them found them to be a little flexible. They will be walked on extensively to create Mountains in front of the Path at the rear of the Blue Juice Wagon. The front area here will be a modest representation of Boston Lodge as Mike has interest in FR as well as RHB. Shed at the right is RHB, another down the Garden to the left with be Portmadog.

Below you can see the start of framework going up for the Mountains, they will be roughly 8ft high from ground level but just 5ft visible. Between the tracks can be seen the start work on the small River scene that will fall into an area formed by an old Roof Tank and Butyl Pond Liner.2D3EE91A-8BA5-496F-AE81-FFEEDFB99F53.jpeg
7E60B30B-CF88-4FE4-94E5-63B879EB536E.jpeg
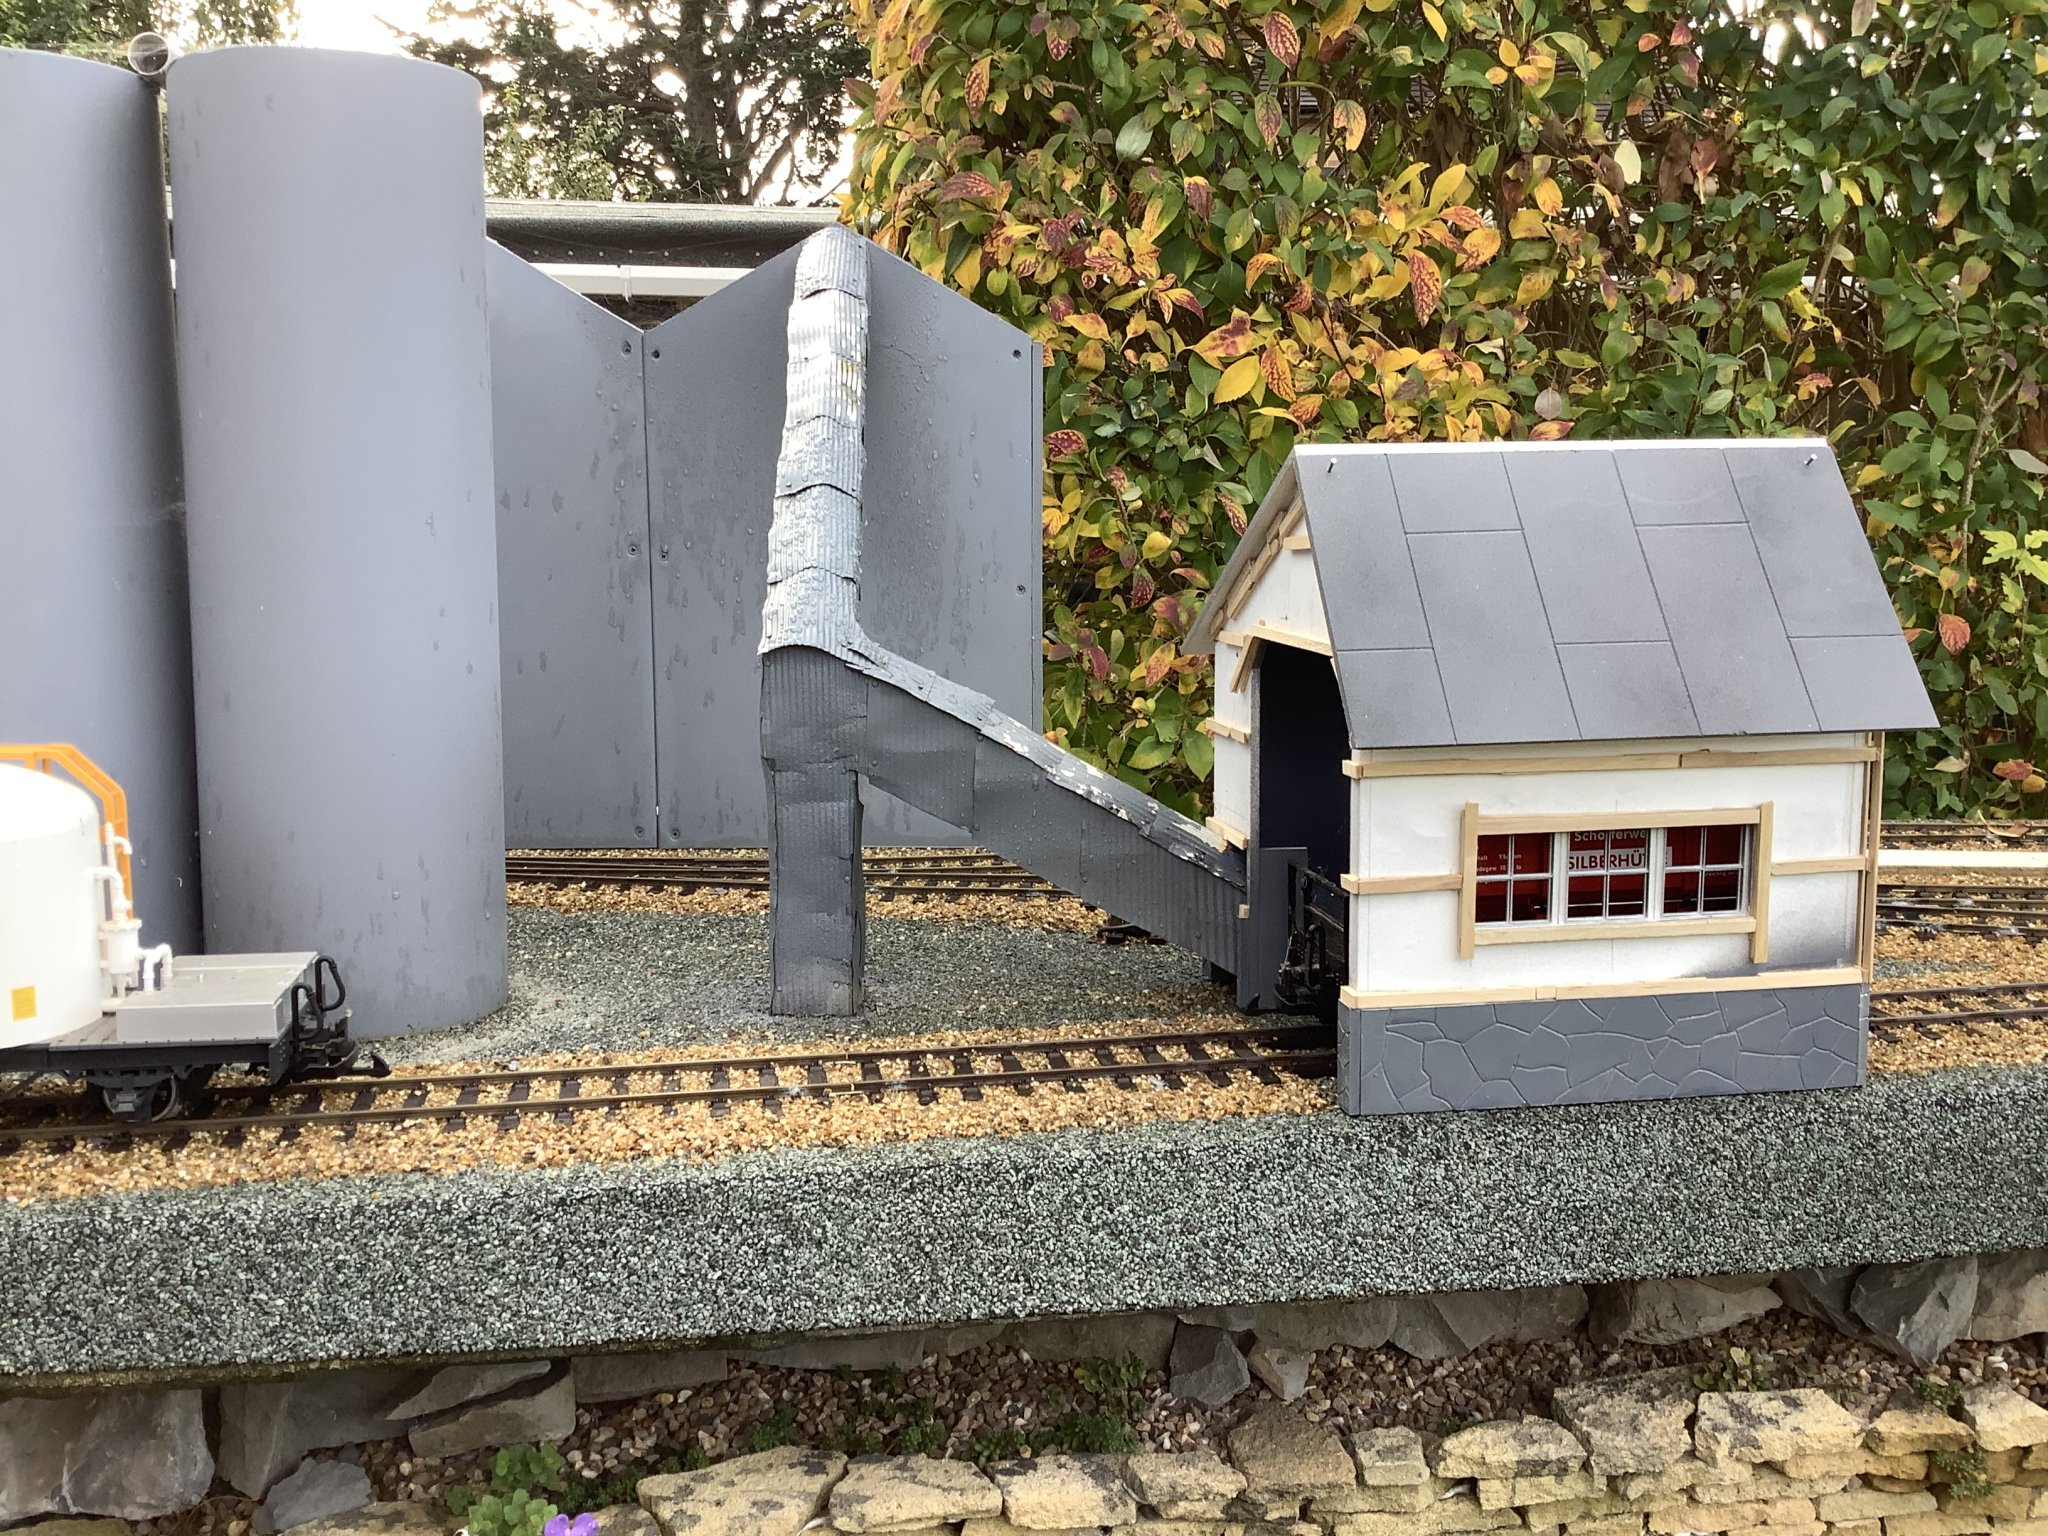
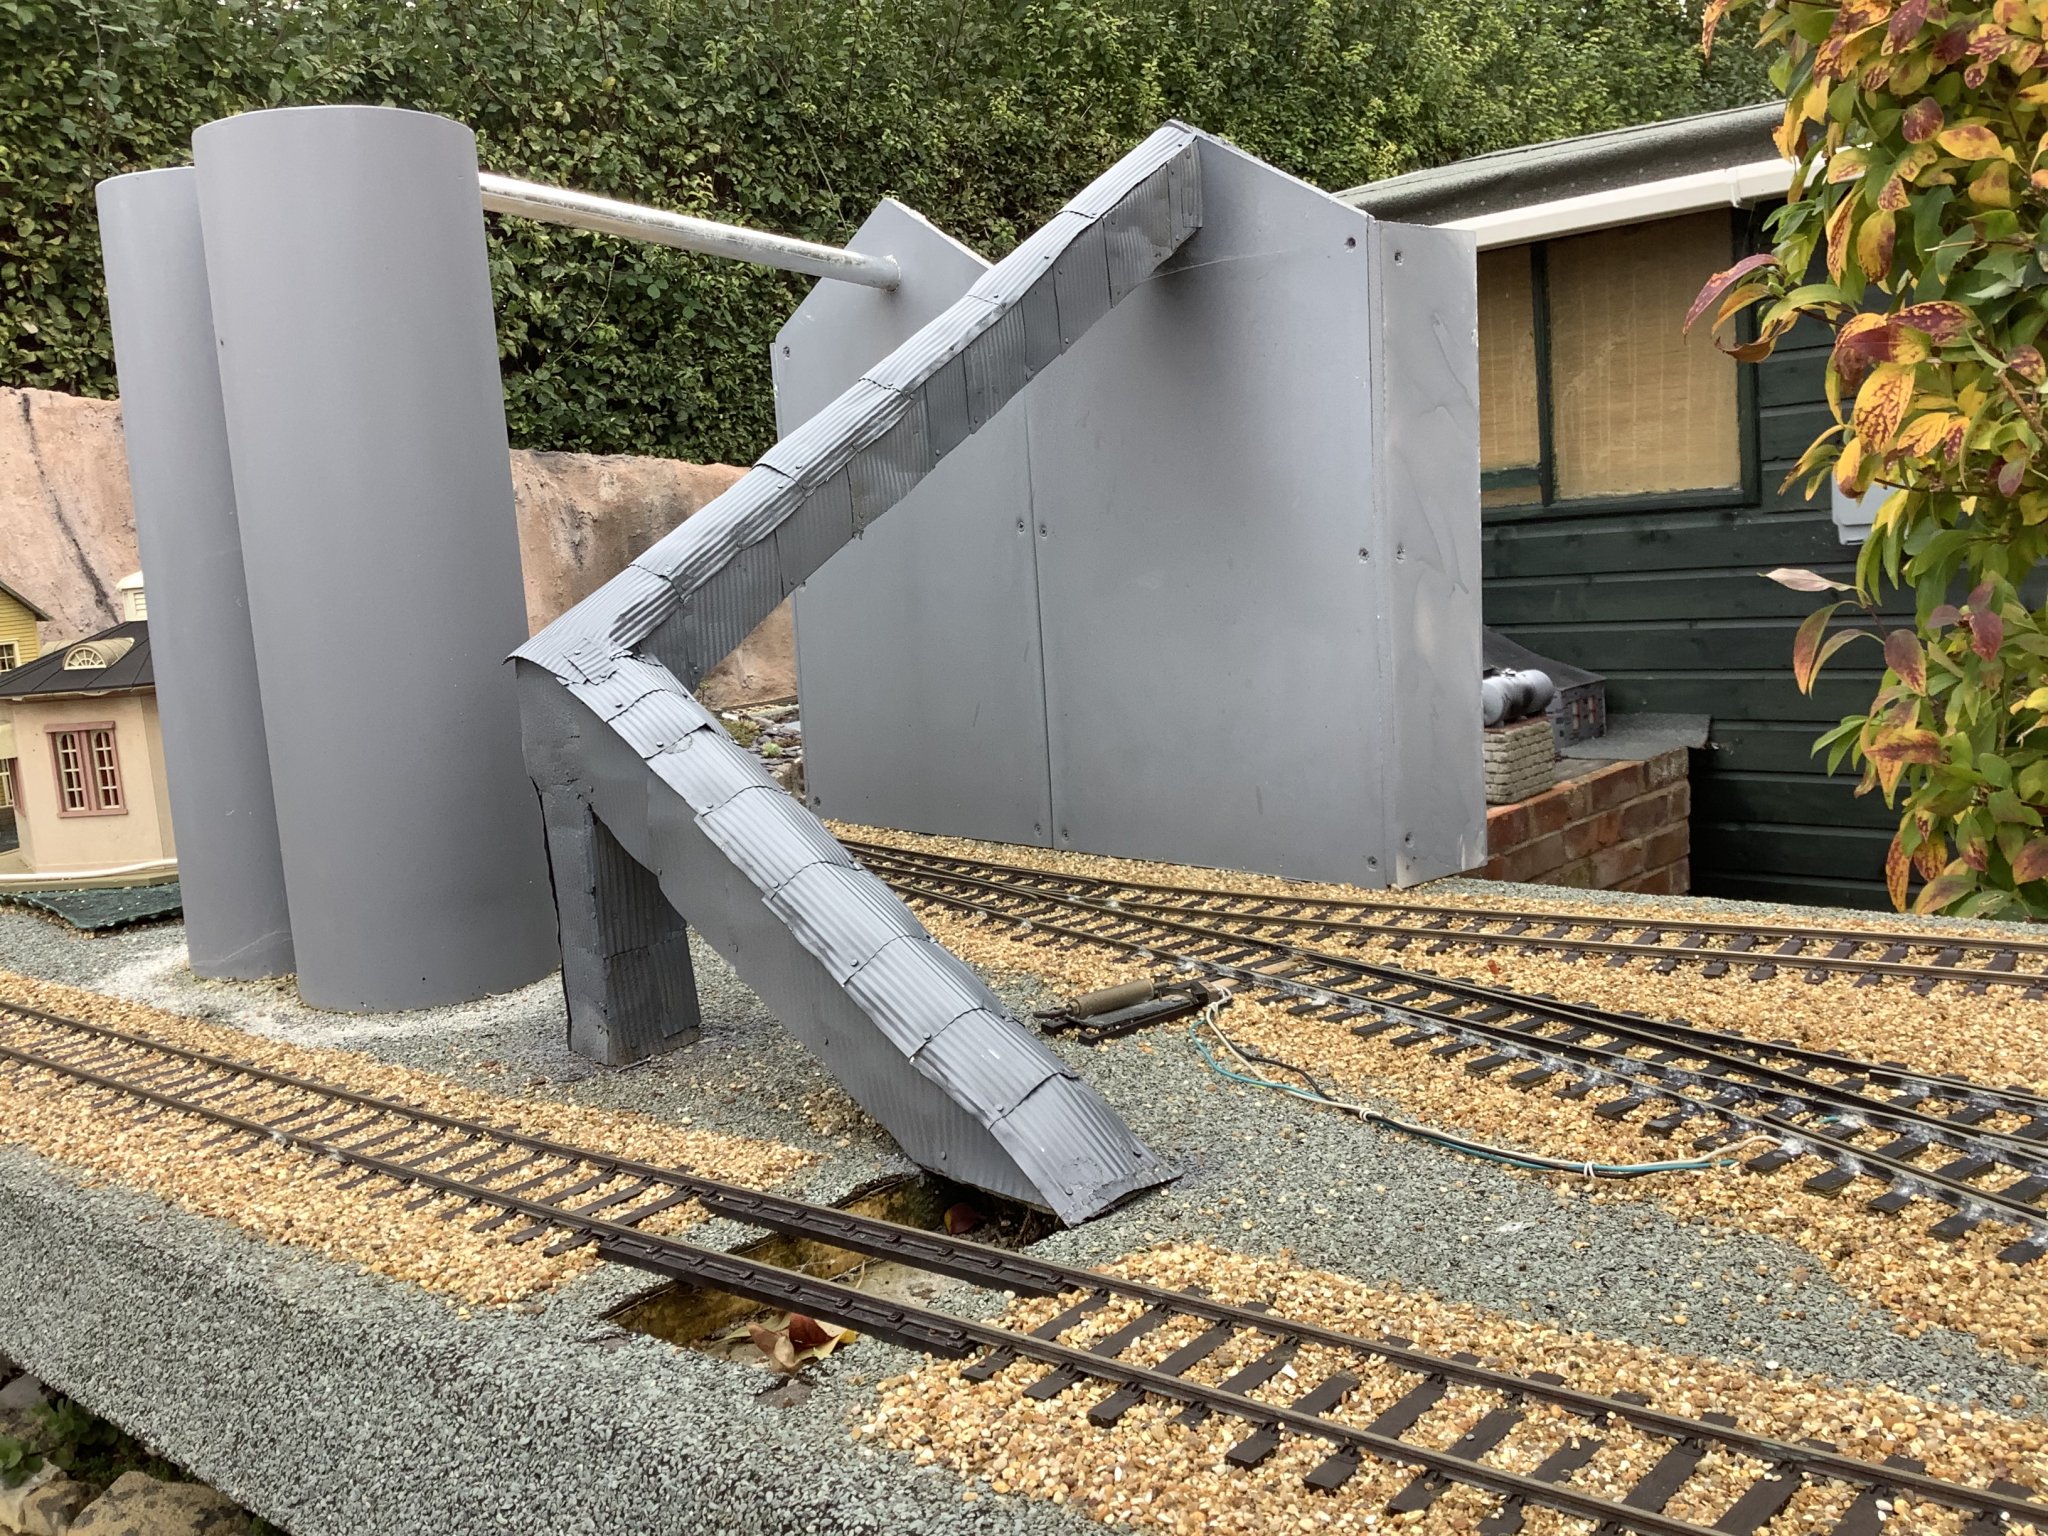
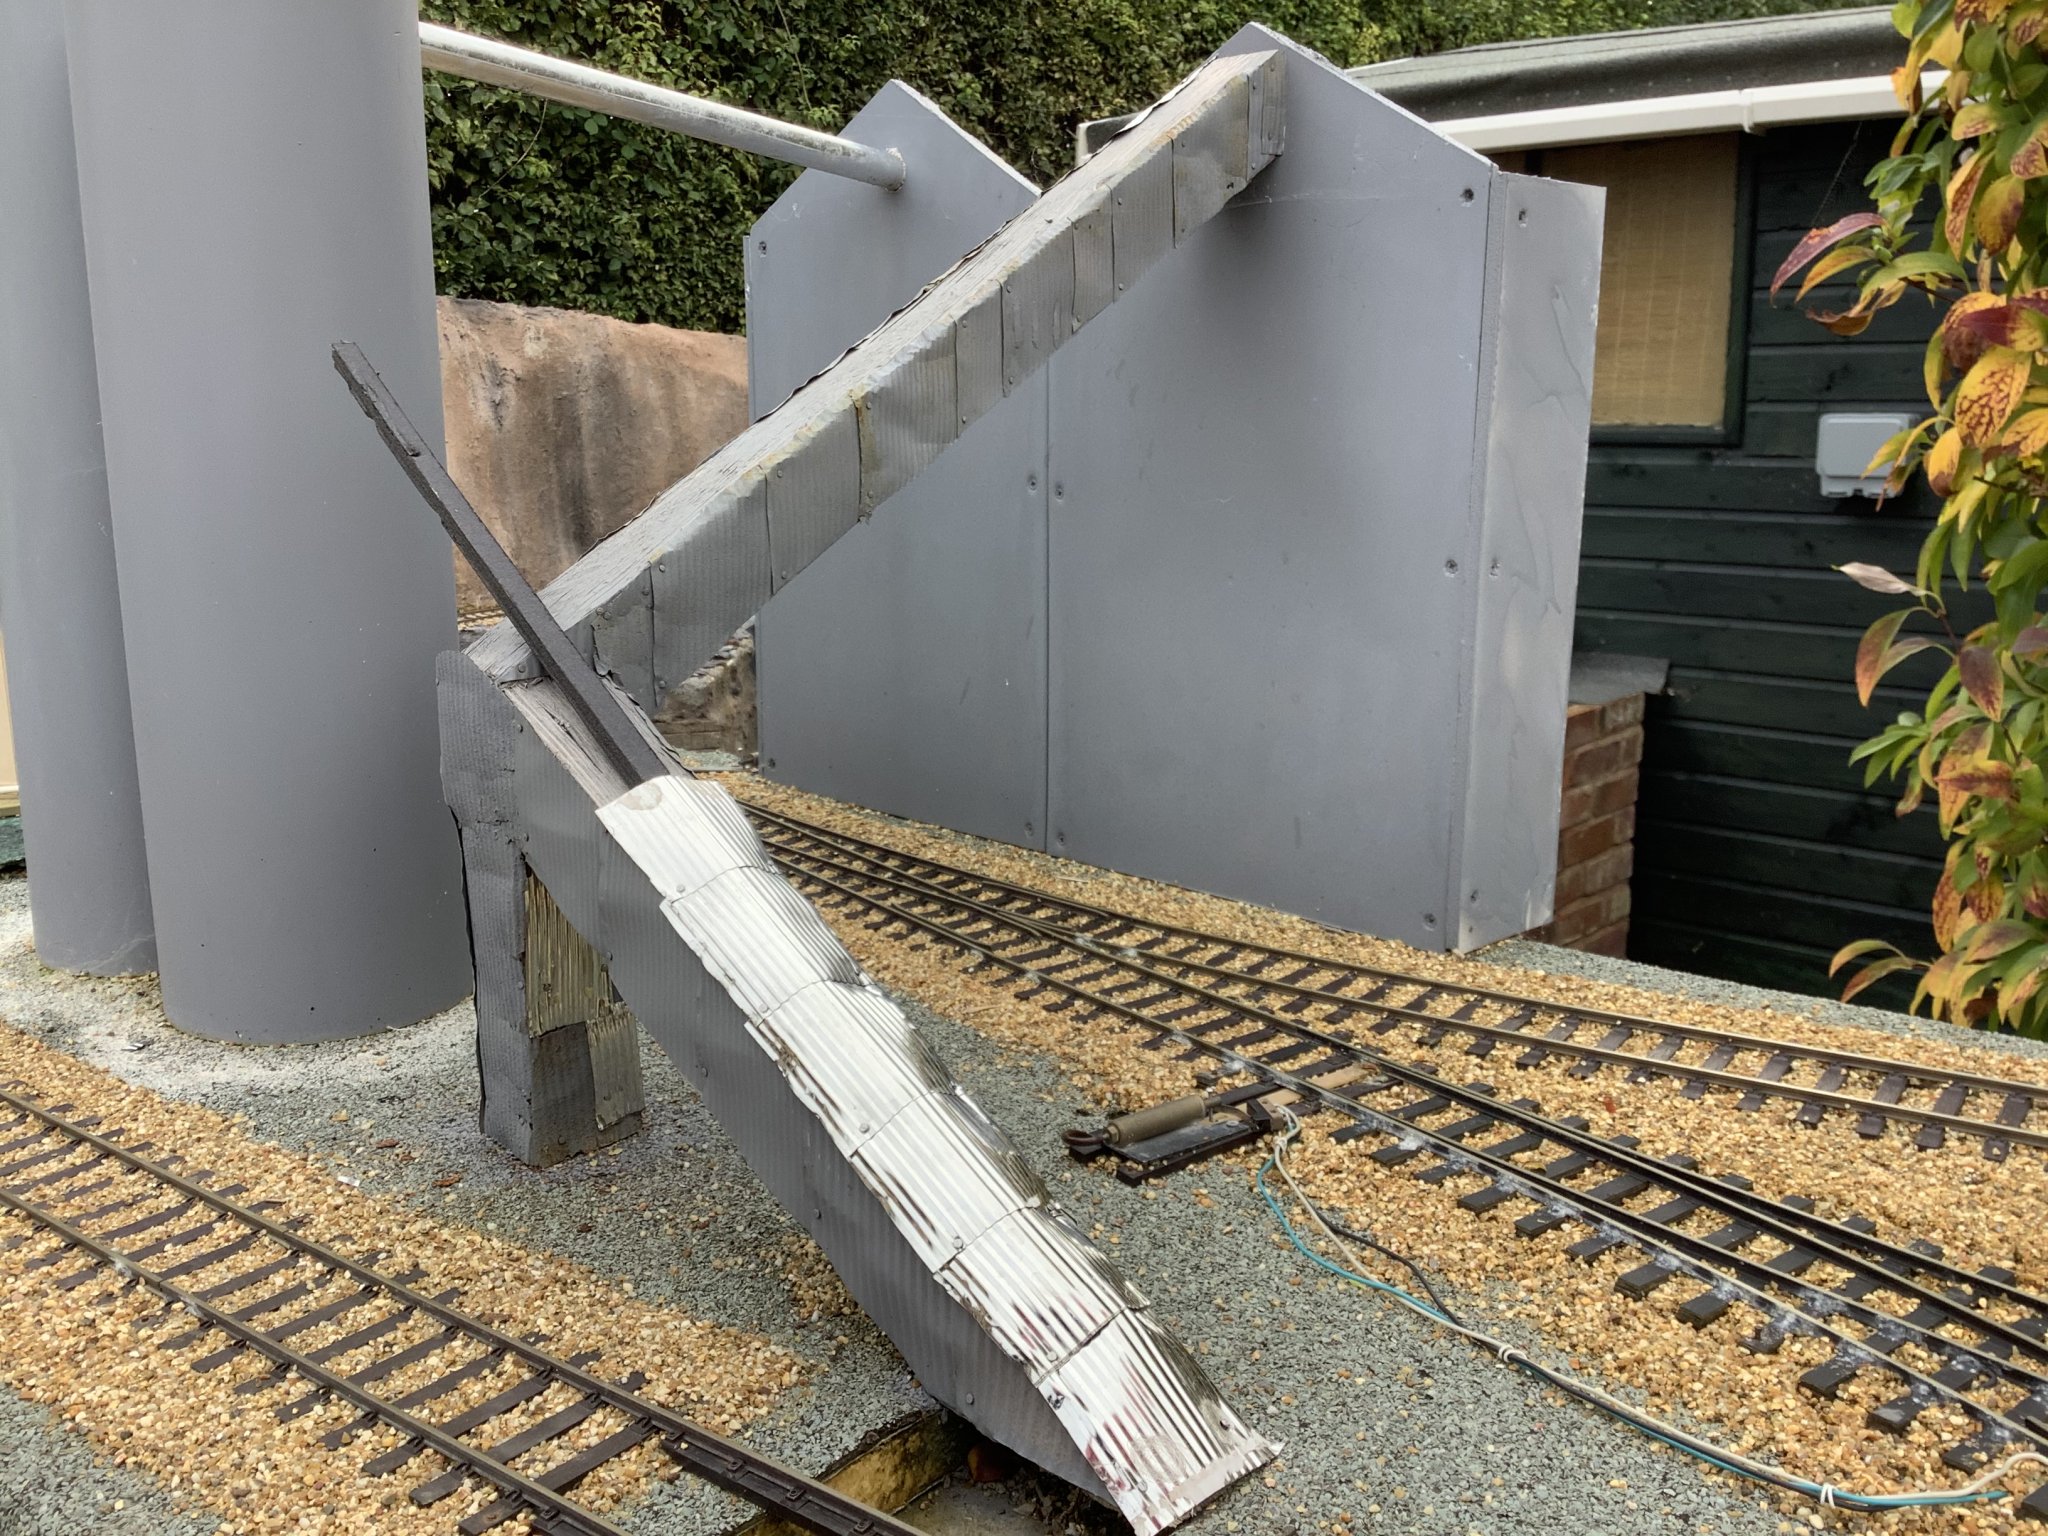
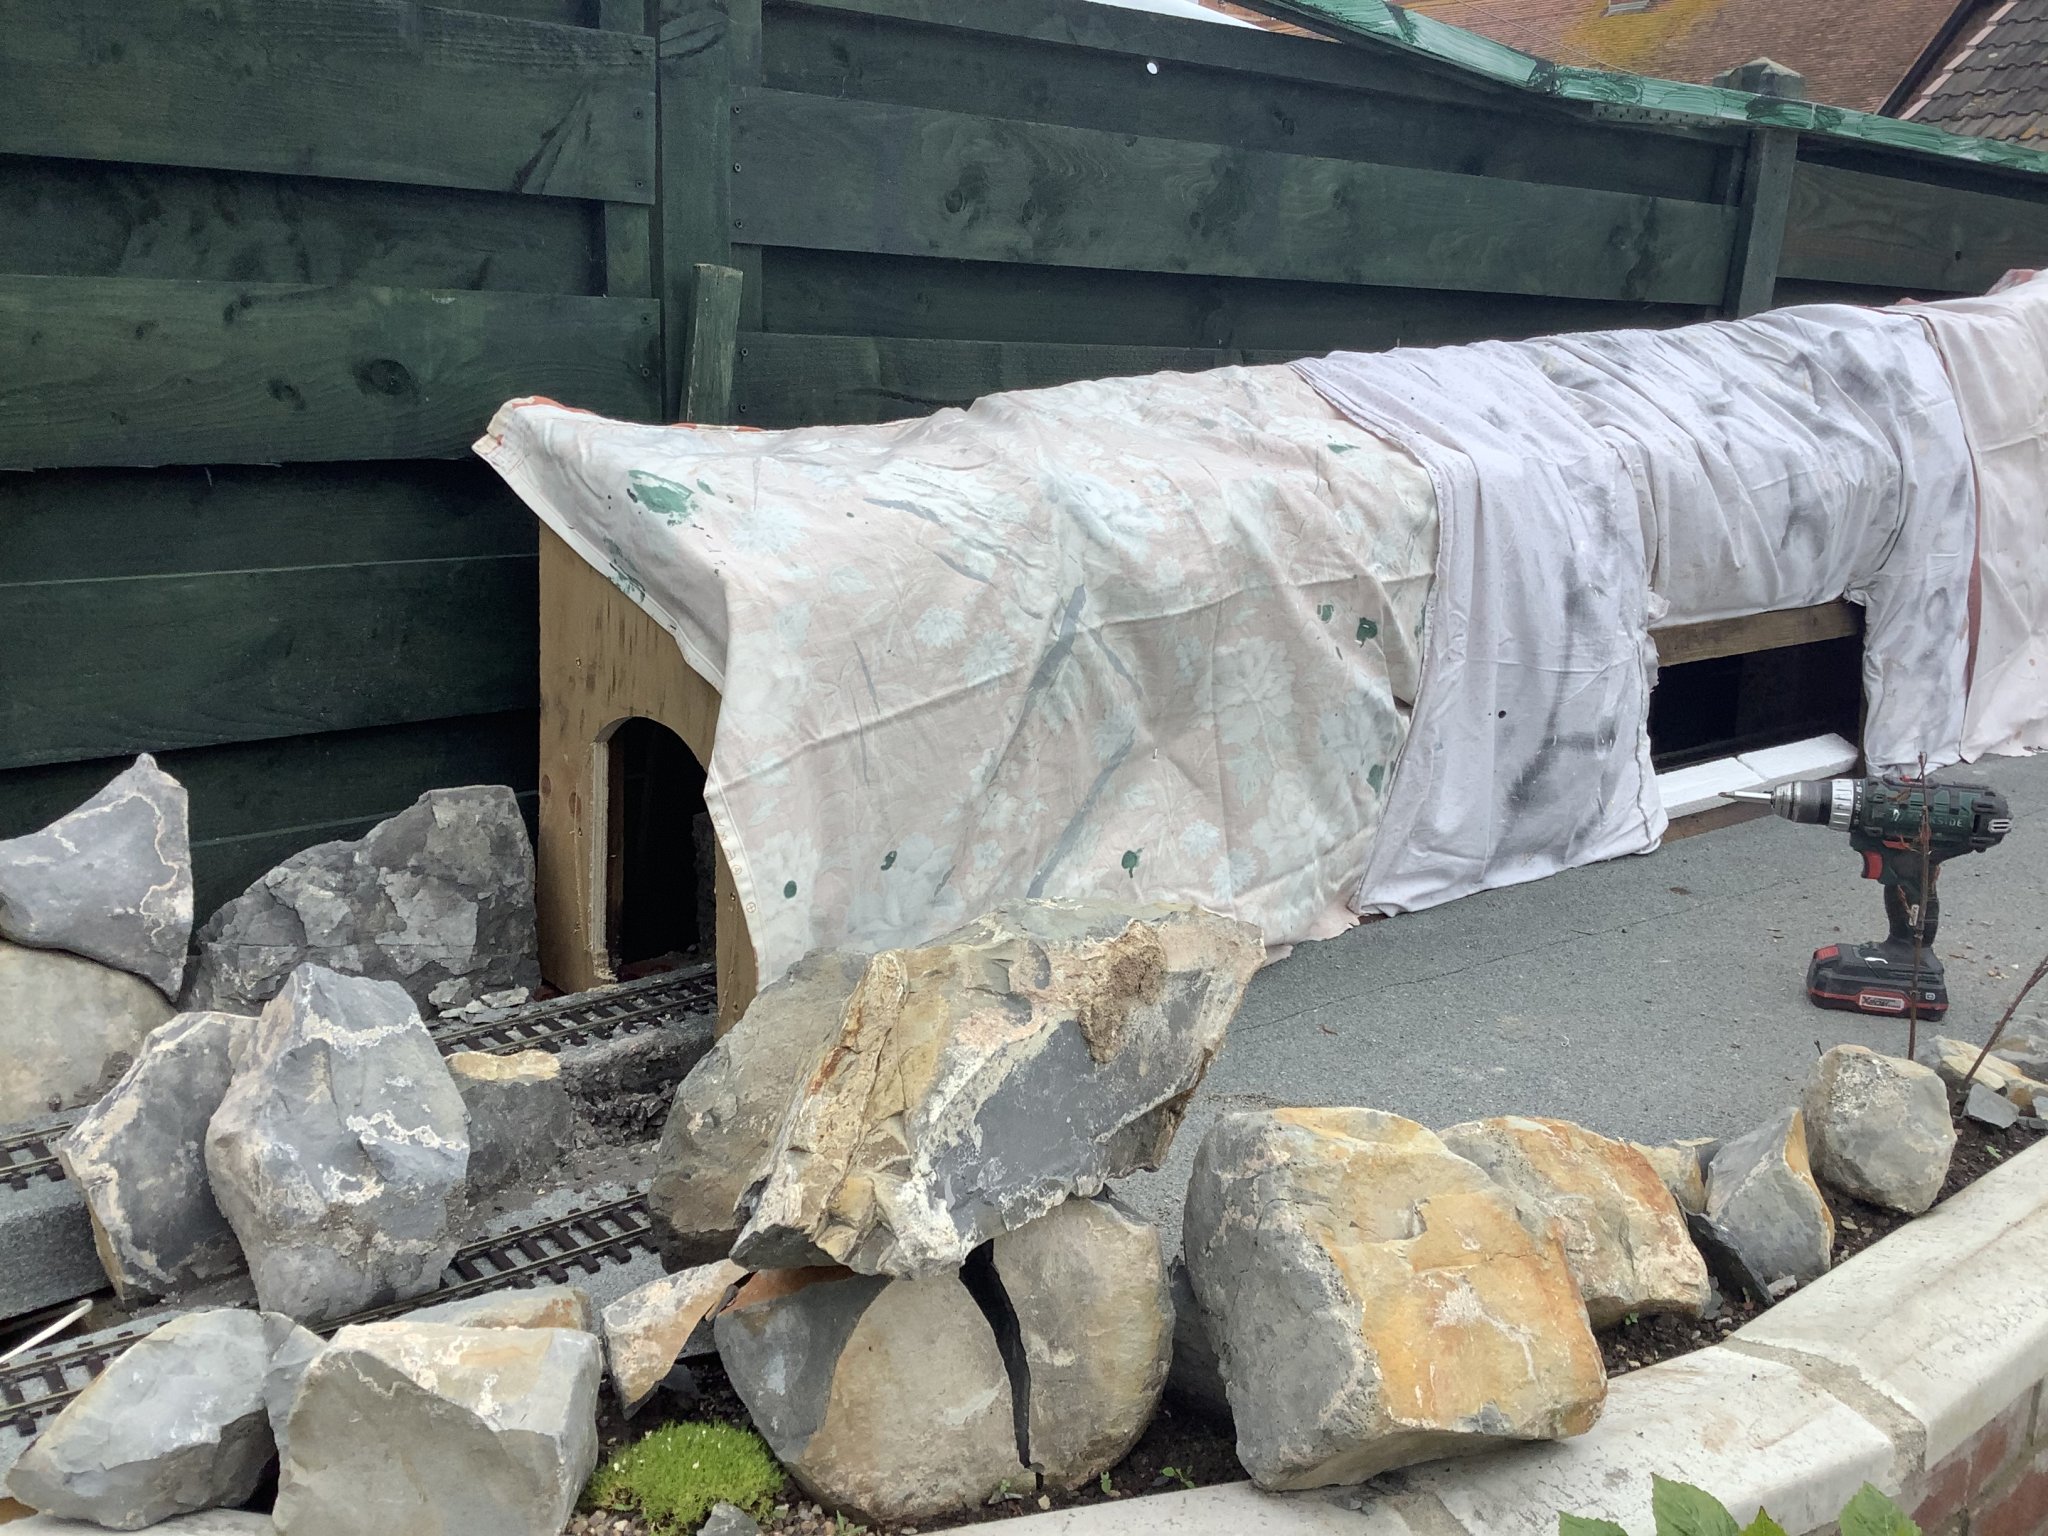
Between the open area and the Viaduct will be an Avalanche Shelter, here showing the first stages of construction by Mike using left over bits from Window and Garage UPVC bits. Bits of wood for Mountain support can also be seen. To get things in place at the bottom I drill a hole in the Garage Post, a big builders nail is then driven in the upright and this is plunged into the hole with a small piece of UPVC to keep the wood out of any puddled water. To the right upright you can just make out the white UPVC offcut.
67B409C5-BFCB-471C-ADAB-5E6D61E8ED5D.jpeg
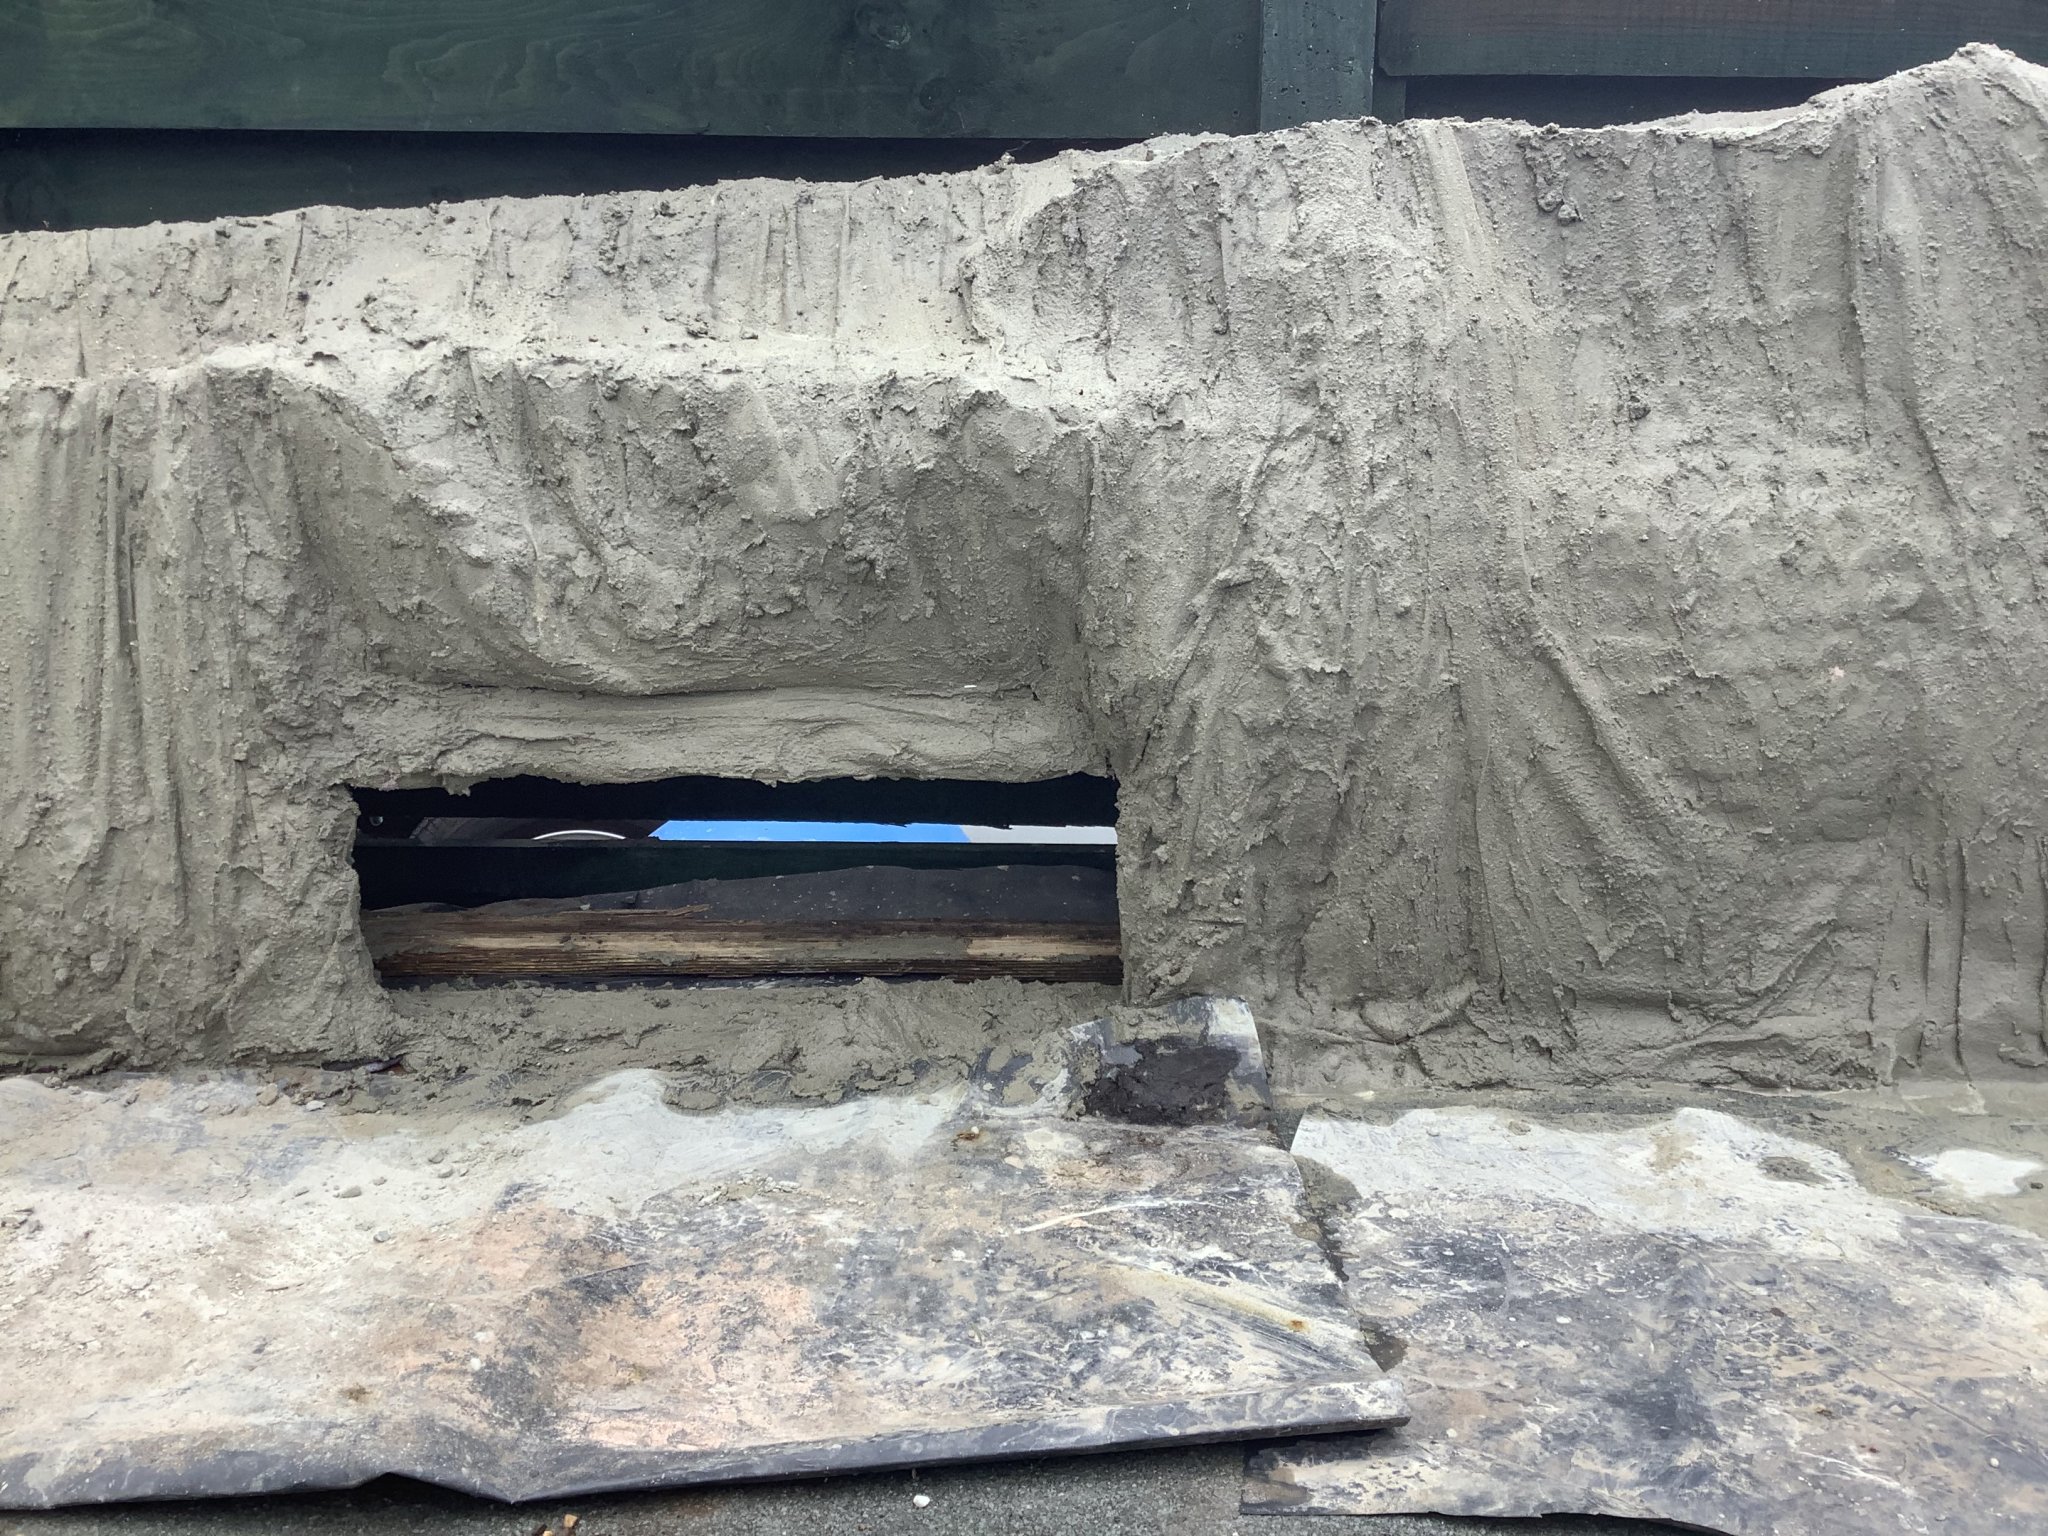
This shows the work that has been done on the Mountains, lots of cruddy old wood to make up a frame. Chicken Wire then an old Cotton Blanket both put up by Mike as I was doing other things, most important only Cotton a dust sheet will do, not modern Duvet Covers as the Concrete does not soak in to them well. A slop of Builders S.B.R. bond, water washing up liquid (just a drop) and cement was mixed up very thin to give a suitable coat to start putting Strata on. I have done a little on the River and in front of it plus the inside rear of the Avalanche Shelter to look like blasted stone for making the right of way. You can still see the Chicken Wire in this view, this will be lost when I put in Strata detail on my next visit though Mike and his Lady may have had a go by my next visit early next year CV19 permitting. As you can see the river is pretty much completed with the Grotto entrance middle left. The sheet has all had a slop so that the mountains do not look like those bright blankets till my next visit.
0C73580E-E758-4539-BA71-3D5680775543.jpeg
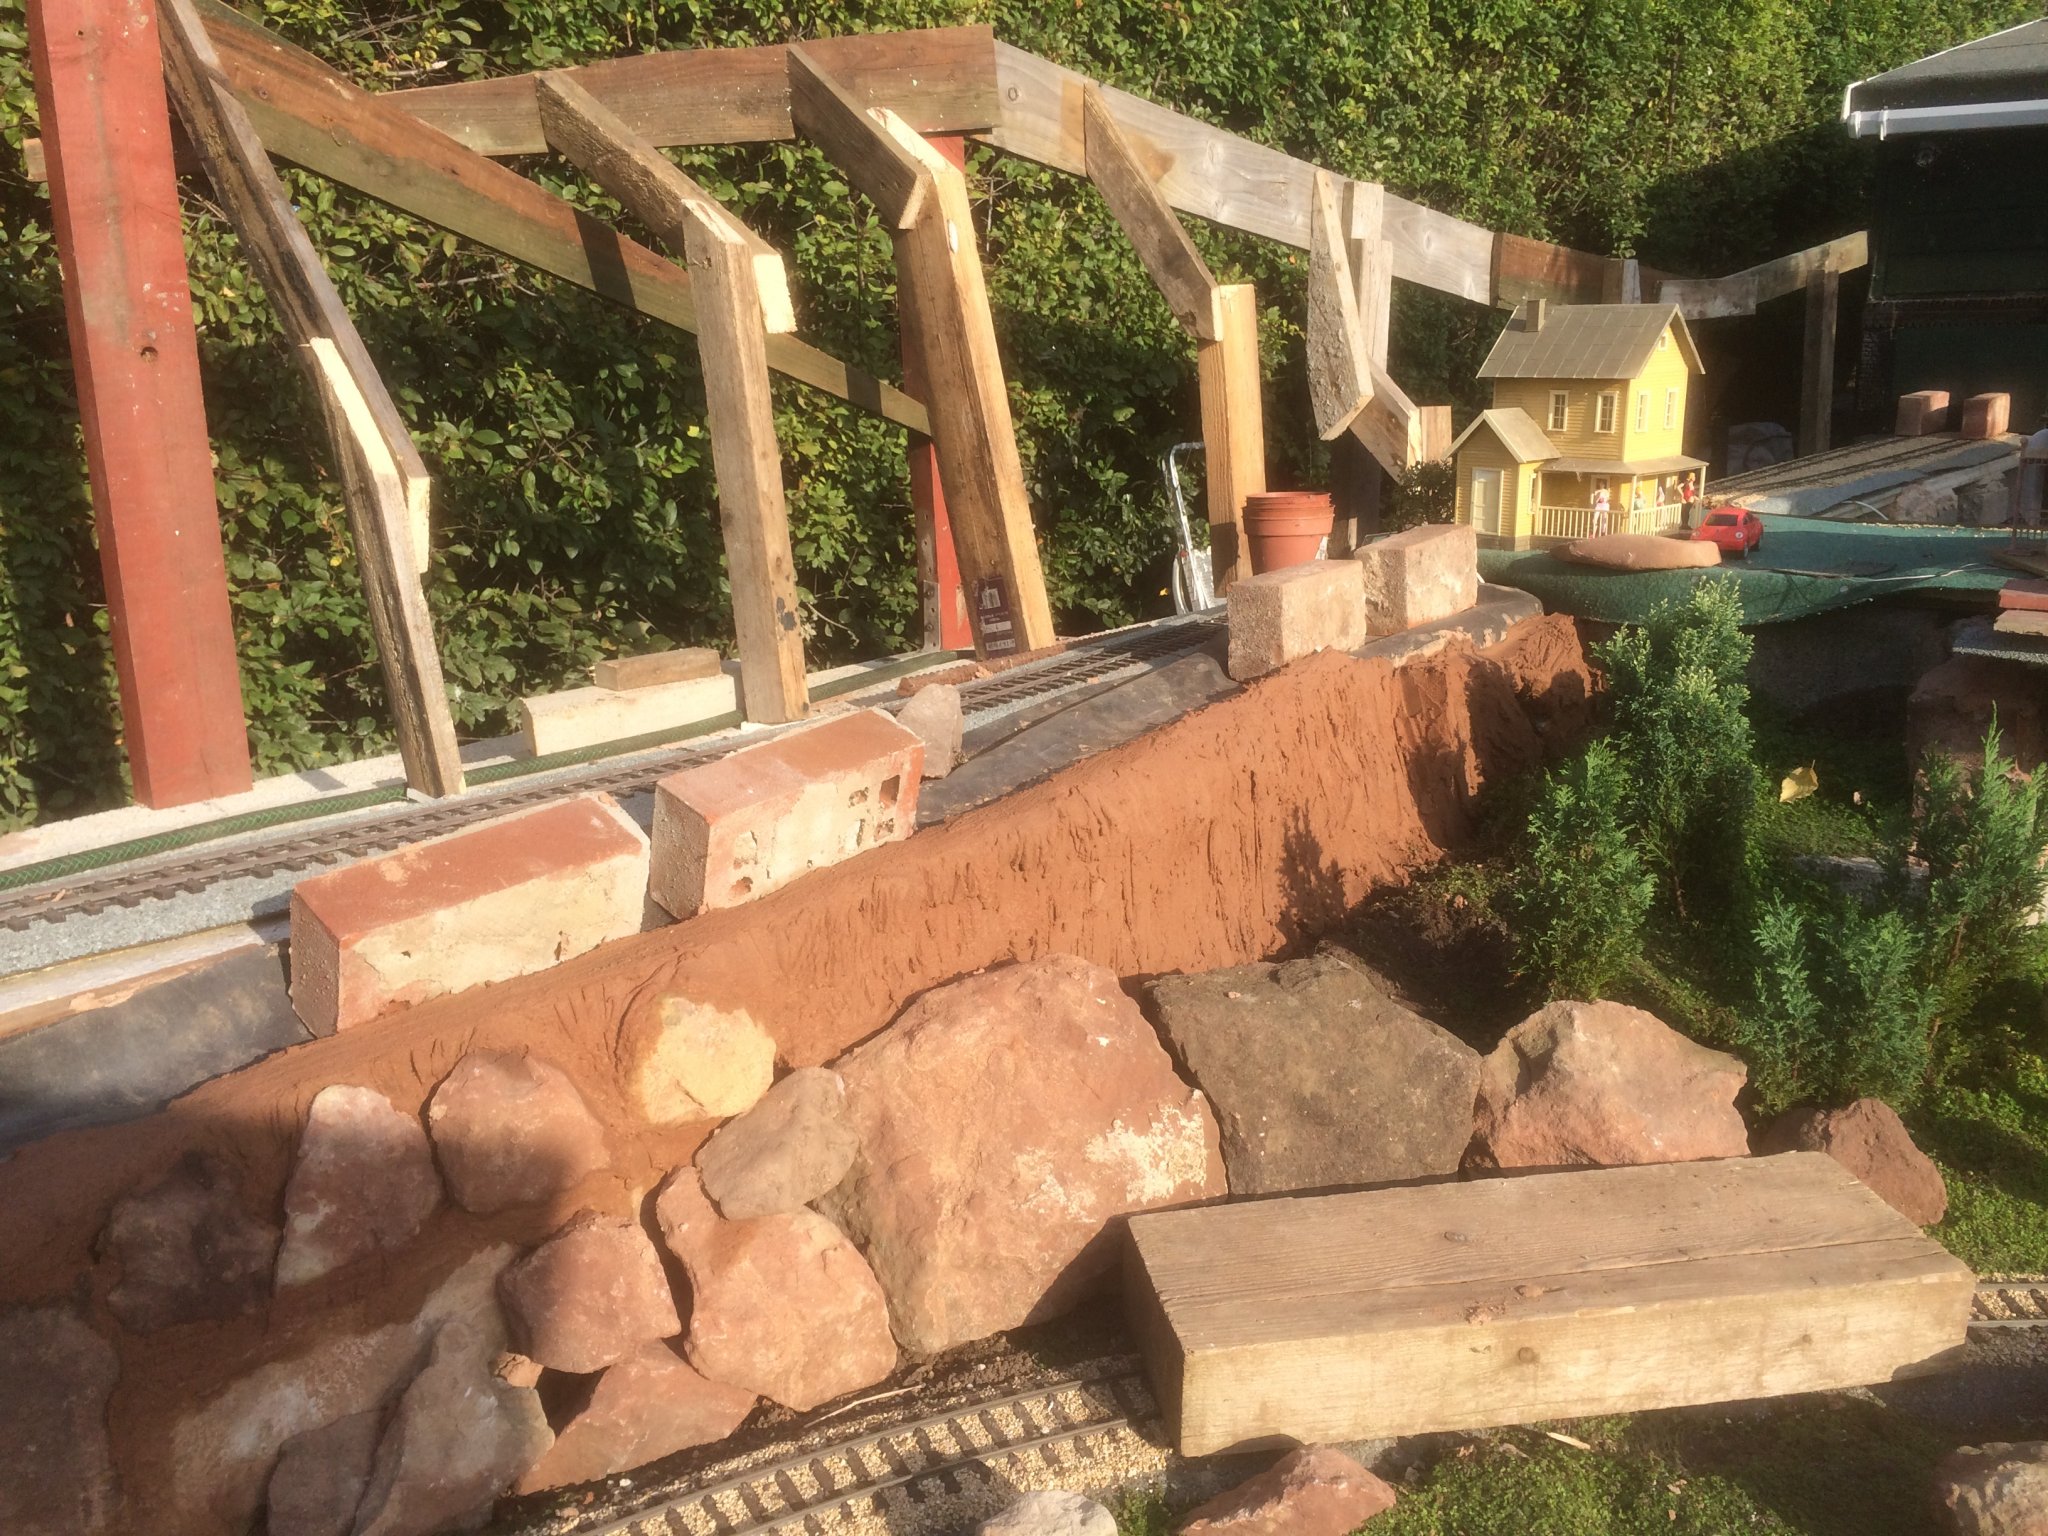
Ah here you can see the framework for the viaduct in place, an initial slop has been put in place to seal the bottom as can be seen to the bottom right of the mould. This will be a mini Landwasser, not so high nor curved but leaping out of Tunnels both sides onto the viaduct that will be in Water not a Valley. The hight in fact would be about right for Bemo Hom! But no matter should look the piece when completed.
4C7461DA-87C3-4262-8D7A-3D0659AECBD0.jpeg
After a couple of days drying the reveal showed a Concrete Viaduct. That bottom colour was caused by a different batch of sand. Can be sorted as it will likely be painted Sandtex Grey after some minor cosmetic fixes over the Winter by Mike. That Pond Liner will be nailed to Wood just above the water line (yes please Mike when the pond is full), there is an overflow pipe at the rear left and a slope up to the walls will be done in Strata to match that on the right on my next visit. when that has been done all the below water level concrete will be sealed with G4 as will the River. This will stop lime gumming up the Pumps that will circulate water.
E9B37B93-0F2F-4B59-8267-C4A313F386F7.jpeg
Here you can see the Grotto and Tunnel Exits to be completed at my next visit.
8D8F493E-2B67-4500-AC24-A6E39CA800E5.jpeg
There is an LGB Girder Bridge that fits the Tracks at the right, removed to get the Viaduct Mould in place for pouring Cement.
F1B47BAB-B4E4-4D74-9CC6-32963F67DF44.jpeg
Thus how things stand at my work and that of Mike. As ever I expect a lot will have been done by by Mike and Mady by my next visit, there was little sign of Mile a Minute greenery except for a small nurturing area at my last visit a year ago. Mady has done wonders with this and the other greenery that is filling the scenic parts.
 

Attachments

  • D74B36E3-A581-4558-B7A8-847076A02ADF.jpeg
    D74B36E3-A581-4558-B7A8-847076A02ADF.jpeg
    673.8 KB · Views: 0
  • Like
Reactions: 1 users

dunnyrail

DOGS, Garden Railways, Steam Trains, Jive Dancing,
Staff member
GSC Moderator
25 Oct 2009
26,164
4,989
75
St.Neots Cambridgeshire UK
Best answers
0
Country flag
A few more pictures of the earlier days showing how the Garden was created with some of the pics showing how Mike’s Dad’s outside line has donated some track and boards that will probably be used later. These were very useful in laying out possible options as can be seen. Note the extensive use of 8 blocks that can be just plonked on a suitable foundation, when surrounded by Carp they go nowhere!

The 4 pics below show the build of the Rockeries with The Terminus blocks just taking shape. This was I think last year. The Bridge is where the Tunnels and Avalanche Shelter are to the right in front of the block walls that were put up by me the year before I think. Note the curved section on the right just mapping things out.
9197F24B-CDBA-4FAA-AD7D-C49A141FAB80.jpeg
The steps (another of my many jobs) here are to aid cutting the Shrubs on the right but also access to a set of sidings that will be in place below the Terminus just before the curve. These will be used to get some stock into the Garden so that the Station can be utilised to move some trains about. The smaller Shed that will be Portmadog can be seen to the left and a view from it in the next pic.
B53B4D1B-D3F8-4471-8311-FA4A25A039D7.jpeg
1508F527-AB44-4DDD-9E64-F8C04F86D30A.jpeg
Close up of mapping things out with boards and 8’s.
7B78C272-F13D-4ED4-837E-C1005B613535.jpeg
Big set square used to make things square and an indicator of how high mountains and slope could be. Water Tank has gone under the Bridge and cut down slightly with the Viaduct now mounted within it in part, see previous post.
ECF57FAA-C734-4E0A-8358-CC954A0C9625.jpeg
Curve from the Terminus to the big shed. Again mapping out using Dad’s boards.
A05AB4DF-F46D-4750-AC95-83E6CE7574E1.jpeg
Boston Lodge will be here, site a little on the tight side so will only be a representation mostly to be used as a Steam Up bay.
6AA9C0F3-1093-4DD3-9709-AD1C2FDD6A0B.jpeg
Looking down the Garden from Boston Lodge, to the right is all made up for Concrete Mountains now. Such a shame to hide all that loverly carp!
E57822C9-E5C8-47A7-B658-46C1EB6B8A9C.jpeg
Nursery for the Babies Tears that is all over the place now and very nice it is looking as well. Again mapping out how the High and Low Level will be going. High will go into Boston Lodge with a Junction to the right of the Shed to head off to the other side of the House on High and Low level to eventually form a big loop. Long term project that one. What may be a bit closer and to be decided is if the low level will also go into the Shed below Portmadog for more much needed storage. Track supports all in place now with the Garage Pannels and 8’s, middle mostly filled with Carp.
CF9433B8-2659-49DF-81A9-7F00E5E0554B.jpeg
 
Last edited:
  • Like
Reactions: 1 user

dunnyrail

DOGS, Garden Railways, Steam Trains, Jive Dancing,
Staff member
GSC Moderator
25 Oct 2009
26,164
4,989
75
St.Neots Cambridgeshire UK
Best answers
0
Country flag
CONCRETE MOUNTAINS an uodate.

Last September I started the thread on this line, this June I was in Somerset again and managed some more work. You may have seen my thread on the work at Boston Lodge:-

Boston Lodge - well not quite!

here is now an update on my other work on the Concrete Mountains. During my absence Mike and his Lady have done a fair bit of work filling in the Mountains with Chicken Wire and a slop of thin Cement over the formwork thus created. Some more planting out has been done and a couple of other water entries to the Stream created last year.

The 2 weeks started off with fine weather and as it was extremely hot, as I was adding strata that that I had already done was getting continuously sprayed with water to slow down the drying process as quick drying can make the cement mix somewhat dusty and weak. A standard discarded kitchen spray bottle with a little washing up liquid works fine for this process.

As this work was to be the final finish of Concrete the mix was made up with some added colour, as an experiment I mixed up some varying mixes to get a feel for how the sand works with Cement colour but Mike also wanted a quite light bit of mountain as well. Just Google Swiss Mountains to see the vast variety of colours involved. I will caption the pictures where added later but the results of this experiment were quite interesting, remembering that the main sand supplied in Somerset appears to be a Red one so colour is not quite what I was used to when building the Ruschbahn and my own Mountains.

Another job was to G4 the Concrete in the Water Features so those Mountains and small revisions to the water course were attended to first, as we were under constant threat of rain and we had emptied the water tank with the Viaduct built in of water I wanted to get all the G4 works done in one hit as there was no glug to clean a brush between works so any brush used would need to be sacrificial. G4 needs Cellulose thinners to clean a brush.

That having been done it was just a daily slog applying strata to the hills, I tend to prefer a putty knife but a brush with a sloppy mix worked quite well in the hot weather, providing it was not too sloppy and the place where it was to be applied was good and wet. Again that old spray coming in handy. Once the mix has been applied further colour can be added if required but this can be a bit touch and go as the dried effect can never be fully guaranteed, I like a slightly darker damp colour that will dry out lighter. But a very dark effect can be interesting in small doses so long as it is applied in a natural drift. Another of my favourite colouring methods is Sulphate of Iron (used as Azalea Food) as this gives a nice Brown effect that works very well with the Red sand in Somerset, more gives an almost Rusty effect but this works quite well also. As said above Mountains do have an almost infinite variety of Colours so it is difficult to be wrong so long as you do not try to overdo any effect overmuch in the same place.

Slartibartfast at work. You can clearly see the Chicken Wire below that initial cloth and slop of cement at the right.
2FED2735-0701-4AF9-974C-648DBA8F3363.jpeg0F289176-AE7C-4A83-9A6D-AFB47BD486E5.jpeg
Here you can see the a selection of completed mountain, much of the detail has been carried out with the putty knife but a damp coarse brush helps also. The Avalanche Shelter 1 can also be seen and the Tunnel that the water course runs through before entering the pond.
93FE9E65-BC44-4E9C-A37B-C1C449E0DF2D.jpeg
65509F98-B6F1-48C7-8CE1-32E0CC800D31.jpeg
This picture nicely shows the difference in colour between the completed mountains (darker) and the slop stuff waiting for its final coat.
8A952AE1-6D5E-4CF6-A11C-BE4EEA01D8E5.jpeg
A view of the Viaduct and Bridge showing the 2 small water additions, thenone on the left commingbout of the mountain where the damp patch is (below this the mountains have had G4 applied where the water flows) and the other one where the lattice work is on the right. The Bridge will be reworked as it is too intrusive of the view of the Concrete Viaduct. The pond overflows into the garden at the front where the dip is seen just in front of the Bridge.
89D85C5F-E017-4459-B04D-82F23790E012.jpeg
This view shows the main water course now G4’d with water running and the drop from the lattice out of the Mountain. The story here is that there was a natural flow that had to be diverted when the Railway was built. String has been glued to the lattice to direct the water into the stream, I am nit sure that this was the best option but Mike had dome it before I arrived. I think I would have used a piece of clear plastic tube for the job A little like those hanging in the air Tap water features.
B709469C-CFED-4147-9C29-E5B1C7E2C012.jpeg
View across the pond showing how the Bridge tends to loose the Viaduct view. The pond will not have Fish but is to be reserved for Frogs.
3F083DAB-5367-4F11-B464-126E21937232.jpeg
A second small avalanche (2) has been inserted to disguise the lower line running beneath the entry to what will become Portmadoc Station. The Mountain on the left is near vertical in not a lot of space and goes up getting on for 5 feet above the pond .
9B2E2BBA-D284-4730-B4F6-7D53A6F5467A.jpeg
0EE139AB-DCB9-40B7-A445-506D9ECB342B.jpeg
Looking along the water course into its tunnel.
1A376C2B-1760-4AB7-BE8D-DE5CC8D3E0A1.jpeg
That is about it till my next visit, what will be done next time is probably not a lot more to the Mountains. But in the future there is the other side of the Garden to look at so perhaps more Mountains?
 
  • Like
Reactions: 1 users

palstig

Registered
12 Sep 2016
381
41
57
Rushden
Best answers
0
Country flag
CONCRETE MOUNTAINS an uodate.

Last September I started the thread on this line, this June I was in Somerset again and managed some more work. You may have seen my thread on the work at Boston Lodge:-

Boston Lodge - well not quite!

here is now an update on my other work on the Concrete Mountains. During my absence Mike and his Lady have done a fair bit of work filling in the Mountains with Chicken Wire and a slop of thin Cement over the formwork thus created. Some more planting out has been done and a couple of other water entries to the Stream created last year.

The 2 weeks started off with fine weather and as it was extremely hot, as I was adding strata that that I had already done was getting continuously sprayed with water to slow down the drying process as quick drying can make the cement mix somewhat dusty and weak. A standard discarded kitchen spray bottle with a little washing up liquid works fine for this process.

As this work was to be the final finish of Concrete the mix was made up with some added colour, as an experiment I mixed up some varying mixes to get a feel for how the sand works with Cement colour but Mike also wanted a quite light bit of mountain as well. Just Google Swiss Mountains to see the vast variety of colours involved. I will caption the pictures where added later but the results of this experiment were quite interesting, remembering that the main sand supplied in Somerset appears to be a Red one so colour is not quite what I was used to when building the Ruschbahn and my own Mountains.

Another job was to G4 the Concrete in the Water Features so those Mountains and small revisions to the water course were attended to first, as we were under constant threat of rain and we had emptied the water tank with the Viaduct built in of water I wanted to get all the G4 works done in one hit as there was no glug to clean a brush between works so any brush used would need to be sacrificial. G4 needs Cellulose thinners to clean a brush.

That having been done it was just a daily slog applying strata to the hills, I tend to prefer a putty knife but a brush with a sloppy mix worked quite well in the hot weather, providing it was not too sloppy and the place where it was to be applied was good and wet. Again that old spray coming in handy. Once the mix has been applied further colour can be added if required but this can be a bit touch and go as the dried effect can never be fully guaranteed, I like a slightly darker damp colour that will dry out lighter. But a very dark effect can be interesting in small doses so long as it is applied in a natural drift. Another of my favourite colouring methods is Sulphate of Iron (used as Azalea Food) as this gives a nice Brown effect that works very well with the Red sand in Somerset, more gives an almost Rusty effect but this works quite well also. As said above Mountains do have an almost infinite variety of Colours so it is difficult to be wrong so long as you do not try to overdo any effect overmuch in the same place.

Slartibartfast at work. You can clearly see the Chicken Wire below that initial cloth and slop of cement at the right.
View attachment 287430View attachment 287432
Here you can see the a selection of completed mountain, much of the detail has been carried out with the putty knife but a damp coarse brush helps also. The Avalanche Shelter 1 can also be seen and the Tunnel that the water course runs through before entering the pond.
View attachment 287431
View attachment 287433
This picture nicely shows the difference in colour between the completed mountains (darker) and the slop stuff waiting for its final coat.
View attachment 287434
A view of the Viaduct and Bridge showing the 2 small water additions, thenone on the left commingbout of the mountain where the damp patch is (below this the mountains have had G4 applied where the water flows) and the other one where the lattice work is on the right. The Bridge will be reworked as it is too intrusive of the view of the Concrete Viaduct. The pond overflows into the garden at the front where the dip is seen just in front of the Bridge.
View attachment 287435
This view shows the main water course now G4’d with water running and the drop from the lattice out of the Mountain. The story here is that there was a natural flow that had to be diverted when the Railway was built. String has been glued to the lattice to direct the water into the stream, I am nit sure that this was the best option but Mike had dome it before I arrived. I think I would have used a piece of clear plastic tube for the job A little like those hanging in the air Tap water features.
View attachment 287436
View across the pond showing how the Bridge tends to loose the Viaduct view. The pond will not have Fish but is to be reserved for Frogs.
View attachment 287437
A second small avalanche (2) has been inserted to disguise the lower line running beneath the entry to what will become Portmadoc Station. The Mountain on the left is near vertical in not a lot of space and goes up getting on for 5 feet above the pond .
View attachment 287438
View attachment 287439
Looking along the water course into its tunnel.
View attachment 287440
That is about it till my next visit, what will be done next time is probably not a lot more to the Mountains. But in the future there is the other side of the Garden to look at so perhaps more Mountains?
Looks fantastic Jon. Very inspirational and a lot of hard work and effort. You deserve a beer now :)
 

-bbbb

Registered
21 Dec 2017
589
129
Idaho
Best answers
0
Country flag
Great job.. The mountains, tunnel, bridges, and water feature all look good. Now we just need some video of some trains passing through it. I wonder about the longevity of the paint and concrete in the weather and with the waterfall on it. Was the paint sealed with some sort of sealer?. I also wonder how durable those mountains are(i.e. how much weight they can take before cracking).
 

dunnyrail

DOGS, Garden Railways, Steam Trains, Jive Dancing,
Staff member
GSC Moderator
25 Oct 2009
26,164
4,989
75
St.Neots Cambridgeshire UK
Best answers
0
Country flag
Great job.. The mountains, tunnel, bridges, and water feature all look good. Now we just need some video of some trains passing through it. I wonder about the longevity of the paint and concrete in the weather and with the waterfall on it. Was the paint sealed with some sort of sealer?. I also wonder how durable those mountains are(i.e. how much weight they can take before cracking).
No paint involved just different colours of sand, the light bit used yellow sand as they call it in Somerset and the rest the locally used red stuff. The concretes mix had liquid cement colour added in places to make it darker, in other places a slop of that colour and just cement was mixed and applied damp with a brush. Many differing processes get the mixed results of colour that you see in mountains and rock strata. As for cracking this is not that much of an issue, below you can see one in my Garden that I posted on my build liked below that has been present for a good while now. Small crack and a little but of wear off but little loss if colour or general strength.502FFC0A-55C0-4A7F-9A58-7B4A55A0DE02.jpeg

Looks fantastic Jon. Very inspirational and a lot of hard work and effort. You deserve a beer now :)
Oh yes please, a trip to Rushden Station required me thinks!
 
Last edited:

dunnyrail

DOGS, Garden Railways, Steam Trains, Jive Dancing,
Staff member
GSC Moderator
25 Oct 2009
26,164
4,989
75
St.Neots Cambridgeshire UK
Best answers
0
Country flag
Now we just need some video of some trains passing through it.
Your wish etc, this was all I took movie wise consists of 2 short clips joined together on my iPad in iMovie. This was a first for me on the iPad and I am pleased that I persevered to get it done.

 
  • Like
Reactions: 1 user

-bbbb

Registered
21 Dec 2017
589
129
Idaho
Best answers
0
Country flag
Your wish etc, this was all I took movie wise consists of 2 short clips joined together on my iPad in iMovie. This was a first for me on the iPad and I am pleased that I persevered to get it done.

I thought the mountains, tunnel, and bridges were going to be the main features, but the planting was amazing and stole the show. Some of the barren rocks near the mountain could use some of those plants.
 

Paul M

Registered
25 Oct 2016
11,875
1,696
60
Royston
Best answers
0
Country flag
Your wish etc, this was all I took movie wise consists of 2 short clips joined together on my iPad in iMovie. This was a first for me on the iPad and I am pleased that I persevered to get it done.

Very impressive
 

dunnyrail

DOGS, Garden Railways, Steam Trains, Jive Dancing,
Staff member
GSC Moderator
25 Oct 2009
26,164
4,989
75
St.Neots Cambridgeshire UK
Best answers
0
Country flag
I thought the mountains, tunnel, and bridges were going to be the main features, but the planting was amazing and stole the show. Some of the barren rocks near the mountain could use some of those plants.
Yes planting will be done over time, but it is tricky to get planting on near vertical mountains as the pots will have very little to sustain them and they will be in full sun for much of the day. Compromise hits home here big time.
 

dunnyrail

DOGS, Garden Railways, Steam Trains, Jive Dancing,
Staff member
GSC Moderator
25 Oct 2009
26,164
4,989
75
St.Neots Cambridgeshire UK
Best answers
0
Country flag
Yesterday as a demo I decided to do a little repair to my Mountain with the crack (see post 6), I made up a slop of very wet cement 3-1 Sharp Sand and Cement with a touch of external grade watered down PVA. That adds some strength to the mix. Applied this with a brush getting it well into the cracks then a little colour was added, this was mostly Wicks Concrete Dye Powder dusted on with a dry brush then given a good wet with an old Kitchen Cleaning Spray, this has water and a little washing up liquid added. Plenty of spray helps to blend in the colour. I also applied a little Sulphate of Iron to give the Brown effect, this is again applied dry and well wetted in. The mountain looks quite different in colour now and these sort of effects can be done any time if the Mountains do not appear to be a pleasing (to you) colour.

If indeed as a repair if cracks appear over time, I do find however that the concrete mountains are generally very resistant to damage as after all there is some flexibility in concrete as high rise buildings can demonstrate with their ability to flex somewhat.
6F3E4BDF-9FCA-45C5-B300-C59FB3450A86.jpeg
 
  • Like
Reactions: 1 user

Anglian

Registered
23 Jul 2018
1,540
602
75
Armagh
Best answers
0
Country flag
Hi. I'd just like to add my compliments to the builders. It looks amazing. I was particularly interested in the fact that the mountain making method actually survives our weather. The planning must have been an interesting stage. Was there a track diagram posted as I have only skimmed through it at the moment, (no pun here).
Absolutely brilliant. Well done.
Trevor
 

dunnyrail

DOGS, Garden Railways, Steam Trains, Jive Dancing,
Staff member
GSC Moderator
25 Oct 2009
26,164
4,989
75
St.Neots Cambridgeshire UK
Best answers
0
Country flag
Hi. I'd just like to add my compliments to the builders. It looks amazing. I was particularly interested in the fact that the mountain making method actually survives our weather. The planning must have been an interesting stage. Was there a track diagram posted as I have only skimmed through it at the moment, (no pun here).
Absolutely brilliant. Well done.
Trevor
The owner of the line had a rough idea of where track may or may not go! A slab was put down for two sheds and the interveneing space that would be where the line would go so only Shed sizes and locations defined that slab. Part of the slab behind the mountain was defined as a footpath for access to behind where Mountains would be built and access to maintain the hedge behind the path. The loop where the vid starts was started after all that and that had new foundations put in for the brickwork in front and slabs behind so all very much designed in the fly. The current layout is a sort of dogbone with a loop, one shed forms one return part with the garage forming the other part. Things will change from that temporary setup as things progress. From the big shed the line that heads towards the garage will have a line out to another terminus and a loop thus making the garage just a storage fiddle yard. From the other shed eventually a terminus (Boston Lodge) and low level fiddle yard will be created with lines heading to the front garden to form the other loop rather than it being in the shed. Though I call it the front Harden it is private so no worries of visibility to passing people. So this will be a large railway, but will take a year or three to reach fruition.
 

dunnyrail

DOGS, Garden Railways, Steam Trains, Jive Dancing,
Staff member
GSC Moderator
25 Oct 2009
26,164
4,989
75
St.Neots Cambridgeshire UK
Best answers
0
Country flag
I have recently had around 2.5 weeks at my friends line in Somerset. Not much of my involvement with the main line but Mike has altered the LgB 50610 bridge seen in earlier pictures so that the girders are cut down to sit below the bridge so as not to distract the view of the concrete viaduct behind. To do it the the top was bolted off then cut down and bolted back below. It is removable for maintenance of the pond unlike the concrete viaduct! I did a couple of cement repairs to the viaduct where the mounding was less than perfect at the base, Mike is painting with textured concrete paint I think he is mixing sand with grey masonry paint.
AB63052A-99F6-4FFA-96B5-290A2A68EECB.jpeg
I took my Piko 25 tonner with me, not much space in the Smart for anything bigger. Shown below with a Reptilian creature hauling a set of Pullmans. Pans down sadly due to errors on Tunnel hights.E5FCC17F-DD87-448A-8B76-72187C497277.jpeg
I had a happy hour or so shunting the high level station which is a tricky place to shunt as only 2 x 4 wheel wagons fit in the run round loop. In the pic above can be seen the 2 cement wagons and 2 ballast wagons that arrived in reverse order plus the 3 vans causing a brain pummeling set of shunting moves to get all as seen here. Great fun though. On running sessions in the future gravel will load from the sidings below to the Cement Works seen above, this will be a near complete circumnavigation of the complete line as existing.
5EAB221C-6D3E-4DA6-A926-9CF67DEB7280.jpeg
Much more work has been done to Boston Lodge see in that thread.
 
  • Like
Reactions: 1 users

dunnyrail

DOGS, Garden Railways, Steam Trains, Jive Dancing,
Staff member
GSC Moderator
25 Oct 2009
26,164
4,989
75
St.Neots Cambridgeshire UK
Best answers
0
Country flag
Jon, what is the green stuff next to the Krok’s track? Natural or artificial? Looks like something I could use…
That is Mind your own business,

Soleirolia soleirolii​

A small leafed plant often talked bout on here.
 

dunnyrail

DOGS, Garden Railways, Steam Trains, Jive Dancing,
Staff member
GSC Moderator
25 Oct 2009
26,164
4,989
75
St.Neots Cambridgeshire UK
Best answers
0
Country flag
I have just spent another couple of weeks in Somerset helping Mike with his project. During my absence lots gets done but there are jobs that do need 2 of us plus others that we can do on our own. Below you can just make out one of the 2 man jobs fitting the old garage panels in place on the 8 shaped blocks. Some more of this work was done to the area behind me in this pic but it appears I never took any pics. Though in the second pic you can see some of the 8’s that we concreted in to small foundations.
99ED87CA-BB95-421D-BF6D-5E09EE0A1B93.jpeg8627750A-153E-4860-8873-4583EB6CA691.jpeg
Oh I did take a pic after more of the old shed panels were laid. The new flaps have been created to access a line at the rear of the baseboard that will be in tunnel. Those slabs are b heavy and take some getting right, we support them at the back, put cement in then a couple of pieces of wood. Gently drop the panel on the wood the lower ontonthe concrete. If all goes well there is some pliability left in the concrete to get the panels level in all planes.
27498F93-DEA2-41D2-9465-964AA99AAF91.jpeg
Other work has seen me progressing the cement works gravel unloading point. The original was roughed up in wood by Like, I have covered it with old bean tin corrugated. Much ofvthis was well rusted so by my next visit the rust will be showing through.
1C3AACBA-4E30-4E05-A122-1F1F5EE9DBD2.jpeg
A couple of years back now Mike also roughed a cover for the unloading point that I have in part completed using plastic coated Foamboard, coffee stirrers and some bad language. The initial cutout was done wrong as when I tested it out for a Fuel Tank the tap cought the sides so I had to re-engineer the thing, cue bad language. 1067FA2B-7F65-43A4-90BA-123888F5FF72.jpeg


89A9FCBA-ADE6-4DCE-BAFB-AA063A0CDBA6.jpeg
Coffee stirrers have been used to bulk up the area that will have larger ones fitted for fake planks that sill just sit over the scribed stonework. The initial stirrers have been glued using UHU Power as was the main building which also has some strengthening pins pushed in at the corners. Further stirrers bulk up using external wood pva to glue them. The pegs are holding two bulking up pieces while they dry. This will all be in an attempt to match the Loading Point further down the line.
5900C2FF-33CA-4CD8-A02E-AF73656A6938.jpegD93E6AFC-7E0C-418D-BFED-D87FDD64E912.jpeg
Having run out of tins some were procured from a bin to create the curved roof line. The cardboard foamboard is to vreate the centre high bit. This was all sprayed grey but much of the paint has come off, hopefully by my next visit rust will have set in.
97AE78EB-36CB-4E67-A5D1-1E82811F129D.jpeg
 

Attachments

  • 83D7E63E-3A3D-4A54-A277-08328036498A.jpeg
    83D7E63E-3A3D-4A54-A277-08328036498A.jpeg
    865.5 KB · Views: 0
  • 9E1E9A44-E218-4E44-B38C-C09E7374CDF3.jpeg
    9E1E9A44-E218-4E44-B38C-C09E7374CDF3.jpeg
    881.1 KB · Views: 0
  • 0A3D5CD6-5B59-4B08-BF24-7FCC0B2A0FC2.jpeg
    0A3D5CD6-5B59-4B08-BF24-7FCC0B2A0FC2.jpeg
    705.6 KB · Views: 0
  • Like
Reactions: 1 user

dunnyrail

DOGS, Garden Railways, Steam Trains, Jive Dancing,
Staff member
GSC Moderator
25 Oct 2009
26,164
4,989
75
St.Neots Cambridgeshire UK
Best answers
0
Country flag
On my last visit there were some shots of projects underway last September. In the last 2 weeks some of these have been moved on somewhat, not quite as much as we would have liked but puffer train rides and some rain as ever slowed down progress.

So first Concrete Mountains.
Above where I showed the flaps to access the rear of the new mountains shows some basic form the new ones were to take.

First job is to get a frame of wood which then has Chicken Wire stapled on it to make the basic shape. Mikes good lady Maddy wanted to view the trains running through the tunnel so that had to be incorporated. Thus ‘peek a boo’ was created. Some hard structure had been created by MIke in my absence as a place to fit the Castle. As you can see the frame is nothing special using old bits of wood to create a frame, in effect if this rots away the cement with chicken wire should be self supporting though the wood life outside of the weather and not in damp will be very long. Not the spot for ‘peek a boo’ where the horizontal low framework is. The clean wood box at the front is to hide the water filter for the pond, this was suggested by me to be a Nuclear Hydro Power Station, however Maddie wanted a Swiss Hotel…..
IMG_7207.jpeg
IMG_7208.jpeg
Thus having fitted in the frame the chicken wire is fitted then old curtaining material stapled to the wood. This creates something to slop concrete onto, note some of the folds help with strata.
IMG_7214.jpeg
A mix of thin concrete around 3 sand to 1 cement with SBK bond (waterproof external PVA is also appropriate) plus some washing up liquid is brushed onto the concrete and allowed to dry overnight. it is beneficial to wet the material a little prior to the cement being painted on. The next day this is repeated but this time I like to slow down the drying by spraying with water and a little bit of washing up liquid
IMG_7216.jpeg
The final stage is much similar but with a slightly thicker mix now going onto near solid cement.

As can be seen below some steps have been created, these will be accessed from a door in a flat roof on a rear annex to the hotel. Stairs were created by using some roofing soffit leftover to create the lower first part. This then had the second part added with a gradient for the stairs, timber inside with plastic to stop the cement adhering created a mould. The steps were just made by pressing wood into the dry strong mix similar to the base mountain mix. Steps worked out better than I even dared believe they would.
IMG_7223.jpeg
The hotel has had some Plastic Coated Foamboard cut and will be detailed up on my next visit. For the rood a couple of roof tiles were deamed to be appropriate, they will be cut to shape and size eventually.
IMG_7224.jpeg
Ply tunnel ends were cut out with postcrete added initially as it is easier to chuck it to the wood when wet with the surface being vertical. Odd rocks from some house changes nearby have been used to create detail on the lead to the tunnel.
IMG_7227.jpeg
Peek a boo is seen here after the final concrete now with some black concrete dye added to give colour detail. This time Maddy wanted Grey Mountains rather than the Pinker ones the other side, thus ‘Yellow’ sand has been used here.IMG_7226.jpeg
Personally after fitting I wish I had shaped the mountain in with the hoke being an avalanche shelter, but too late now for that!
 

Attachments

  • IMG_7215.jpeg
    IMG_7215.jpeg
    614 KB · Views: 0
  • IMG_7217.jpeg
    IMG_7217.jpeg
    789.5 KB · Views: 0
Last edited: