Shortened Annie yard switcher

GrantMundy

Registered
Country flag
After looking for a USRA 0-6-0 and not having much luck and then not having much interest in the PIKO 0-6-0 tender loco I decided that my first kit bash attempt could be with a Bachman 4-6-0 (have a few and quite a few pieces of them sitting around spare!)
I had a new complete chassis sitting around, so I thought I would start with that to get the fundamental mechanics correctC4DD7200-11B1-44D6-B18D-4DBD23A65075.jpeg
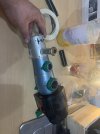
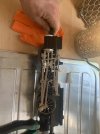
Stripped the chassis to bare plastics and re-tapped the connecting rod link studs with an M3 tap to ensure there was thread all the way though5532ED3E-A5B7-4016-8392-140FFDCB5FBB.jpeg
After this I measured and cut the lugs from the center wheels down to the length of the front and rear drive wheels on the loco, the section I removed I fitted onto the rear drive wheels with 2 small shin washers to compensate for the cut from the dremel8E3073D6-D56E-44B2-B017-11BC7A715265.jpeg48EB0CCA-FF02-4461-A8E2-4FB2CAD58E1D.jpeg

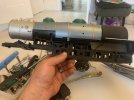
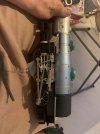
The next challenge was the original valve gear from the old chassis. I wanted to incorporate all of that back into the model. admittedly this was a challenge, as the positioning of the valve gear had to be near as identical to the original as possible. It started with a lot of trimming to get the valve gear roughly in the right place. Which was achieved roughly to give a good guide332C133D-92F2-49E7-877E-47A91A682385.jpeg
Once I had a rough idea I started by cutting the top and front area off of the original chassis. This then let me mount the valve gear properly and let me mount the piston assemblies onto the front of the chassis

4E48F1BC-C318-4D45-93D6-AAEF0B621DAD.jpeg
It was a tight squeeze with the original valve gear, so some internal trimming was required! I had to trim the inside of the pistons to get clearance for the drive rods. Wasn’t ideal however I was going for a certain look.3BA999AC-C48D-45F1-BA29-AF893EED29C1.jpeg

i also had to trim the bracketey off the valve guides however i don’t believe that it will affect the strength once it is finished and re braced though.

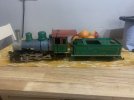
Once valve gear was fitted, I trimmed the front of the chassis off and started cutting the body. I cut it at the start of the parallel top line of the boiler. Once trimmed it took out one of the domes, which I will reincorporate later. I finished off with a bit more trimming of the front and by gluing the two body half's together. Think it’s not a bad first day. I’ve got a picture next to another Bachman big hauler to compare lengths.

013995EA-C0D2-4ED6-AAF5-119387688F00.jpeg4E23E914-FD45-4665-9999-FD4BD6C6386D.jpeg3CE0CF24-FC87-4F15-8BD0-CA0D3114FAC2.jpeg
Be gentle, it’s my first attempt at a kit bash!
 

Attachments

  • 4F7E7FE4-94BC-4C6F-8821-275AE76F0687.jpeg
    4F7E7FE4-94BC-4C6F-8821-275AE76F0687.jpeg
    312.5 KB · Views: 0
  • CE05F727-80BF-401B-AF37-7C02A663FC6C.jpeg
    CE05F727-80BF-401B-AF37-7C02A663FC6C.jpeg
    266.3 KB · Views: 0
  • 092D887B-61D2-4BA3-9064-EACA316B6896.jpeg
    092D887B-61D2-4BA3-9064-EACA316B6896.jpeg
    242.8 KB · Views: 0
This is great! I also have a few of the Annies lying around and have thought about converting one to an 0-6-0 or a 2-6-0 Irish Outline. Your conversion seems to have worked very well and your pictures clearly show the process and results. Thanks for taking the time to post!
 
This is great! I also have a few of the Annies lying around and have thought about converting one to an 0-6-0 or a 2-6-0 Irish Outline. Your conversion seems to have worked very well and your pictures clearly show the process and results. Thanks for taking the time to post!

Thanks very much! I was itching to do more, however time escaped me today, the idea is to use solely the Annie to eliminate sourcing any other parts, apart from some styrene sheeting which I will use when modifying the tender. Annoyingly it's not as perfect as I wanted. I have this rule when converting/ modifying anything that it must look 'factory', so that is the challenge I am facing. Hopefully I will get some more done tomorrow!
 
Excellent bash,watching this one with interest,I have thought of a 2 8 0 but just never got around to it,,,,,,,,yet.;)
 
Very nice first attempt, your work on the wheels and valve gear was inspired. As for the look, perhaps a shorter Cab may work better then the firebox could be reduced. That with a shortening of the smokebox will allow a slightly longer boiler thus giving a more balanced look to your bash. Good luck if you choose to go further. Oh I guess you are making this a tender locomotive using the original one? If so that would benefit from a little shortening as well. Best not to cut in the middle but perhaps at the rear so that you can better disguise where the tank has been cut with a small plasticard up strip with pins as rivets.
 
Very nice first attempt, your work on the wheels and valve gear was inspired. As for the look, perhaps a shorter Cab may work better then the firebox could be reduced. That with a shortening of the smokebox will allow a slightly longer boiler thus giving a more balanced look to your bash. Good luck if you choose to go further. Oh I guess you are making this a tender locomotive using the original one? If so that would benefit from a little shortening as well. Best not to cut in the middle but perhaps at the rear so that you can better disguise where the tank has been cut with a small plasticard up strip with pins as rivets.

thanks for the input. I agree with possibly shortening the cab. And yes, I was going to shorten and alter the tender but from the front end. I don’t think the front radius’s will work with my idea. Think I’m going to proportionally shorten the tender in relation to the Loco. That’s the plan maybe this evening!
 
Look great! I've done a similar 'bash, converted an Annie to a 2-6-0.

15597359566036305409805012085016.png

details here:

Scot
 
Look great! I've done a similar 'bash, converted an Annie to a 2-6-0.

View attachment 268238

details here:

Scot
The Annie chassis is very versatile , reasonably priced and capable of much modification
Here is a GWR prairie I recently produced following buying a part built gauge 3 body at a show
The running gear Was produced from an Annie
Not too much to do other than chop away a lot of plastic
Re site the cylinder block, re shape it and then shorten the connecting rod whilst at the same time re shaping the big end!
The same process could be applied to produce an 0-6-0 as long as you drive the centre wheel/axle etc
I ve toyed with chopping around an Annie with outside valve gear but not yet taken the tools to it!!5C41D115-C22C-443E-BA57-A918AECD19F7.jpeg8B0217BA-65AE-463E-97FC-3E7B1A909029.jpeg8B0217BA-65AE-463E-97FC-3E7B1A909029.jpeg2AE352B7-5D4D-40E9-BCD4-CA7E5A2D86C3.jpeg
 
Yes I used an Annie, well a big hauler for this. Very versatile chassis when you use a little lateral thinking and are happy to cut it. Been seen on here before but I hope quite relevant for this thread as a mini hi-jack.
D317314F-B06F-467C-80EF-6C08CC364E8F.jpeg
 
Thank you all for the inputs thus far. As you will see below they were duly noted!

i agree’d with dunnyrail and decided that shortening the cab and elongating the boiler would be a wise step. I must say I was pleased with the outcome.

i wanted to get the second dome in, so I cut the joint from the previous day and trimmed the removed section to stretch the boiler and to incorporate the dome
C80C0DE5-E94F-4D2B-85E0-04FB80A0D01B.jpeg
I then started with the cab, I had a spare Pacific/ mikado cab laying around, however I felt the proportions wouldn’t lend themselves aesthetically. So back to the dremel!
DD6451A5-F607-47AC-8BD6-B4C963B450DD.jpeg
i gauged that a masking tapes width looked like a sensible reduction in cab width. The final cut was not made there, but was made between the windows to extend the front opening.

once reattached i had more of a rear overhang which I did like, so I trimmed the rear bracketey from underneath the cab and repositioned it further forward, so the body would sit correctly on the frameECF158CE-5423-40EC-944C-6BB6E99364BF.jpeg

I think the end results were quite satisfying!

A725D402-940F-4595-BE76-C97328E1ABE6.jpeg
I then added a few of the larger details to gauge the completed look

0775CC92-AF37-46C9-A2AB-26B0F1FAFBF5.jpeg

Hopefully some more progress tomorrow.
 

Attachments

  • 0D713251-F413-4059-B318-4DF0222471DC.jpeg
    0D713251-F413-4059-B318-4DF0222471DC.jpeg
    211.1 KB · Views: 0
Thank you all for the inputs thus far. As you will see below they were duly noted!

i agree’d with dunnyrail and decided that shortening the cab and elongating the boiler would be a wise step. I must say I was pleased with the outcome.

i wanted to get the second dome in, so I cut the joint from the previous day and trimmed the removed section to stretch the boiler and to incorporate the dome
View attachment 268278
I then started with the cab, I had a spare Pacific/ mikado cab laying around, however I felt the proportions wouldn’t lend themselves aesthetically. So back to the dremel!
View attachment 268280
i gauged that a masking tapes width looked like a sensible reduction in cab width. The final cut was not made there, but was made between the windows to extend the front opening.

once reattached i had more of a rear overhang which I did like, so I trimmed the rear bracketey from underneath the cab and repositioned it further forward, so the body would sit correctly on the frameView attachment 268281

I think the end results were quite satisfying!

View attachment 268283
I then added a few of the larger details to gauge the completed look

View attachment 268282

Hopefully some more progress tomorrow.
Brill definitely looking the part now, just a little off the smokebox and perhaps the pilot as well should balance the overhang between the front and rear of the drivers. Great at giving you more work me is!
 
some more modifications carried out on the body again this evening after dunnyrails advice. Seems to have improved the model
more so.

68DABB5C-745A-43AB-95DF-7315F538DEC0.jpeg
out came the masking tape trick again! Spacing works out really wellusing a roll of it.

trimmed the front of the frame aswell. Needless to say I think the look is just right now!30EED9FC-F0C6-4CF2-BE9C-65DB6C577735.jpeg

as im now confident it looks right. I finished off by bonding all the body sections together properly. So it will be a case of sanding and painting the main shell now.


see what I can get done with the tender tomorrow. Time permitting!
38BED24D-D0FC-4894-97AC-2839E776ADC3.jpeg
 
Last edited:
some more modifications carried out on the body again this evening after dunnyrails advice. Seems to have improved the model
more so.

View attachment 268337
out came the masking tape trick again! Spacing works out really wellusing a roll of it.

trimmed the front of the frame aswell. Needless to say I think the look is just right now!View attachment 268338

as im now confident it looks right. I finished off by bonding all the body sections together properly. So it will be a case of sanding and painting the main shell now.


see what I can get done with the tender tomorrow. Time permitting!
View attachment 268339
Superb a great job and what a well balanced little loco you have created, looking forwards to seeing the full job. 10/10.
 
some more modifications carried out on the body again this evening after dunnyrails advice. Seems to have improved the model
more so.

View attachment 268337
out came the masking tape trick again! Spacing works out really wellusing a roll of it.

trimmed the front of the frame aswell. Needless to say I think the look is just right now!View attachment 268338

as im now confident it looks right. I finished off by bonding all the body sections together properly. So it will be a case of sanding and painting the main shell now.


see what I can get done with the tender tomorrow. Time permitting!
View attachment 268339
Would this help in terms of a tender?
It’s from an Aristocraft 2-4-2ST ?
I’ve no use for the body
The chassis lives on under the tender for my Indian railways YP pacific
Chris5B1D6BFC-448E-43FF-BC2E-97D23A8BA7A9.jpegDA03F173-6308-47A6-BFF0-5209C8F04764.jpegED98EBC0-9364-4EBF-9699-FEFB7C07335F.jpeg
 
Another evening of cutting and the starts of a smaller tender.

I spent hours searching through variations of tenders behind US 0-6-0’s, I toyed with all sorts and even considered the LGB 2-4-0 tender, I. The end I went with what I had!
6359F5F9-0B06-496A-9B27-06A6A55F385A.jpeg
Quick trim off along the top, as I think I’m going to step it in for the new coal bunker

DA795944-DA9A-44C4-9694-26559EB6A744.jpeg
However shortened in the center I still felt it may look a bit dispaportionate. So I trimmed the base down front and back
63C50C5E-C276-4EF6-919A-5076F62DCD50.jpeg
Ignore the coal!

think after that it’s ended up quite a decent length.
F9F35596-5A2F-4646-A1EE-78D67D14A5D4.jpeg
hopefully try and make up the coal bunker sides and top this evening
 

Attachments

  • F36C9B6D-3EF3-474C-9E51-8C3BEA4BD27D.jpeg
    F36C9B6D-3EF3-474C-9E51-8C3BEA4BD27D.jpeg
    358.7 KB · Views: 0
  • 5ACE706F-CAB2-45FF-A5AA-BC853907D26E.jpeg
    5ACE706F-CAB2-45FF-A5AA-BC853907D26E.jpeg
    405 KB · Views: 0
Back
Top Bottom