(RhB) Schienenschleifwagen - Rail Grinder (Building and Upgrading a Kit)

Parkdesigner

Registered
25 Oct 2009
143
164
Los Angeles, CA / Derbyshire, UK / Frankfurt, DE
Best answers
0
Country flag
Well, as I finish up the FO/MGB Tm 2/2, it’s time to start the next build! (Actually, the “next build” started last weekend!)

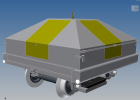
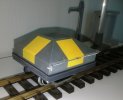
So the next item on the docket, a small model of the RhB’s “Schienenschleifwagen” - their towed, non powered Rail Grinder. Very little about the prototype exists. Nevertheless, master modeler (and forum member) Torgrim produced a fabulous 3D printed kit for the model. You can find it here: RhB Schienenschleifwagen by TLoco on Shapeways


What’s really clever is that the model is designed to house the standard LGB “Track Cleaner” unit - so while the prototype reprofiles the railhead, this model cleans it! As soon as it was offered for sale, I purchased a kit - then promptly lost it in the impending house move. It finally turned up while working this spring on the Tm 2/2 and so I sat it aside to start next.

This past weekend I started to look for reference on the prototype. Sadly, no much exists!

Schweers + Wall have only one small bit, that offers these photos:


After hours of hunting through german rail photo sites, I turned up this shot from 2016:


Interestingly the above photo shows the unit in a road trailer, rather than on a rail wagon. Schweers + Wall indicated that the unit was more or less assigned to a Xe 2/2, but this leads me to believe it may be more of a “as needed, where needed” piece of equipment.

My thoughts then tuned to other modelers’ builds. Frustratingly, it appears Torgrim himself was the only person to attempt building this model - and he apparently stopped somewhere before finishing / detailing.


So, with only the above to guide my build, this is going to be a bit tough. I did go have a dig for other meter gauge Swiss Schienenschleif unit photos on the internet.
I turned up these two - which appears to be a similar, small non-powered “tow” unit. I’ll base some of the under carriage on what I can make out here:


So, here we go… time to build!
 
  • Like
Reactions: 1 user

PhilP

G Scale, 7/8th's, Electronics
5 Jun 2013
33,567
3,521
Nottingham
Best answers
0
Country flag
If you can work out how to create the sparks, I will be very impressed! ;)
 

Loco

Registered
24 Oct 2009
669
17
Vestfold
Best answers
0
Country flag
The model has not yet been finished by me, but it is in a state where I can show you how to assemble the parts required for the build. Basically what's left is finishing painting and making the lead weights. I will get back to you on Thursday this week with the information required to build it. Sometimes life just takes a left turn when it should go right, so things don't work out as planned...

The unit will actually fit inside a flat car (or high side car), just like the prototype. I couldn't find much information apart from the pictures in the Schweers + Wall at the time the 3D-model was made, and with the adaptations required to use standard LGB parts the model is not a 100% true representation of the prototype.
 

PaulRhB

This Way Up
24 Oct 2009
8,855
408
Wilts Drifting toward the RhB,plate tectonics rock
Best answers
0
Country flag
If you can work out how to create the sparks, I will be very impressed! ;)
One of those wheels from the kids sparking guns :)
Multiple flashing superbright leds underneath might have to do though ;)
 

Parkdesigner

Registered
25 Oct 2009
143
164
Los Angeles, CA / Derbyshire, UK / Frankfurt, DE
Best answers
0
Country flag
PhilP - Honestly, I tired. I looked at a few of the those toy guns that shoot sparks - and some the wind-up walking Godzilla toys that function the same way. Ultimately - while I think I might be able to make something work, I decided it was better left alone.

PaulRhB - I'm thinking some LEDs will be the way forward... looking at mixing a welding LED and some "firebox flicker" lights, powered by battery within the car shell. However, I'll save that bit until the car itself is built.

Loco - Great to see you! I appreciate the offer. Yes please, any advice you have is always welcome. I may actually be a few steps ahead, but if not for my build, I’m sure others out there will find it useful!


Speaking of the build, here we go!

Step one, was gathering all the parts (or at least, all the parts I could find). On Torgrim’s Shapeways page, you’ll see a list of extra parts you’ll need to source for the kit. Things like wheels, bearings, brass rod, etc. For my build, the Aeronaut was impossible to find. Either here in the states, in the UK, or in Germany. Nevertheless, I’ve got a solution sorted for the railings, so I continued on without that item.

Once gathered, I laid everything out to survey the scene:


In addition to the large two piece body of the car, there is the smaller set of detail parts that come from Shapeways as well.


Step one was cleaning and sanding the 3D body and axle supports. After I throughly coated the kitchen table in dust, I set off outside to start the first rounds of primer.


While that dried, I turned my attention to the LGB 50050 Track Cleaner. When in development, Torgrim had indicated that extreme edges of the cleaning pads would need to be trimmed, which I ham-handedly did with an Atlas track saw and an Xacto blade.


With the first round of primer done, I brought the shell back inside and wanted to see a test fit! I attached the track cleaner, S-Kuplix coupler, and the axle supports:


Then I added the LGB wheels to see the thing together:


So far, so good!

For this next bit there are no photos (probably for the best), but my plan was to sand, paint, sand, paint, etc... until I had a nice smooth finish, just like the one in Torgrim’s photo. Trouble, is, no matter what I tired, I could not get the finish smooth. I switched up the grit on the sand paper, I tried different primers and paints. Nothing worked. Over and over, it just kept coming out with the 3D printer striations showing through… so, in a fit of desperation, I cheated.

I dragged out my box of styrene sheets, the Xacto knife, and decided if I couldn’t get it to look right, I’d just cover the sucker up!


And job done!

The next item I tackled was the undercarriage / frame. Torgrim’s model is a bit basic in these regards, not least of which because he had to make it fit both the track cleaning unit, and the available wheel sets. (This is not a complaint in the slightest!) That said, I thought I’d take some inspiration from the other rail grinder reference I could find, and so I started to hack together a few bits of “frame” to go underneath:


The following challenge were the wheels themselves. The bearings specified in the parts list, for whatever reason, would not fit my LGB axles. Assuming this was likely a failure of the cheap as chips bearings I ordered from China, I ordered a second, more costly batch thinking this would correct whatever QC issue I had. Well, not exactly. The next batch of bearings arrived in the post, and the same issue as before persisted. This then had me start thinking about LGB’s QC! So, as a test, I ordered some no-name wheels off ebay. Plastic was all I could find in the smaller diameter that I needed for this model, but given the car will be as much a “load” as it will be running, I figured this would be ok.

The new plastic wheels arrived, and thankfully the bearings fit these axles without issue… so, with that hurdle cleared, onwards!


After this, I attacked some of the detail pieces from the Shapeways kit. Given the limited photos of the prototype, it was a bit hard to determine where all the handles and bits were supposed to go. Ultimately, I decided that I would add “handles” to either side of the model, and then fashion some “hinge” like details for the front and rear. (Not sure this is how the model works in real life, but at least in my head, I could reason out this solution as functional.)

I began by trimming details from the sprue:


And once done, I reorganized everything to see where I stood.


Next up - a few more details to fabricate/modify, and then back out to paint!
 
  • Like
Reactions: 1 user

Parkdesigner

Registered
25 Oct 2009
143
164
Los Angeles, CA / Derbyshire, UK / Frankfurt, DE
Best answers
0
Country flag
And continuing the adventure...

A few more added details were on the to-do list. Cutting an LGB car end cable (a spare from an FO loco I believe) was the first task. I then drilled out the "valve" end. (I have no proof that this exists on the real car, but I liked the asymmetry it brings to the end of the car frame.)


I dug around in the spares box and found an old air tank. A little clean up and I figured this would give just a hint of form and purpose to the underside of the car.


Finally, another LGB detail chopped up to provide a junction box that I thought would help break-up the underframe’s lines.


With everything collected or modified, I started to tape things down to go back outside for primer and paint!


And outside they went - for a glorious Sunday afternoon of paint!


Inside again to flip and retape...


And after another round of paint, back indoors all the parts came.


I let them sit over night and then once the "tackiness" had subsided, I pulled everything apart and took stock of how things currently sat.
Obviously, painting the styrene surface of the car body, rather than the 3D printed surface has worked out as I had hoped. A clean, crisp finish... much like the drink I had to celebrate the weekend's efforts!


Stay tuned - next up is assembly, adding weights to the car body, and adding the yellow paint portions to the upper body!
 
  • Like
Reactions: 1 user

Paul M

Registered
25 Oct 2016
11,881
1,696
60
Royston
Best answers
0
Country flag
If you can work out how to create the sparks, I will be very impressed! ;)
Easy, just dare to disagreek with the missus
 

PhilP

G Scale, 7/8th's, Electronics
5 Jun 2013
33,567
3,521
Nottingham
Best answers
0
Country flag
Now, 'somewhere' I have some fibre-optic 'floss'.. - Very fine floppy plastics fibre-optic 'stuff'.

It is really floppy, but pretty poor at light transmission. - Light spills all along the 'fibre'.
If I can find it, I reckon in 'working mode' it would flop about, and give an effect of 'sparks'??? :think::think::think:

Only problem, I have not seen it for a few years??????????????????????????????
It is probably in the loft.. Somewhere... Or in the garage.... or ..... :(
 

Parkdesigner

Registered
25 Oct 2009
143
164
Los Angeles, CA / Derbyshire, UK / Frankfurt, DE
Best answers
0
Country flag
Marching forwards…


Step one was getting the axle supports reinstalled. Once in place, the substrate for the extra styrene “frame” I fabricated was glued into place between the supports.


After the glue (CA) dried, I then unfastened the supports to see how sturdy the assembly was. As you might imagine - the cross beam felt rather delicate. So out came the box of styrene, and a second set of braces - these a bit “beefier” than the first ones - were cut to fit in behind the axle supports.


Satisfied with the dual supports, I then glued those into place (using the test fit as a jig), and once the glue was initially set, left them clamped to set and dry.


After everything was nice and dry, all parts were taped again and sent outside for a coat of Testors Spray Dullcote - 1260.


(BTW - now is probably a good time to point out that for primer, on all grey parts I used “The Army Painter” Spray Primer - Wolf Grey and then finished them in Testors Spray Enamel - Semi-Gloss Grey 1237. All black items are sprayed with “The Army Painter” Spray Base Primer - Matt Black and then simply sealed.)


A few hours in the sun, and everything comes back in!

First up, I used my pin vice to drill a hole on the car’s end frame to install the small hose valve.


I then tackled the wheel assembly. Due to the clearance of the LGB Track Cleaner pads and the axle supports, I assembled the wheels and supports together, detached from the car. The bearings were glued into the supports, and then the axles where pushed into the bearings.


While the glue on the wheel assembly set, I remounted the Track Cleaner to the car’s chassis. This is simply a pair of screws that are included in LGB 50050 kit screwed into the 3D printed body.

Once attached, I turned the chassis over, and installed (glued) the small air tank into a suitable position. In this case, I felt along the rear frame made sense.


Now, while inverted, I also installed the wheels, supports, and side frames.


Next up was the process of adding weight to the model. As it stands, the springs in the track cleaner pads are so strong, that they push the car up and off the rails as the car isn’t heavy enough to compress the pads against the rail. A trip to the local hobby shop found a package of A-Line steel weights with self adhesive backs. While intended for HO / 00 cars, I figured this would be fine.

I stuck and stacked the weights into the chassis, trying to equally distribute them over the two axles. The entire package is just enough weight to get the wheels to contact the rail head. (I’ve already ordered a second set of weights to add to the model later.)


And that's it for this round!
When I pick this back up, it will be time to mask and add detail paint to the car body, and begin the final assembly... Stay tuned!
 
  • Like
Reactions: 1 user

dunnyrail

DOGS, Garden Railways, Steam Trains, Jive Dancing,
Staff member
GSC Moderator
25 Oct 2009
26,174
4,993
75
St.Neots Cambridgeshire UK
Best answers
0
Country flag
When I first saw the pictures of this kit I wondered what you were going to convert out of a Single Socket / Light fitting! Food for thought if you need another one?
 

wandgrudd

Registered
24 Oct 2009
442
57
....
Best answers
0
Country flag
When I first saw the pictures of this kit I wondered what you were going to convert out of a Single Socket / Light fitting! Food for thought if you need another one?
glad i'm not the only one.
 

Loco

Registered
24 Oct 2009
669
17
Vestfold
Best answers
0
Country flag
Very nice build and I really like the details you have added. You definately don't need any assistance to complete the build.

As for the set with details from Shapeways, I've attached a couple of pictures to show how I interpreted the pictures as good as I could from the Schweers + Wall book. The two discs on the under carriage I believe could be reflectors. The other ones most likely are latches in order to get access to the internals of the unit. The screen wiper is not for this build :), but for another scratch build.

A few other comments:
- LGB wheel set axle diameter will have to be reduced if that set is to be used, I sanded them down to about 3 mm in order to get the bearings to fit. The issue is that I couldn't find ball bearings with about 3.2 mm diameter.
- Sanding the WSF material from Shapeways requires a lot of elbow grease. I start with K80 to K100 and move to finer sand paper. I always use water (wet sand), and apply primer after a two or three rounds with heavy sanding. Then I continue wet sanding, priming, wet sanding, priming until I am satisfied.
- Weights: I've tried about 600 grams (0,6 kg) of lead weight which seems sufficient - but I have not tried less. The 600 grams weight is for an engine but has the wrong dimensions for this unit. How much is the weight of the steel pieces in your picture?

As for my build, the paint job is under par and I will have to redo the whole thing.
 

Attachments

  • Details.png
    Details.png
    121.4 KB · Views: 0
  • IMG_20190725_194503.jpg
    IMG_20190725_194503.jpg
    113.7 KB · Views: 0
  • Like
Reactions: 1 user

Dan

Registered
28 Jan 2010
656
52
Eastern MA, USA
Best answers
0
Country flag
I get scared when someone says rail grinding. I prefer rail cleaning/polishing for no damage to occur.
 

Parkdesigner

Registered
25 Oct 2009
143
164
Los Angeles, CA / Derbyshire, UK / Frankfurt, DE
Best answers
0
Country flag
Hi Loco!

Thanks for that - but it's all down to your kit - it's a great little project. :)

I am glad to know the wiper is not for this (I did have a couple of checks, just to make sure I hand't missed some insane windscreen wiper on this thing!! Ha!)
Also really happy to hear that you sanded down the axles. That explains the mystery!

Once I get "enough" weight into the car, I'l be sure to report back here what seems to be working quantity wise.


Speaking of the car, here's the next round in the build...


With some sun shining, I grabbed the mask tape and started to prep the body shell to mask out the yellow panels of the car.


And then out for paint. For this round, I used “The Army Painter” Spray Primer - Desert Yellow.


And then back inside to remove the first round of mask, and prep for the other two sides.


After the car body went back outside for the second round of yellow paint, I turned my attention to the some of the smaller details. The reflectors (at least that's what Loco thinks they are and I agree) appear to be small, round white disks on the car's rear-end corners. I trimmed the Shapeways parts from the sprue, and then painted each with Testors Enamel Paint - White.


Now, time for a little kit-bashing... in looking at the photos available for the car, I decided I wanted to add a little more "mechanism" to the car side latches. Something that might appear as a hinge or hasp. I had a dig around in my parts box and came up with a package of Grandt Line parts for an O scale stock car. I thought pieces of these would make a good addition, so I trimmed and sanded them, and then took them out to hit them with some paint.


As the afternoon sun crept up, I gave everything a blast of Testors Spray Dullcote - 1260.


And as those dried, I installed the car-end reflectors on the grinder chassis.


Next up, I'll begin to assemble the whole thing... and will start my "punch list" for completion. Stay tuned!
 

Parkdesigner

Registered
25 Oct 2009
143
164
Los Angeles, CA / Derbyshire, UK / Frankfurt, DE
Best answers
0
Country flag
So a little update. I took the various pieces and parts and assembled the model as it currently stands.

I've attached the handles and the bashed "hinges." Basically everything I have is attached. I think it looks pretty good already, but obviously there are still things to do. (Lifting ring, reflective circles on the angled sides, likely more "hinges" - I'll detail it all out in my punch list.)

Have a look:


I think the little car will make a nice end to a short engineering train... placing it with an Fd hopper and towed by something like my Tm 2/2 Schoema looks about right.


I'll update the thread with some more thoughts and a punch list later this week. Thanks everybody!
 
Last edited:
  • Like
Reactions: 1 user

Parkdesigner

Registered
25 Oct 2009
143
164
Los Angeles, CA / Derbyshire, UK / Frankfurt, DE
Best answers
0
Country flag
I'll update the thread with some more thoughts and a punch list later this week.


Well... whoo boy.

I'm afraid "later this week" got away from me! Three trips to China, one to Japan, and one to the UK sort of derailed my focus after the last update, and I admit I completely forgot I owed this thread an update! (Only thanks to a prompt in another post from PhilP was I reminded!)

So, five days or five months, who's counting, eh? Let's get on with it!

As I last left the car, I was closing in on completion. Handrails were the biggest thing I still had to sort. As mentioned at the end of the 24 Jul update, I had ordered additional weight to help with the car's tracking. Those arrived by post in late August, and I set back off on the build as time permitted between travels.

The weights to be used.


The question was really "how much" more weight should I add? The answer would be "everything you can cram in there!"


If I could have added additional weight, I would have. The car tracks well now... but it would benefit from more. Unfortunately, this also precluded any further exploration of adding a lighting effect or even the ambitious "sparking" effect to the car. (I did order a couple of the sparking wind-up toys... but was not sure I'd be able to control them, even if I could have found room for them onboard.)


Next up was fabricating the side rails. Torgrim's instructions list a series of small eyebolts to use as railing mounts in conjunction with some brass rod. Unfortunately, I dug and dug on the tinterwebs, ebay, and even in multiple German hobby shops, and came up empty on the eyebolts. So, I had a rummage in the greebles box and came up with 6 small hinges (halves) from Bachmann's 1:20.3 frameless tank car spares bag. I took one down to the LHS and tested bits of Evergreen styrene rod until I found the appropriate diameter and picked up a package.

With parts sorted, I trimmed the rod to length and attached the mounts.


I glued the bits and set them aside to dry. The diameter of the railing may be larger than prototypical, but not so much so I think it will be distracting.


As mentioned earlier, I also wanted to add a bit more "latch detail" to the sides of the grinder. I again used On3 D&RGW car details for this.


Prep of all pieces for primer and paint.


And then the paint itself. Again I turned to "The Army Painter” Spray Primer - Wolf Grey for the color application, and then sealed them with Testors Spray Dullcote - 1260.


Once dried, the latch details were added to the car ends and the railings were fixed to either side.


As a ramdom extra detail, I noticed during a test fit that the car felt slightly "empty" underneath. Earlier I had added a spare LGB detail of a conduit and junction box below, but wanted more. Looking for an asymmetrical option to break up the model, I chose to place a small cable extending down to one of the pads ("grinder heads"). I'm not sure what this would be - control perhaps? pneumatics? - but in studying various rail grinders I found similar cables and felt this would help "bulk out" the model.


And with that... time to button up the car body and assemble the last bits. Just four screws to go...


So that brings us to current! There is still a small punch list to finish out. This includes:
  • Add the lifting ring to the top
  • Add the three small reflective rings to the car's angled sides (two on the sides and one to the rear)
  • Add latch detail/hatch to the rear car side
  • Various additional underside control details

And there you have it. The car could be considered done now... though at a minimum I'd like to cover off the first two items when I have a bit of spare modeling time this holiday. (I'll have to be quick - first trip overseas of 2020 is now set for 5 Jan!)

If I never touched it again however, I think she still looks quite good.
I'd expect it would make some other modeler very happy to find it at my estate sale! :rofl:


Cheers everyone!
Josh
 
  • Like
Reactions: 1 users

PhilP

G Scale, 7/8th's, Electronics
5 Jun 2013
33,567
3,521
Nottingham
Best answers
0
Country flag
Thank you for the update. :):clap: