Reverse loop using R1 curves and point

Portsladepete

Registered
2 Jun 2020
211
19
69
England
Best answers
0
Country flag
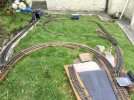
I am planning for next year!! I want to have a reverse loop using only R1 curves and short radius points, due to lack of space mainly. My plan is to have the point on the end of the right hand siding, with the loop either in the space between the far left siding on the grass, or alternatively in the space where you can see a broom handle (hopefully), I can’t work out how many curves I would need, or how they would match up to the point, (assume left hand).
I downloaded Anyrail, to my laptop, which decided to throw a wobbly, yesterday, so now only have iPad,so can’t use any track planning software, so am asking if any kind soul could advise.
 

Attachments

  • CA3793A5-8ABB-411C-A1E2-2F4CE54AC040.jpeg
    CA3793A5-8ABB-411C-A1E2-2F4CE54AC040.jpeg
    1.2 MB · Views: 0

korm kormsen

Registered
24 Oct 2009
2,765
296
Country
Paraguay
Best answers
0
Country flag
eleven R1 and three straights. (for the shortest version) lefthand point, 2 R1 left, 9 R1 right, 3 straight, back into point.
or nine R1 but then seven or eight straights. lefthand point, 1 R1, 2 straight, 8 R1, 5 or 6 straight, back to point.
 
Last edited:

Gavin Sowry

Garden Railroader and Raconteur
27 Oct 2009
7,841
2,490
70
Hutt Valley, NZ
Best answers
0
Country flag
The neat thing about LGB geometry, is its consistency, and logic.
The curved road of an R1 is exactly the same shape as an R1 curve, and they both curve 30°. 3xR1, and you have turned 90°. 6xR1 and that's 180°. There are 360° in a circle, 12 R1s...starting to get the picture.
You'll need 3 straight. Assume, for this exercise, that the point is running South to North. LH R1, and you have turned 30°, add two R1 curves (left), and you have gone 90°, and are 600mm North of your start, and offset to the left by 600mm. Now, add six R1 to the right (half a circle) and you are still offset by 600mm, but now another 1200mm north of the start. Add the final 3 R1s, and that brings you back to dead straight south-north (in line with the turnout) and 1200mm from the 'start'. That's 4 x standard straight, but you already have 300mm in the straight track of the turnout, so you only need 3 straights to join up. If you want to use track power, then you need some insulated joints.
 
Last edited:

Portsladepete

Registered
2 Jun 2020
211
19
69
England
Best answers
0
Country flag
Thanks to you both, my brain doesn’t allow such clarity:wasntme:! Would these take up much more than the 4 feet diameter of a standard r1 circle? I can start the loop earlier if need be, the right hand siding is made up of two large diameter Aristocraft curves, I think 10ft diameter, I’ve had them for about 20 years and have forgotten what they actually are. Very grateful for your time.
 

SevenOfDiamonds

Registered
3 Jan 2010
497
109
Best answers
0
Country flag
We like pictures here!

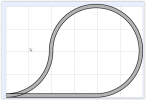
(Edit: original version was on a 300x300mm grid. Now placed on a "one foot" grid, which might be more helpful)

1596181530993.png

All the best

David
 
Last edited:

dunnyrail

DOGS, Garden Railways, Steam Trains, Jive Dancing,
Staff member
GSC Moderator
25 Oct 2009
26,163
4,989
75
St.Neots Cambridgeshire UK
Best answers
0
Country flag
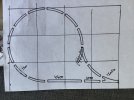
So here is another one just created from the LGB Track Planning Template, no clever computer stuff round here. Only thing I am not sure about is the grid squares, according to the template they are a Metre I do not believe that the squares are a that big more like 18inches.
E8B47680-87AC-415F-90DA-6F902FA1BD7F.jpeg
 

ebay mike

Retired, but still hoarding. (GOF)
6 Dec 2011
4,081
717
Norfolk - edge of nowhere.
Best answers
0
Country flag
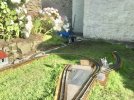
I am planning for next year!! I want to have a reverse loop using only R1 curves and short radius points, due to lack of space mainly. My plan is to have the point on the end of the right hand siding, with the loop either in the space between the far left siding on the grass, or alternatively in the space where you can see a broom handle (hopefully), I can’t work out how many curves I would need, or how they would match up to the point, (assume left hand).
I downloaded Anyrail, to my laptop, which decided to throw a wobbly, yesterday, so now only have iPad,so can’t use any track planning software, so am asking if any kind soul could advise.
Conversation started Pete.
 

Portsladepete

Registered
2 Jun 2020
211
19
69
England
Best answers
0
Country flag
So here is another one just created from the LGB Track Planning Template, no clever computer stuff round here. Only thing I am not sure about is the grid squares, according to the template they are a Metre I do not believe that the squares are a that big more like 18inches.
View attachment 270874
Very grateful, you’re all so helpful:)
 

Portsladepete

Registered
2 Jun 2020
211
19
69
England
Best answers
0
Country flag
Tried out my reverse loop for size, thanks to everyone, (especially Mike) it is going to fit:nod:. Also tried out the LGB analogue reverse loop set indoors, all works as expected, one query, does it normally slow the loco down by about a third 676E76AB-E130-4302-A7A1-ECADE2382DE2.jpeg676E76AB-E130-4302-A7A1-ECADE2382DE2.jpegas soon as it enters the isolated section? The K part is self explanatory with it’s direction arrow, the T part has a white dot which I have put closest to the K part. It is quite handy, in that you know when your in that section ,tried looking on web but no mention if it’s supposed to be that way round or it doesn’t matter
 

dunnyrail

DOGS, Garden Railways, Steam Trains, Jive Dancing,
Staff member
GSC Moderator
25 Oct 2009
26,163
4,989
75
St.Neots Cambridgeshire UK
Best answers
0
Country flag
Tried out my reverse loop for size, thanks to everyone, (especially Mike) it is going to fit:nod:. Also tried out the LGB analogue reverse loop set indoors, all works as expected, one query, does it normally slow the loco down by about a third View attachment 271662View attachment 271662as soon as it enters the isolated section? The K part is self explanatory with it’s direction arrow, the T part has a white dot which I have put closest to the K part. It is quite handy, in that you know when your in that section ,tried looking on web but no mention if it’s supposed to be that way round or it doesn’t matter
The analogue one will have diodes in it so some slowing is to be expected but not a third, though depends how fast you were going? Probably not that fast as you have to reverse toe controller part way round.
 

ebay mike

Retired, but still hoarding. (GOF)
6 Dec 2011
4,081
717
Norfolk - edge of nowhere.
Best answers
0
Country flag
Tried out my reverse loop for size, thanks to everyone, (especially Mike) it is going to fit:nod:. Also tried out the LGB analogue reverse loop set indoors, all works as expected, one query, does it normally slow the loco down by about a third View attachment 271662View attachment 271662as soon as it enters the isolated section? The K part is self explanatory with it’s direction arrow, the T part has a white dot which I have put closest to the K part. It is quite handy, in that you know when your in that section ,tried looking on web but no mention if it’s supposed to be that way round or it doesn’t matter
That's the same position I tested it in Pete. Didn't notice any slowing down though. Have you tried it on a variety of speeds to see if it occurs at other voltages?
 

Portsladepete

Registered
2 Jun 2020
211
19
69
England
Best answers
0
Country flag
The analogue one will have diodes in it so some slowing is to be expected but not a third, though depends how fast you were going? Probably not that fast as you have to reverse toe controller part way round.
I measured the voltage as best I could, it dropped about 1.5 volts from outside the insulated section, the third bit was a guess. Found I couldn’t be in both places at once, and was in danger of being run over by an angry Stainz lo_O. Anyway it’s a very clever bit of magic, and it works !:)
 

Gizzy

A gentleman, a scholar, and a railway modeller....
26 Oct 2009
36,132
2,273
63
Cambridgeshire
www.gscalecentral.net
Best answers
0
Country flag
Pete, have you put the 1015 piece (which has the diodes) with the arrow facing the loop exit? And not towards the 1015T track (which is just a track with cuts in the 2 rails)?

I had 3 sets of these on my last layout and I never had any speed loss issues....
 

Portsladepete

Registered
2 Jun 2020
211
19
69
England
Best answers
0
Country flag
Pete, have you put the 1015 piece (which has the diodes) with the arrow facing the loop exit? And not towards the 1015T track (which is just a track with cuts in the 2 rails)?

I had 3 sets of these on my last layout and I never had any speed loss issues....
Hi Gizzy, Yes, as you describe, not that bothered as it actually gives me an indication, I know diodes will drop voltage, so if it’s going through two, voltage sounds about right. The loco has to run slowly , as it’s only to test the units, and before I know it, it wants the controller reversed, I don’t move very fast anymore:(. The controller is my little Piko 1 amp type without any frills, maybe if a feedback controller was used it would not be noticeable. Anyway if it’s just a diode bridge, not that much to go wrong I hope! Cheers Pete
 

Portsladepete

Registered
2 Jun 2020
211
19
69
England
Best answers
0
Country flag
That's the same position I tested it in Pete. Didn't notice any slowing down though. Have you tried it on a variety of speeds to see if it occurs at other voltages?
Hi Mike, yes it drops at all the speeds I could try it at, more noticeable at slow speeds, it could be something to do with this little controller, but I’m not worried about it. Nothing could have happened to it, unless Hermes have a layout :D . I had to put it away, if I’m allowed, I’ll try it on the Aristocraft one tomorrow. Points and motors are great, track is as well. Best thing is, it fits in my small space in the garden.
Cheers Pete
 

ebay mike

Retired, but still hoarding. (GOF)
6 Dec 2011
4,081
717
Norfolk - edge of nowhere.
Best answers
0
Country flag
Hi Mike, yes it drops at all the speeds I could try it at, more noticeable at slow speeds, it could be something to do with this little controller, but I’m not worried about it. Nothing could have happened to it, unless Hermes have a layout :D . I had to put it away, if I’m allowed, I’ll try it on the Aristocraft one tomorrow. Points and motors are great, track is as well. Best thing is, it fits in my small space in the garden.
Cheers Pete
I was using an LGB 1amp job, so it could explain it. The loco I used was one of the Casey type.
Mike
 

PhilP

G Scale, 7/8th's, Electronics
5 Jun 2013
33,559
3,521
Nottingham
Best answers
0
Country flag
With no load, a Buhler LGB motor will turn at about 2-3 volts.. So if we say 4-6 volts to move your train, and you have two diodes (each dropping about 0.6 volts, that would be a quite noticeable drop in speed..

PhilP.
 

Gavin Sowry

Garden Railroader and Raconteur
27 Oct 2009
7,841
2,490
70
Hutt Valley, NZ
Best answers
0
Country flag
I considered using that fancy diode reversing system. Read up all about it, including the voltage loss, and the fact that there would be a momentary kick when you reversed the polarity once the train was on the loop. Frankly, in the end, it was the cost (in the Colonies) of the system. Did some figuring, and installed a system that cost only $6.00, and did not get a voltage drop. Down side, the train, theoretically, has to stop when changing mainline polarity. I reckon that's OK, because a real train would have to do that if the turnout was a manual one where the crew had to bend the iron.
On the Taita Gorge, trains using the reversing loops (yes plural), enter said loop, and once completely in the loop, and just before the exit, the Direction button on my Train Engineer is pressed, the train then slows to almost a stop. There is a dwell time before it reverses (which we don't want to do). At that point, I just flick the magic $6.00 switch, and the train builds up speed and carries on its merry way. And the $6.00 solution? A DPDT switch wired up in reversing mode.
DSC_0901.JPG

.... and for an extra $3.00 (an on/off switch), you can even control the crossing loop! The backshunt is handy for the short loop/large train (which fits the crossing loop out the front) scenario.
 
Last edited:

dunnyrail

DOGS, Garden Railways, Steam Trains, Jive Dancing,
Staff member
GSC Moderator
25 Oct 2009
26,163
4,989
75
St.Neots Cambridgeshire UK
Best answers
0
Country flag
I considered using that fancy diode reversing system. Read up all about it, including the voltage loss, and the fact that there would be a momentary kick when you reversed the polarity once the train was on the loop. Frankly, in the end, it was the cost (in the Colonies) of the system. Did some figuring, and installed a system that cost only $6.00, and did not get a voltage drop. Down side, the train, theoretically, has to stop when changing mainline polarity. I reckon that's OK, because a real train would have to do that if the turnout was a manual one where the crew had to bend the iron.
On the Taita Gorge, trains using the reversing loops (yes plural), enter said loop, and once completely in the loop, and just before the exit, the Direction button on my Train Engineer is pressed, the train then slows to almost a stop. There is a dwell time before it reverses (which we don't want to do). At that point, I just flick the magic $6.00 switch, and the train builds up speed and carries on its merry way. And the $6.00 solution? A DPDT switch wired up in reversing mode.
Yes I forgot on my early LGB layout I used the system with Diodes that I made up myself. Simples easy and cheep, I had a Station in the loop with a siding so all Trains stopped there as a norm, thus reversal ofvthe controller never appeared to be an issue as the trains were returning to the Terminus other side of the Garden and I would of course have to reverse the Analogue Controller anyway.