Reusing/repackaging NiMH batteries

maxi-model

UK/US/ROW steam narrow gauge railways 1:1
Country flag
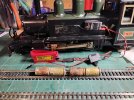
Got the first thing on the workbench for 2 years (don't ask). I am transferring the RC/battery gubbins from an, as bought, converted LGB U Class to one that more closely represents the Zillertal #2 (Again, don't ask - but I'll be lobbing a working U Class hulk on here soon :D).

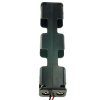
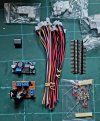
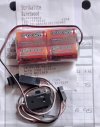
1st question - can I reuse the NiMH batteries, as shown in the pictures in regular plastic holders, like regular AA's ? As previously installed everything was a bit of a mess, and I hate mess. Worked fine, but a mess. Note the original packs were like the 4 cells at top of picture, except 3 where they had been daisy chained with soldered wires to each cell's terminal ends. Original 4 packs - soldered tabs to terminal ends of cells and what appear to be card insulators. All same brand, 2500 Williams, AA. Cells hold a good charge. Your thoughts and advise please. Thanking you in advance.

Next I need to sort the spider's web of a wiring loom. I will also be adding an MLS sound card. The Tx/Rx and combined with Rx ESC are Deltang products. So more questions to follow. Max
20240831_175203.jpgdscf5999-s_13.jpg500_dscf8704_16 (1).jpg
 
From experience, it's better to have a soldered pack rather than use the plastic cases. I've always used packs made up by others - don't trust myself to solder tags to battery cells - but I've never really been successful with those plastic holders; don't like um.

I think the electrical continuity is better with a soldered pack.

You can get bespoke packs from Strikealite, and you'll get the latest LSD technology which is far better.
 
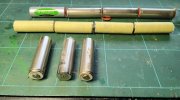
If the cells are all 'button-top', like the three single cells, you *could* remove the soldered connections, clean the caps / ends of flux and carp, and put them in a holder..

However, as Rhinochugger Rhinochugger says, thee will possibly weep, corroded, and may not last.

I would NOT mix brands of cells, it will end in tears.

You could give it a go, but remove the pack at the end of the season..
Keep it topped up over winter, then see if it is any good next year, not inside an engine.

When you come to sort the RC wiring, you know where to come..

PhilP
 
To my eye some of those batteries have had the external insulation removed that could cause short issues when placed in battery holders. There is not much wrong with the holders but heeding Rhinochugger Rhinochugger and PhilP PhilP advise could be a saving grace as if the loc gets knocked the holders can loose their grip on battery thus involving a painful pull apart of the loco.
 
Thanks for all the advise. The batteries are all the same make. Removal of jackets caused by their method of installation - double sided sticky and hot glue (!) See first picture below. I have neatly re-wrapped each cell, ensuring an overlap, used masking tape.

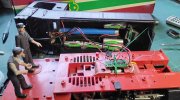
I want to create an installation, cards20240831_101111.jpg, batteries & switchgear, that is all on the chassis, with only the lights body mounted with JST connections, to the body. Did that with my GRS L&B Manning Wardell. I wish to reuse the batteries, for convenience I want holders. I suppose I could use some of the very thin brass strip and low temp solder to create permant formations. I can always add strapping as a, literal, belt and braces job to secure. LGB body has 5 mounting screws, but 2x in side tank areas could be removed. It has not proved too traumatic getting in. Max
 
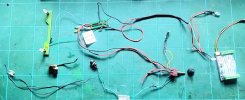
And now to sort the wiring. Switch is an on/centre off/on with 6 pins. I think I can follow the circuit :( I want to renew the lot, all those different wire types and colours :mad: Off the peg (modified) or made to order bespoke harness ? The fun bit will be making sure the polarity is all correct. I suppose I will need to run the MLS card off the battery input and motor output (don't forget to make room for speaker) I do not intend the RC control any of the MLS card, I'll just use their remote if I feel the need to toot. I assume that won't cause isssues with the card. There is a fuse in there, it's that black barrel on a broken bit of breadboard :D Max

Shopping list so far - 4 in line battery box x 2, 3 in line x 1, both wired. Modest sized speaker. Optional, base wiring harness

Assorted wiring, LED's, fuse, switch, charging socket, Deltang (Micron) card. Find them all ? MLS card not part of original installation.

20240901_103457.jpg

The card in question

20240831_101119.jpg
 
And now to sort the wiring. Switch is an on/centre off/on with 6 pins. I think I can follow the circuit :( I want to renew the lot, all those different wire types and colours :mad: Off the peg (modified) or made to order bespoke harness ? The fun bit will be making sure the polarity is all correct. I suppose I will need to run the MLS card off the battery input and motor output (don't forget to make room for speaker) I do not intend the RC control any of the MLS card, I'll just use their remote if I feel the need to toot. I assume that won't cause isssues with the card. There is a fuse in there, it's that black barrel on a broken bit of breadboard :D Max

Shopping list so far - 4 in line battery box x 2, 3 in line x 1, both wired. Modest sized speaker. Optional, base wiring harness

Assorted wiring, LED's, fuse, switch, charging socket, Deltang (Micron) card. Find them all ? MLS card not part of original installation.

View attachment 332315

The card in question

View attachment 332316
If you intend to use a TV remote to drive the sounds, make sure the little black thing (white plug going to right of board) is visible for TV remote lign of site. But I expect you already know that? Because I drive my MLS from my Tx I have no worries only needing occasional sight if I need to make changes to any of the sounds. Thus I make sure that little thing is visible. Fosworks wiring loom will make things much simpler but you may need some extra plugs n sockets to get all connected.
 
I can supply you with 'plug and play' on the receiver, simple wiring loom, and connectors (or with LEDs and resistors) to plug to the receiver..

You would need to connect to the motor, suitable connector for the battery (I might have suitable / can get holders) and then the screw-terminals on the MLS card..

PhilP
 
Thanks for all the advise. T

I wish to reuse the batteries, for convenience I want holders.
OK Max, just testing your logic:

'I wish to reuse the batteries....' Do you know what sort of charge they're holding? Are they all as good as each other? (One duff cell will drag the lot down.)

Yes, they appear to be LSD, so you won't get anything better, provided they are really up to scratch.

'For convenience I want holders.' Mmmmm if you had bespoke packs, they'd be shrink-wrapped, which would take up less space, and could be located as steadily as a holder pack. There is a tendency for electrical weakness in every connection of those holders (personally, I don't like them for this sort of installation - call me old fashioned ..................)

However, at the end of the day, it's up to you, of course.

As regards the wiring, buy the MLS sound card and everything will be explained in the instructions. For a fuse, buy one of Philp's polyswitch jobbies - inexpensive and can't be beat :nod: :nod:

I speak from experience of having installed, and re-installed :oops::oops: a few battery locos.

However, as with all things, we all have our preferences and foibles - you pays yer money and you takes yer choice :):):)

My thinking, nothing ventured nothing gained. The purpose of this exercise is to reuse an existing functioning installation as fully as possible. Batteries, rc kit, esc, switches, fuse, led's. Just rearrange to make more user friendly and tidy it up the wiring.
.
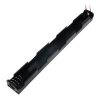
A 10 cell tray costs 75p. Cells were holding a good charge before I took them out. If they cause trouble "loose coupled" then I'll spend £30 odd. "Packaging" sometimes requires a little latteral thinking and creativity - what are the minimum dimensions in each plane, and any other impediments ? They dictate what you can or cannot achieve, if you do not know those you cannot conceive.

And to cause even more consternation, I've just opened up the new host. Ooohhh! What a loverly virgin loom. I wonder if I could incorporate some of it ? I don't mind incandescents and there's a nice Seuthe smoker too. To hell with the amps being drawn and the reduced run time (evil laugh). Then again I might just tidy up the existing stuff and flog it off with that hefty weight in the now vacant redundant body and chassis.

I might have done a few installs myself over the years. However, this is the first time I have tried to transfer somebody else's installation with a card I am not familiar with, and in LGB loco, hence my asking questions here.

MLS card has come from stock (it's in the picture) Use them for low grade low value locos, otherwise ESU if generic sound offends my ears. Sorry if that sounds a bit pompous and condescending. Don't get me wrong, I like the MLS, simple, no fuss, reliable if all I want is a chuff or a rumbling diesel and an odd toot now and again. Max

Virgin loom - Muhahaha !

20240901_164144.jpg
 
Black/White smoke unit wires, so I think that might be a 5V unit.
The flat ended filament bulbs would tend to support this theory.
You will probably want to use the rear PC, as it supports lights in the right places?

So... You could use the existing board, as there must be 'something' to give you roughly 5V for the lamps and smoker.
Or,
You could replace it with a little 'buck' convertor. - Which would make life easier with the receiver.

You can use the bulbs, and smoker, with the receiver, but you do need a 5V supply (caveat, so first paragraph).

PhilP
 
Oh!
Trying to use the LGB switch. - It can be done, but it will probably make your brain hurt!
:D

PhilP
 
Black/White smoke unit wires, so I think that might be a 5V unit.
The flat ended filament bulbs would tend to support this theory.
You will probably want to use the rear PC, as it supports lights in the right places?

So... You could use the existing board, as there must be 'something' to give you roughly 5V for the lamps and smoker.
Or,
You could replace it with a little 'buck' convertor. - Which would make life easier with the receiver.

You can use the bulbs, and smoker, with the receiver, but you do need a 5V supply (caveat, so first paragraph).

PhilP

Interesting - 20721 manual, check. Variable voltage buck,check (and YouTube user video). Have fixed 6v voltage regulators too, check. Various connectors, wire and shrink, check. Multimeter, check. "Mad Scientist" will to bend the laws of physics to meet my own needs, check. Redy to go !

So I could fillet out the lights and smoker and incorporate with Micron & MLS card with 12v supply ? I assume lights -/+ go where those resistors for the lights are sitting now with the buck interposed to reduce voltage. Could the smoke unit be diven from the same buck ?

Looking at the LGB "brown blob" there are a couple of bits on there that look like they might be voltage regulators. Just need double check what feeds where on that 6 pin switch. Max

20240902_121022.jpg
 
Just home and car emptied. - So house is now full! :D

Give me time to get sorted..
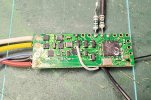
Can you post a picture of the receiver, so I can double check how the accessories are wired. - Do you think you can cope soldering to the pads along the edge of the board?

PhilP
 
Just home and car emptied. - So house is now full! :D

Give me time to get sorted..
Can you post a picture of the receiver, so I can double check how the accessories are wired. - Do you think you can cope soldering to the pads along the edge of the board?

PhilP

Your wish is my command - have fine point iron, will solder, can't be much worse than others I have worked with :)

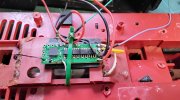
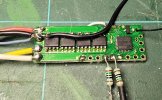
Clockwise from top right - 1st resistor to + rear led's, 2nd resistor assumed + to front led's. At left - thin black ariel. Bottom - black (to rear led's to batt - at right), white lead to reverse of card ( use unknown) At right - red batt + , black batt - with blue front led's & black (hidden) rear led's (both ground ?), yellow motor +, white motor ground.

20240902_184640.jpg

Reverse side -

20240902_184616.jpg
 
Last edited:
Just my two cents...
NiMh is just NiMh, you can mix anything with it what you want as long as it is NiMh.
Nimh does not need a bms or a "controlling" system, only max 1.450v per cell.
If they can hold the V for a week. consider them good.
NiMh chemistry is prone to memory effect what can cause 0.01ah(for example) storage.
Charge them up with no more then 0.5a per cell they will be fine.
General rule btw, quick charge or schock charge is around 500ma.
Normal charge is 200ma
Slow or maintanance charge is around 20ma.
Even 0.200mah for even 10Ah cells or 200mah cells

They will get a little warm tho, that is needed to reach a full charge.
After 1.280v they will reach "delta" thet must have this to get 100% full and get the cristals back in line, they will get luke warm.

NiMh is NOT capable of a system voltage of above 32V, please keep this in mind.
NiMh is a very successful and very long lasting cell and very save.

Every cell below 0.8v you dont want to spent time on, unless with special equipment.
Dont charge cells below 0.6v not worth it, maybe you are lucky and the cells are just lazy and in the need to wake up.

When a NiMh cell is abused or short circited for long time, it will be to hot, their will be some "black goo"
Consider them/it as done/dead.
The same applies for white crystals, if you see them, sorry they are done.

Main rule charge them every six months up to 1.3v storage/resting voltage, and your great grandkids will enjoy/use them also.
NiMh when not abused and properly used/stored will last?!?!?!decades.
I have them of 25 years of age in my powerwall still as new, but follow the rules!
Yeah that was a painful lesson just like the one--->no higher then 32v system voltage....sigh

In normal use dont discharge them below 0.950v and not higher then 1.250v, one time a year charge up to 1.450v and discharge to 0.8v, charge back up to 1.3v
If having one with healt isseus 2 x a year.
I have over 5000 in use, still adding and testing them....

Very useful information Igor. Just had to replace my 18 year old NiMH battery pack for rc on live steamer. 1 servo only, reverser (piston valves) Max

Knackered battery pack - Symptoms, although they registered around a full voltage they would not take a charge. So I took a look :fearscream: 18 years not bad going. All the wires and, as a result connectors and switchgear needed replacing, would not take solder whatever I tried. Apparently a well known problem, so Stikalite told me. Pack £14.64, Switch and connectors £5.75, p&p £6.95.

20240508_002202.jpg

Nice new battery pack !

20240526_101033.jpg
P
 
Last edited:
DON'T! Connect bulbs and /or smoke to pins along the edge of the receiver!!
These are 'logic' level (0V or 3.3V) outputs, that can drive a LED or two, but NOT filament lamps etc.

You will need the 'A', 'B', and 'C' outputs on the end of the receiver, adjacent to the aerial.
These are FET switches to ground.

Circuit is output from buck converter (this will cope with lights and smoke, easily. Not sure about the fixed 6V regulator, it might struggle?)..
Use the positive output of the buck converter as the common to lights and smoke.
Front light(s) other side to 'A'.
Rear light(s) other side to 'B'
Smoke to 'C'.

You might have a 'problem' with the 'C' output? - It could be momentary, so only 'on' when the Bind button is pressed.
I can tell you how to change this action if necessary.

You can test if these outputs work as stated with a meter, right now.
Positive lead from meter to battery positive. Negative lead from meter to pad on receiver. - CARE! That you don't slip..
You will read nothing when off, on all the pads.
'A' will show battery-volts when running forwards.
'B' will show battery-volts when running backwards.
'C' will show battery-volts with the Bind button. - Probably only when the button is held.

If it proves necessary, All these output actions can be changed.

PhilP
 
Back
Top Bottom