Removing doors from 3062 coach...?

Zerogee

Clencher's Bogleman
Country flag
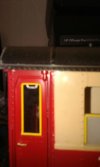
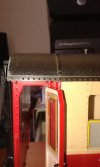
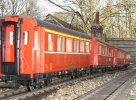
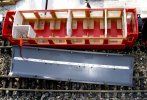
A quick question.... I'm in the middle of dismantling an LGB 3062 type coach (the classic Austrian style bogie coach that has appeared in so many guises and liveries over the years) so that I can repaint the bodyshell.... I've got the body ALMOST completely stripped down, chassis removed, all seats, windows and partitions out, but I'm a bit stuck on the doors....they are clipped top and bottom into holes in the main body moulding, but there doesn't seem to be any easy way of removing them without severely bending the door itself to pop out the mounting pins from the holes - and I'm wary of applying TOO much brute force and ignorance for fear of snapping either the door or its hinge pins.
Is there an easy method of removal that I'm missing?

Thanks in advance!
Jon.
 
Jon,
take a deep breath, stop your heart beating and then gently bend the door in the middle to release one pin and then remove. Hopefully, all will be well and you can exhale and take another deep breath in relief.
 
With a bit of luck you heart will restart too! :rofl:
 
Thanks Tim (and Alan, I think...) - so there is no "secret technique", it is simply a case of flexing the door carefully and praying nothing snaps....?
Is this easier to do if you pop the small window out of the door itself first?

Jon.
 
OK, further to my own posts, doors now removed from bodyshell without any damage! :rofl:

Also managed to remove the tiny gold handles (and the little black plastic latch piece on the inside) from the doors, by simply pressing gently on their mounting pin from the inside of the door with the flat of a screwdriver blade - but now stuck (pun intended) on the door windows - they seem to be glued very solidly in place, and are so far defying my attempts to either flex or pry them out..... is it best to just leave them where the are and carefully mask them off with some tape before spraying?

Jon.
 
Photo 1 is door closed photo 2 raise door after you've opened it no need for bending or flexing, please don't break it cos their like hens teeth to replace and they fall out regularly and never seen again. The top lug needs to raise into socket at roof edge photo 2.

I'm in need of quite a few doors and have gone down the 3D print route with SLR models. A very good option. I'm a very satisfied customer.
 

Attachments

  • door removal 1.jpeg
    door removal 1.jpeg
    22.2 KB · Views: 0
  • door removal.jpeg
    door removal.jpeg
    34.8 KB · Views: 0
As above fully open the door and lift until the lower pin comes out of hole and lower out of top hole. these doors are almost always lying loose in the box as they fall out all on there own as the box gets turned around or moved!!
 
Photo 1 is door closed photo 2 raise door after you've opened it no need for bending or flexing, please don't break it cos their like hens teeth to replace and they fall out regularly and never seen again. The top lug needs to raise into socket at roof edge photo 2.

I'm in need of quite a few doors and have gone down the 3D print route with SLR models. A very good option. I'm a very satisfied customer.

Thanks, so that's the secret - hopefully will be useful to others at some point! I managed to get the doors out without any damage, but gave up on trying to remove the clear windows from them and have just carefully masked them off.

Jon.
 
I used Frog tape when I sprayed similar doors for my short Orient Express stock as I bought bodyshells with all fittings removed. As an aside, should you damage any of the door handles, I have a few spares of both lever and T types. Was going to list some shortly as it's time for another clear out.

Mike.
 
Thanks Mike! Shouldn't need any handles as the came off without problems and will hopefully go back the same way, but knowing you have some is handy.....

Jon.
 
Just a thought.
Whilst your 3062 is in the shed having the up-grading works completed, think about fitting the later style corridor connectors, not only do they look the part giving the impression of closer coupling but If you add a thin strip of 1/8th black foam to one edge, you can have no gaps at all. Must get around tuit myself one day.
You can, should you wish add a full length Yellow line just under resulting in a full First Class unit.
All 10 of my 3062s have yellow Led strips fitted on the roof underside with plug & sockets, inter linking coach to coach with a flashing Red tail light on the last one,
all ten coaches are powered via two sets of LGB ballrace wheel sets, one at each end of the rake, roofs or is that roves, well the greyish bits on top can also be removed, as they are also wired via non reversible plugs & sockets and are therefor
now interchangeable, aids positioning of passengers at a later date.

Any time you're passing, Please drop in, I'll do the tea, You bring the sticky buns.
 

Attachments

  • DSC00013.JPG
    DSC00013.JPG
    204.6 KB · Views: 0
  • DSC00014.JPG
    DSC00014.JPG
    155.4 KB · Views: 0
  • DSC00017.JPG
    DSC00017.JPG
    137.2 KB · Views: 0
  • DSC00019.JPG
    DSC00019.JPG
    100.3 KB · Views: 0
  • DSC00021.JPG
    DSC00021.JPG
    152.9 KB · Views: 0
Just a thought.
Whilst your 3062 is in the shed having the up-grading works completed, think about fitting the later style corridor connectors, not only do they look the part giving the impression of closer coupling but If you add a thin strip of 1/8th black foam to one edge, you can have no gaps at all. Must get around tuit myself one day.
You can, should you wish add a full length Yellow line just under resulting in a full First Class unit.
All 10 of my 3062s have yellow Led strips fitted on the roof underside with plug & sockets, inter linking coach to coach with a flashing Red tail light on the last one,
all ten coaches are powered via two sets of LGB ballrace wheel sets, one at each end of the rake, roofs or is that roves, well the greyish bits on top can also be removed, as they are also wired via non reversible plugs & sockets and are therefor
now interchangeable, aids positioning of passengers at a later date.

Any time you're passing, Please drop in, I'll do the tea, You bring the sticky buns.

Good idea John,

Some of mine date back to the late 70s and came with a plan gated end. After buying some later corridor equipped ones, I did just as you said. This was the late 1980s, and then you could get the spares you needed direct from LGB!

As I recall the corridor connection comes in two parts. The gate was removed from the coach, and then used to temporarily hold the rear part of the new corridor connection in place to act as a template whilst the fifth hole was drilled.

Good fun to do and a very visually plesing result.

I seem to recall that the gates recovered from the early 3063 and 4s where then used to adorn some early plain/solid 4 wheel coach balconies....

James
 
Thanks for the tips and advice, all - what I probably should have mentioned is that this isn't a standard 3062 type coach that I've been disassembling and repainting - it's the cut-down part of the coach used as the rear two-thirds of my recently acquired GRS-built steam railcar.... originally in RhB markings and red/cream livery, this has now been changed to an all-over medium green which will, I think, look very nice for an old style DR (or pre-unification State Railways) livery. The coach DOES have the corridor connection at the rear, but I think I may well leave that off as it doesn't really work on the back of a railcar.
I will do some photos of the progress on repainting and reassembly soon!

Jon.
 
Last edited:
Back
Top Bottom