No72
Registered
.JPG")
.JPG")
.JPG")
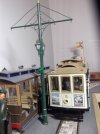
 Now that I can use my hand I have planted quite a few traction poles in place.
Now that I can use my hand I have planted quite a few traction poles in place.I have to do some cad work to sort out the best location for the poles that will have the 3 way frog suspended from the wiring as the location of that is critical and I'm not quite sure where that frog should go. I'll assume its on the intersection of lines drawn through the centres of the 3 sets or track. the centre poles are in place along memory lane as well as the end strain posts.
One of the colour light staff is up as well as the tram at terminus sign. They will of course work when my little rotary converter power supply arrives from China and powers up the system.
As all my cars have poles in the neutral position ie in the centre of the wheels it should work ok.
No poles yet for the curve into the car sidings as I have to be fairly precise with their location too as there is a frog over the curved turnout. The "big" tree will then be planted so as not to interfere with the overhead wiring...
Attachments
Last edited by a moderator:
")
.JPG")
.JPG")
.JPG")
.JPG")
.JPG")
.JPG")
.JPG")
.JPG")
.JPG")
.JPG")
.JPG")
.JPG")
.JPG")
.JPG")
.JPG")
.JPG")
.JPG")
.JPG")
.JPG")
.JPG")
.jpg")