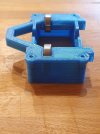
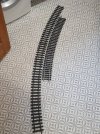
Petg warping

DGE-Railroad

The Orchard Line
26 Jan 2020
607
89
52
United Kingdom
Best answers
0
Country flag
I've tried my first printing in petg last night. I've printed exclusively PLA until now.

I use Simplify3d as my slicer/controller and a Creality 3D printer.

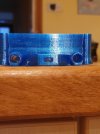
The prints have come out pretty well all things considered, but I can't seem to eliminate the warping

The piece seems to adhere to the bed okay; ive tried using both a glue stick and painters tape with the same results.

No raft,
240c hotend
60c 1st layer / 55c bed
0 cooling 1st layer / 100%
The part is 100% infill and 5 solid top/bottom layers because it needs to be as strong as possible.

Everything else (speeds, retraction,etc) are the standard PLA ones

Any other suggestions for where I need to look to sort out the warping? Turn off the fan for the bottom few layers? Increase the bed temp?
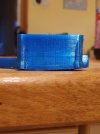
20201024_082252.jpg

20201024_082235.jpg
 
  • Like
Reactions: 1 user

mike

Master at annoying..
Staff member
GSC Moderator
24 Oct 2009
51,804
4,431
Rossendale
www.gscalecentral.net
Best answers
0
Country flag
I tried it, couldn't get a decent print, and have stuck with pla
 
  • Sad
Reactions: 1 user

DGE-Railroad

The Orchard Line
26 Jan 2020
607
89
52
United Kingdom
Best answers
0
Country flag
Success!

Upped the bed temperature to 80c and dropped the fan to 0 for layers 1-4- then to 80% for layers 5 upwards.

Job's a good'un!
20201024_163809.jpg

Strongest thing I've ever printed :)
 
  • Like
Reactions: 1 user

musket the dog

Registered
31 Oct 2009
787
143
Leicester
nlrr.webs.com
Best answers
0
Hi DGE,

I'm glad you got it sorted in the end. I was thinking that maybe the 100% fill might have been contributing to the warping? Applying the rules of conventional moulded parts. the thicker the material is, the greater the difference in temperature will be between the internal and external layers of the plastic as it is being laid down. As they cool at different rates (Outsides cool first, as the heat inside moves to the surface) the parts will warp as one area cools and shrinks before another. I don't think anything would be as strong as a solid piece of material, but you might be able to get somewhere near with thinner walls and an optimised interior.

Thanks for sharing your experience with the rest of us though. Did you have to control the fan speed manually or were you able to program it into your slicing software?
 
  • Like
Reactions: 1 users

DGE-Railroad

The Orchard Line
26 Jan 2020
607
89
52
United Kingdom
Best answers
0
Country flag
Thanks a million Ricky!

I think you're probably right about the infill level. I have to say I'd wondered if it was to blame, given it was clearly a temperature gradient thing. It definitely got more pronounced after I increased the infill.

My issue with changing that was the fact the part needed to be as strong as I could make it. It's the only reason for going down the PETG route in fact. The part I'm making is a dual rail bender so rigidity was key.

I think dialling the cooling fan back was probably the biggest factor. I programmed it into the slicing software; it's a paid-for package so thankfully it's very feature-rich and offers the ability to set the temperature and cooling on a layer-by-layer basis if needed.

It's satisfying to have conquered it and the filament gives a nice print. I'm looking forward to reverting back to good old PLA though :)
 

dunnyrail

DOGS, Garden Railways, Steam Trains, Jive Dancing,
Staff member
GSC Moderator
25 Oct 2009
26,160
4,986
75
St.Neots Cambridgeshire UK
Best answers
0
Country flag
Thanks a million Ricky!

I think you're probably right about the infill level. I have to say I'd wondered if it was to blame, given it was clearly a temperature gradient thing. It definitely got more pronounced after I increased the infill.

My issue with changing that was the fact the part needed to be as strong as I could make it. It's the only reason for going down the PETG route in fact. The part I'm making is a dual rail bender so rigidity was key.

I think dialling the cooling fan back was probably the biggest factor. I programmed it into the slicing software; it's a paid-for package so thankfully it's very feature-rich and offers the ability to set the temperature and cooling on a layer-by-layer basis if needed.

It's satisfying to have conquered it and the filament gives a nice print. I'm looking forward to reverting back to good old PLA though :)
Interesting that you are making a Rail Bender, sure that a few in here might like to see the completed product with some views on how effective it is In operation. Oh and the link if you publish it for others to use on thingiverse or some such other site.
 

DGE-Railroad

The Orchard Line
26 Jan 2020
607
89
52
United Kingdom
Best answers
0
Country flag
Will do. I'm just waiting on a few bolts to assemble it and I'll get some photos/video of how it performs.

This is something of a technical exercise as I stumbled across the design after Rhinochugger kindly gifted me his mono railbender (which is doing great work!)
20201024_090837.jpg

And Keith very kindly offered me the loan of his Massoth dual one.

All credit for this design needs to go to the ingenious Pierre Rouzeau who has published it on his website (along with a brilliant transporter/railer box)
Pierre Rouzeau
 

dunnyrail

DOGS, Garden Railways, Steam Trains, Jive Dancing,
Staff member
GSC Moderator
25 Oct 2009
26,160
4,986
75
St.Neots Cambridgeshire UK
Best answers
0
Country flag
Not only has Pierre created what appears to be a good rail bender and doing both rails but he prototyped it in Oak. Now that is a class act.
 
  • Haha
Reactions: 1 user

DGE-Railroad

The Orchard Line
26 Jan 2020
607
89
52
United Kingdom
Best answers
0
Country flag
I like the way his AutoCAD designs have go to the extent of a bill of materials, sketches of the device in operation (loco box) and pronounciation guide (rail bender) :D :cool: