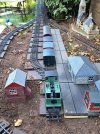
Outdoor layout reborn

3 minutes of fame

3d printing, electronics and trams
Country flag
Hello, sorry it's been a while. My G45 garden layout took a back seat following some issues with rot, so I dismantled it pending rebuild.

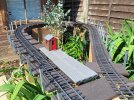
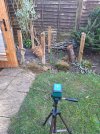
So this weekend I got the chance to start the rebuild. I'm using the existing fence posts, as they're all in good condition, while the 19mm plywood track base has been replaced with Filcris recycled plastic "wood". This consists of 50mm x 30mm runners, with 19mm planking. This gives enough flexibility to withstand expansion and damage, while retaining a base level within 2mm over the whole circuit.
1000017334.jpg

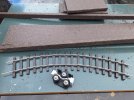
To bend the Cliff Barker stainless track into permanent curves - rather than just pinning the flexible lengths in place, I made myself a rail bender from some parts from a defunct 3D printer, and a 3d printed insert. It works very well, and can be easily adjusted.
1000018005.jpg
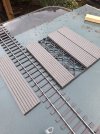
While picking up some bits from Wickes, I saw these decking modules on special offer at £12 for 4.They are made of a quality flexible plastic, and screwed to the plastic backing frame. Perfect for platforms or bridge decks!
1000018012.jpg

More pictures as track laying continues..
 
I was glad that all the stock ran without complaint. Batteries have held up well, and retained charge, and nothing important fell off!

Next stage is to rebuild the bottom loop and station area and restore continuous running.
 
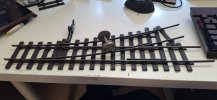
More progress. The station track work should be finished this weekend. I wanted to replace a rather sharp turnout with a better built, gentler radius version, so today was spent cutting up some old Code 200 steel rail and working through a fug of methyl ethyl ketone bonding ABS components to the sleepers.

1000018952.jpg

I'm quite pleased with the end result, which hopefully will provide many years of operation.

This is the only turnout on the layout that needs an operating lever. All the rest are sprung, as they are either trailing, or simply provide access to runaround loops. This makes operating the layout extremely simple, with the only choice being whether to run the train into the Terminal platform or loop.

Hopefully I'll be running trains on the whole layout by Monday evening.
 
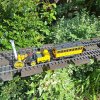
With the track now complete, Rocket took to the rails, after about 4 years of static display. A quick oil up, and recharge the battery and we were away!

This was the first model I 3d printed, and it's holding up fairly well. I must finish painting the coach at some point!
1000019135.jpg
 
Last edited:
Hello, sorry it's been a while. My G45 garden layout took a back seat following some issues with rot, so I dismantled it pending rebuild.

So this weekend I got the chance to start the rebuild. I'm using the existing fence posts, as they're all in good condition, while the 19mm plywood track base has been replaced with Filcris recycled plastic "wood". This consists of 50mm x 30mm runners, with 19mm planking. This gives enough flexibility to withstand expansion and damage, while retaining a base level within 2mm over the whole circuit.

View attachment 340041

To bend the Cliff Barker stainless track into permanent curves - rather than just pinning the flexible lengths in place, I made myself a rail bender from some parts from a defunct 3D printer, and a 3d printed insert. It works very well, and can be easily adjusted.

View attachment 340042
While picking up some bits from Wickes, I saw these decking modules on special offer at £12 for 4.They are made of a quality flexible plastic, and screwed to the plastic backing frame. Perfect for platforms or bridge decks!

View attachment 340043

More pictures as track laying continues..
Looking forward to see how it turns out.
Did you give any thought to using a second set of rollers to make a dual bender?
 
Looking forward to see how it turns out.
Did you give any thought to using a second set of rollers to make a dual bender?
I'm assuming you mean so that a track panel could be curved without first removing the sleepers?

As the rail needs to slide through the sleepers to allow the bend, I'm not sure how well it would work. I use Cliff Barker G1 track, as the sleepers are easy to remove and refit. The sleepers are in double units, with easy to trim webbing, so refitting them to get a smooth curve is relatively simple. I'm not sure how well it would work with track designed to stay together as one unit.

The track is now complete and fairly well adjusted. Work on landscaping the station area is now in progress, with about a ton of new top soil added to the raised bed. There's no intention to make it look like a scale model railway, but rather a railway through a garden.
 
Great to see trains running. rRocketblooks like a quality 3D print

Rik
 
With the track now complete, Rocket took to the rails, after about 4 years of static display. A quick oil up, and recharge the battery and we were away!

This was the first model I 3d printed, and it's holding up fairly well. I must finish painting the coach at some point!
View attachment 342331

Interesting method of applying the decking. Spacing it, as you have done, allows for plenty of water drainage.
 
Interesting method of applying the decking. Spacing it, as you have done, allows for plenty of water drainage.
It's more to allow more light to plants below. Because of the double track, it's quite a wide track bed.

It also reduced material costs significantly, saving about £90 in the plastic decking boards.
 
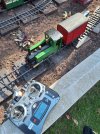
It's been about 3 years since I last ran any live steam, so it was nice to get the MSS oscillator out for a run. Those with good memories will remember that the wagon behind is a radio controlled brake wagon, to control the speed.


The platforms have been constructed, safety railings erected and I got a few buildings out as well. Other than the kit built MSS, everything you can see is 3D printed or laser cut.

1000019872.jpg1000019862.jpg1000019859.jpg1000019857.jpg
 
Back
Top Bottom