You are using an out of date browser. It may not display this or other websites correctly.
You should upgrade or use an alternative browser.
You should upgrade or use an alternative browser.
New beginnings
- Thread starter Jasper
- Start date
casey jones snr
Registered
Jasper, 3 minutes to boil an egg.It seems I'm missing the joke here.
playmofire
Registered
In England/the UK, three minutes is thought of as the right time to boil an egg.It seems I'm missing the joke here.
Oh I thought it was 4? That works for me but then I keep eggs in the fridge so that could make the difference.In England/the UK, three minutes is thought of as the right time to boil an egg.
Jasper
Hey, I'm only being creative here!
Some time ago in this thread, we spoke about the western curve, and how wobbly it was. Trains looked like they would fall over. Since then, other hobbies claimed a lot of my time, but this week I got a Round Tuit.
Still not perfect, but good enough for a very eager Emma locomotive.
Still not perfect, but good enough for a very eager Emma locomotive.
Jasper
Hey, I'm only being creative here!
Tonight I did a steam up session, and I used the camera car for the first time. Unfortunately the camera's battery was nearly empty, which I didn't know, so only the beginning of the session is on video.
I'm enjoying video editing, but I don't have the illusion that it's great work or anything. It's just the fun of learning yet another skill.
Jasper
Hey, I'm only being creative here!
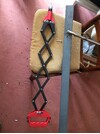
I got tired of not being able to reach one spot on my tramway. It's the bit that's squeezed between the fence and the Hazel tree. Sort of a "green tunnel". Here it is:

So I decided to do something about it. I removed all the benchwork beneath the triangle, and replaced it with new beams, leaving an opening for me to scramble through.
Then I removed some plants, leaving an opening where I can stand between the track and the fence. I also paved it. Now it looks like this:

It's all very tight. At 57 I'm still quite slim and nimble, so this is an incentive to stay that way.")
Now I can finally properly maintain the "green tunnel". For instance I can clean track, so the two-rail electric stuff can ride the whole line. I can also repair the overhead whenever a cat takes it down.
So I decided to do something about it. I removed all the benchwork beneath the triangle, and replaced it with new beams, leaving an opening for me to scramble through.
Then I removed some plants, leaving an opening where I can stand between the track and the fence. I also paved it. Now it looks like this:
It's all very tight. At 57 I'm still quite slim and nimble, so this is an incentive to stay that way.
Now I can finally properly maintain the "green tunnel". For instance I can clean track, so the two-rail electric stuff can ride the whole line. I can also repair the overhead whenever a cat takes it down.
Last edited:
Jasper
Hey, I'm only being creative here!
And I tackled yet another lingering problem: not being able to run the Brammert loco because it can't deal with my tight curves.
I had a bunch of R2 and R3 curves lying about the workshop, and I decided to use these to lay a big circle in the garden. Well more of an egg than a circle.
That went well. Brammert made some happy rounds. I planned to run the camera wagon behind it, but that didn't work because (a) I forgot which button on the camera is "on-off" and (b) there was no SD card in the camera. Go ahead, laugh.
Of course simple solutions to these problems exist, but I suspected that by the time I could devise such solutions, and carry them out too, Brammert might have run out of steam. So I just ran him without camera wagon. Better next time.
Honestly, I'm mightily relieved that I came up with this idea, and that it went so well. I've been feeling embarrassed about having ordered this nice machine and not being able to run it. So now I know I can run it, albeit not on the main layout. And yes, if I ever rebuild the main layout, I might (should?) use wider curves. But that isn't for the short term.
These days I'm dipping my toes into Club life. something that I (quite a loner) have been avoiding for a long time. So that should give Brammert other opportunities.
Nice loco but clearly a way of slowing it down would be a great help, looks to me that the gearing may be too low. All the geared locomotives I have can run at a nice slow steady speed.And I tackled yet another lingering problem: not being able to run the Brammert loco because it can't deal with my tight curves.
I had a bunch of R2 and R3 curves lying about the workshop, and I decided to use these to lay a big circle in the garden. Well more of an egg than a circle.
That went well. Brammert made some happy rounds. I planned to run the camera wagon behind it, but that didn't work because (a) I forgot which button on the camera is "on-off" and (b) there was no SD card in the camera. Go ahead, laugh.
Of course simple solutions to these problems exist, but I suspected that by the time I could devise such solutions, and carry them out too, Brammert might have run out of steam. So I just ran him without camera wagon. Better next time.
Honestly, I'm mightily relieved that I came up with this idea, and that it went so well. I've been feeling embarrassed about having ordered this nice machine and not being able to run it. So now I know I can run it, albeit not on the main layout. And yes, if I ever rebuild the main layout, I might (should?) use wider curves. But that isn't for the short term.
These days I'm dipping my toes into Club life. something that I (quite a loner) have been avoiding for a long time. So that should give Brammert other opportunities.
Jasper
Hey, I'm only being creative here!
Some months ago I spent quite a bit of effort looking online for 7/8" scale figures. As I remember it, all sellers were in the UK and none were willing to ship to the EU. That included Model Earth, but Clavey is a new name to me. I will certainly look into them.Perhaps a 7/8s scale driver from Clavey Models or one from Model Earth Design.
Last edited:
Jasper
Hey, I'm only being creative here!
Thanks for the invite! Sounds like fun.Very nice Jasper. When I'm finished with my 'circle', you're more than welcome to run Brammert in my garden
Gerard
Co-Author " Our Model Garden Railway" on Amazon
Hello Jasper,
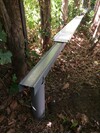
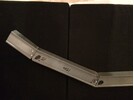
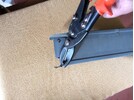
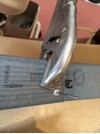
Nice work you are doing in wood! Maybe i can help you speeding things up with this new idea of building a track base using 3m long iron u-profile for guiding powerwires and using quick fit pot nails.You can put a weather resistant flat plate like Trespa on top the U-profile and fix it using pot nails. The small white fences are plastic corner pieces for plastering walls. You can easy make a bend by cutting 2 sides of the U-profile keeping one side alive which will be bended , the other 2 sides overlap and create another nice pot nail connection. Make the bends on the spots where the curved rails are connected so each curved rail has a straight U-profile section as foundation. I used 15 degree at the start of e end coming from a straight followed by one or more 30 degree bends ending in a 15 degree bend again at the connection with the next straight track. The iron U-profiles are relatively cheap and rust prevented so wheather proof. I used 80 mm gray PVC pipe as pilars using a ground hand drill . Drive the pillar in the ground and top of at the desired level.. As for the pot nails one tip: when connecting a metal sheet with a plastic sheet use them allways with the metal sheet at the backside and the plastic plate in front because when applying the nail the shaft of the nail widens with great force. Hope this mail will be of any help for you.
Nice work you are doing in wood! Maybe i can help you speeding things up with this new idea of building a track base using 3m long iron u-profile for guiding powerwires and using quick fit pot nails.You can put a weather resistant flat plate like Trespa on top the U-profile and fix it using pot nails. The small white fences are plastic corner pieces for plastering walls. You can easy make a bend by cutting 2 sides of the U-profile keeping one side alive which will be bended , the other 2 sides overlap and create another nice pot nail connection. Make the bends on the spots where the curved rails are connected so each curved rail has a straight U-profile section as foundation. I used 15 degree at the start of e end coming from a straight followed by one or more 30 degree bends ending in a 15 degree bend again at the connection with the next straight track. The iron U-profiles are relatively cheap and rust prevented so wheather proof. I used 80 mm gray PVC pipe as pilars using a ground hand drill . Drive the pillar in the ground and top of at the desired level.. As for the pot nails one tip: when connecting a metal sheet with a plastic sheet use them allways with the metal sheet at the backside and the plastic plate in front because when applying the nail the shaft of the nail widens with great force. Hope this mail will be of any help for you.
Attachments
-
 U-profile on top of pipe and TRESPA on top of U-profile both connected with pop-nails.JPG429.8 KB · Views: 0
 -
 kabelgoot met twee hoeken dmv knippen en potnagelen..JPG357.2 KB · Views: 0
 -
 kabelgoot knippen met blikschaar.JPG794 KB · Views: 0
 -
 Kabelgoot materiaal bij bouwmarkt.JPG519.5 KB · Views: 0
 -
 kabelgoot potnagel direct voor toepassen potnageltang.JPG236.2 KB · Views: 0
 -
 kabelgoot met klem en heavy duty potnageltang.JPG342.8 KB · Views: 0
Definitely worth it, he does do nice models, but check the height of some of them, as they appear a bit tall. He's a bit of a cottage industry so he may be willing to send to the EUClavey is a new name to me. I will certainly look into them
Jasper
Hey, I'm only being creative here!
Thanks! I searched for him last night, and ordered a figure on eBay. It took some fumbling around between the british and dutch eBay sites, but he was very helpful, and now I have a painted 7/8" driver coming.Definitely worth it, he does do nice models, but check the height of some of them, as they appear a bit tall. He's a bit of a cottage industry so he may be willing to send to the EU

Last edited:
Jasper
Hey, I'm only being creative here!
Thank you. I'll keep it in mind.new idea of building a track base using 3m long iron u-profile