Motorising Occre Trams

3 minutes of fame

3d printing, electronics and trams
14 Dec 2020
574
154
Lincolnshire
www.mgnr.uk
Best answers
0
Country flag
Hi All.
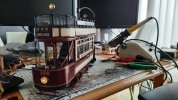
I've posted a few images on various posts of my Occre trams and how I motorise them, so I thought I would document my latest build which hopefully will be of interest to others.

The Occre Trams come with white metal wheels with quite small flanges and wooden axles and inside frames. Built correctly these are fine for positioning on a diorama and even pushing along a bit of track, but not much more. They won't really run through pointwork and will derail very easily.
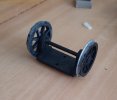
Wheelset.jpg

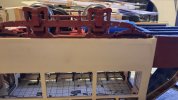
I looked around for some better solutions, but the unit supplied by Occre themselves- and no longer in production is quite poor and to my eyes would not last long. After a bit of searching, I came up with the Apple Tree Models axle hung gearbox and motor setups. Although designed for G3, the smallest variant will squeeze into G45 if you use outside frames. I ordered a couple of sets and was very impressed with them. My trams have 1 powered axle each, which is enough for a single tram, but if you are likely to pull trailers, you might want to consider motorising both axles.
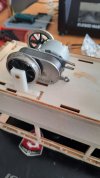
Motor and axles in situ 2.jpg

The 3D printed frames. These were done with my filament printer, while the ones above were printed in resin. Both seem to work equally well!
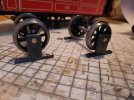
Wheel sets.jpg

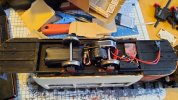
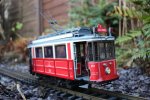
The rest of the kit is pretty simple. The frames are just simple 3D prints - I've shared these on the 3D print page and if anyone wants any, just let me know and they are yours for the price of a pint. I've used a basic speed controller and 7.4V Li-Ion battery back and a radio controlled car R/C, total cost £35 from Amazon. I would prefer the dedicated units, but they seem to be out of stock everywhere and my solution works very well, even if you need to be gentle on the trigger to get smooth starts and stops. I might well modify the controllers at some point to give some inertia control. The spare R/C channels can be linked to relay and trigger boards for audio and lighting. My Istanbul tram has some gong effects and permanent lighting as per the prototype, while my London tram will probably get something similar. All electronics are fitted under the sole bar and pretty much disappear once the trams are completed.
IMG_0013.JPG

I'll update the thread as the London tram progresses. I am painting up the main body at the moment and once this is complete, I will fit the running gear and electronics before I build the top deck and apply the finer detail. This makes it easier to run in the wiring for the lighting and to hide the battery pack.
 

PhilP

G Scale, 7/8th's, Electronics
5 Jun 2013
33,567
3,521
Nottingham
Best answers
0
Country flag
The Appletree units do look very nice..
I keep meaning to get one, to see how the motor 'likes' PWM..

PhilP
 

3 minutes of fame

3d printing, electronics and trams
14 Dec 2020
574
154
Lincolnshire
www.mgnr.uk
Best answers
0
Country flag
The Appletree units do look very nice..
I keep meaning to get one, to see how the motor 'likes' PWM..

PhilP
I am running them on a basic PWM speed controller and other than a bit of whine they perform pretty well. They are certainly no worse than other similarly sized motors.

I did find the gearbox to be a little "agricultural" when I first got them, but with some running in they have improved. I do like the overrun from the motors. Release the controller and the tram will run on about half a metre before coming to a halt.
 

Rhinochugger

Retired Oik
27 Oct 2009
36,716
4,240
North West Norfolk
Best answers
0
Country flag
I am running them on a basic PWM speed controller and other than a bit of whine they perform pretty well. They are certainly no worse than other similarly sized motors.

I did find the gearbox to be a little "agricultural" when I first got them, but with some running in they have improved. I do like the overrun from the motors. Release the controller and the tram will run on about half a metre before coming to a halt.
The benefits of not having a worm drive :nod::nod:

Worm drives are convenient and space saving for the smaller gauges - they're not the best solution for our large scale models, but most manufacturers have followed like sheep :rolleyes::rolleyes::rolleyes:
 
  • Like
Reactions: 1 user

dunnyrail

DOGS, Garden Railways, Steam Trains, Jive Dancing,
Staff member
GSC Moderator
25 Oct 2009
26,171
4,993
75
St.Neots Cambridgeshire UK
Best answers
0
Country flag
Probably worth mentioning that Fosworks do a similar but nit such high quality single wheel motor that fits in a similar way. Mot-100 at £34.50 with wheels so a little cheeper. Not tried one yet but worth knowing about.
 

3 minutes of fame

3d printing, electronics and trams
14 Dec 2020
574
154
Lincolnshire
www.mgnr.uk
Best answers
0
Country flag
Yes, they are slaters wheels. They've been stored in the shed for a few months, so realism is setting in!!

The gearboxes are designed to take any Slaters wheels you like, but the gearbox size limits you to about 30mm or so.
 

3 minutes of fame

3d printing, electronics and trams
14 Dec 2020
574
154
Lincolnshire
www.mgnr.uk
Best answers
0
Country flag
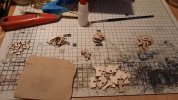
The one thing with building these trams is you do have to get used to a lot of repetitive actions. This is the kit of parts to make the 2 sets of stairs.

Stairs.jpg

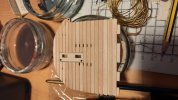
And cutting all the strips for the floors is no less onerous.

Floor.jpg

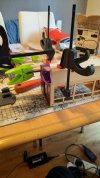
I've found you do need to clamp stuff tight to keep it all to shape. I think this is one of the common failures - simply pushing stuff together, leading to a weeker joint.

Gluing together.jpg
Still, good progress for the day, stairs ready to assemble and painted, passenger cabin pretty much completed, painted and varnished. Next thing will be some electrical first fix and the truck.
 

dunnyrail

DOGS, Garden Railways, Steam Trains, Jive Dancing,
Staff member
GSC Moderator
25 Oct 2009
26,171
4,993
75
St.Neots Cambridgeshire UK
Best answers
0
Country flag
The one thing with building these trams is you do have to get used to a lot of repetitive actions. This is the kit of parts to make the 2 sets of stairs.

View attachment 278164

And cutting all the strips for the floors is no less onerous.

View attachment 278168

I've found you do need to clamp stuff tight to keep it all to shape. I think this is one of the common failures - simply pushing stuff together, leading to a weeker joint.

View attachment 278169
Still, good progress for the day, stairs ready to assemble and painted, passenger cabin pretty much completed, painted and varnished. Next thing will be some electrical first fix and the truck.
Just wait till you get to the white metal handrails for the sides and stairs, I broke so many that I ended up soldering up new ones.
 

Rhinochugger

Retired Oik
27 Oct 2009
36,716
4,240
North West Norfolk
Best answers
0
Country flag
I've found you do need to clamp stuff tight to keep it all to shape. I think this is one of the common failures - simply pushing stuff together, leading to a weeker joint.
Yes, I found when making a laser cut kit that when using a good external wood glue (like Titebond 2) the moisture of the glue would cause the panels to temporarily bow.

Serious clamping of the joints coupled with a decent glue leads to a rock solid model :nod::nod:
 

3 minutes of fame

3d printing, electronics and trams
14 Dec 2020
574
154
Lincolnshire
www.mgnr.uk
Best answers
0
Country flag
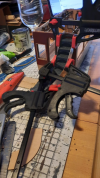
It's taken a bit of time to get them right, but the stairs are built and clad. Quite a lot of sanding, test fitting and swearing required to get the woodwork correct and then the metal sheeting to add.

1610098013434.png

These mini clamps are a boon for things like this. I have some smaller ones that use elastic bands and friction, but they are too fiddly for this sort of clamping.
Final result was OK though.

1610098098329.png
 

3 minutes of fame

3d printing, electronics and trams
14 Dec 2020
574
154
Lincolnshire
www.mgnr.uk
Best answers
0
Country flag
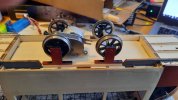
I got time today to fit the gearbox and wheels. To get the right wheel height, I needed to increase the axle frame height, but being lazy, I couldn't be bothered to reprint the frames, so I just cut some 3mm x 1mm wood strips to make some packers to go under the frames. The frames are just screwed into the packers and tram chassis with some small self tapping screws - the sort of thing normally found holding small models together.

20210111_123915.jpg
Once I was happy with positioning, I could trial fit the electronics and cosmetic side frames. All looks good - despite the ridiculously short wheel base, so the next job will be to wire up the speed controller and r/c along with the lighting controller. The underfame seems to hide the gubbins pretty well from normal viewing angles.

20210111_175204.jpg
 

3 minutes of fame

3d printing, electronics and trams
14 Dec 2020
574
154
Lincolnshire
www.mgnr.uk
Best answers
0
Country flag
A little more progress, the radio control arrived - and I had a spare Esc, so I got everything fitted and wired up. A quick test around the circuit and all is working well. I need to add the lighting next, which will be micro leds for the headlights and interior. These won't be directional, just switched on when the tram is powered up. I only really fit them to tell me when they are switched on!!20210116_124518.jpg
 

DafyddElvy

1:22.5 & 15mm Scale Trams, , NG Steam Railways
10 Feb 2021
984
96
West Lothian
Country
Scotland
Best answers
0
Country flag
Is it the S1 9v motor/gearbox you've used?
I have taken the plunge in to G'ish scale and the bachman tram I picked up on flea bay arrived today, the first thing I want to do is replace the power truck and what you have been using looks ideal.
For control I am probably going to go with the locoremote wifi system.
Thanks for sharing your traction motor find.

David
 

3 minutes of fame

3d printing, electronics and trams
14 Dec 2020
574
154
Lincolnshire
www.mgnr.uk
Best answers
0
Country flag
Is it the S1 9v motor/gearbox you've used?
I have taken the plunge in to G'ish scale and the bachman tram I picked up on flea bay arrived today, the first thing I want to do is replace the power truck and what you have been using looks ideal.
For control I am probably going to go with the locoremote wifi system.
Thanks for sharing your traction motor find.

David
Thanks, yes the Appletree units are excellent for this purpose and I find 7.4v into 9v motor works very well.

I'm very happy with how the tram turned out.

20210131_125659.jpg
 

3 minutes of fame

3d printing, electronics and trams
14 Dec 2020
574
154
Lincolnshire
www.mgnr.uk
Best answers
0
Country flag
These are the 31mm 1/32 wheels.
 

3 minutes of fame

3d printing, electronics and trams
14 Dec 2020
574
154
Lincolnshire
www.mgnr.uk
Best answers
0
Country flag
Regarding the lighting, this uses micro leds, with the wires threaded through 0.5mm holes drilled into the casting. These are super glued into place and then Glue and Glaze is used to create the glass lens. To run the wire up the poles, the completed wiring assembly was threaded down some heat shrink tubing along with a piece of brass wire. This gives a very strong slightly flexible pole with no visible wiring.
 

3 minutes of fame

3d printing, electronics and trams
14 Dec 2020
574
154
Lincolnshire
www.mgnr.uk
Best answers
0
Country flag
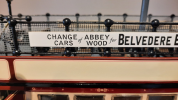
An interesting conversation with Occre today. I noticed before I bought the kit that there was a typo on the destination board on the upper deck of the tram. See if you can spot it...

1615828933936.png
I gather it's been like this since the kit was launched more than 10 years ago and no one has ever mentioned it to them!