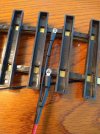
Matt's First Garden Railway

mjotrainbrain

Registered
19 Jun 2021
22
4
25
Michigan, USA
Best answers
0
Country flag
It's hard to express concisely how excited I am to be finally building my own garden railway, but I'm sure many of you can understand! This is something that I've wanted to do about as long as I can remember, and the opportunity has finally come along. Last week I purchased what is more or less an REA starter set off Facebook Marketplace. It consists of a 2-4-2 Rogers locomotive with slopeback tender in B&O paint. It's got a couple rough edges from years of use, but overall it seems solid. The speaker in the tender seems to be blown, some parts are broken on the locomotive which I should be able to repair, and the paint has some scratches. I also have not yet tested if the smoking function works. Would Lionel smoke fluid be OK to use? I have a lot of that kicking around. I also got a pair of REA passenger cars (1x coach and 1x combine; not the deluxe version unfortunately) which need the 3 of the 8 steps glued back on, an REA model 5400 power pack, 24x REA 4' diameter curves, 6x REA 3' straights, and 1x LGB 2' straight track piece. To me, this is a perfect amount of equipment to get a layout built in the space I have, although I'm sure one or two turnouts will be added before long.

The first thing for me was to test what does and doesn't work, and then clean it all up. I was initially disappointed that the loco did not run despite being advertised as working, however after a thorough reading of the instructions my dad noticed a switch that had to be flipped in the cab. Doh! Dining table pic showing off my freshly dusted Rogers:
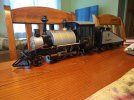
IMG_20210615_184837422.jpg

Next up I restrained my excitement to start laying track long enough to clean all the rail joiners in vinegar and salt, and used my automotive wiring skills and supplies to make a nice waterproof track power lead. This way I can unplug the transformer and leave the wires connected to the track behind, with zero concerns of moisture or creepy-crawlies settling inside the connector. At this point I found something to gripe about; the tiny screws holding the ties to the rails. They're fine for that, but once you try to get ring terminals attached to provide track power they're barely long enough and its hard to find ring terminals small enough. It's a small issue though, and eventually I intend to get power to the tracks through rail clamps anyhow.
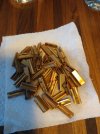
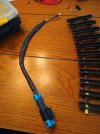
IMG_20210615_174758493.jpgIMG_20210615_173212699.jpgIMG_20210615_170249367.jpg

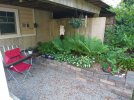
Next up, I had to select a place to begin construction. Being a uni student who still lives at home, that was a decision that had to be made with my mom. We found a suitable place where the dog couldn't do any damage (she's a black lab who LOVES to dig holes) and where the train would be a nice decoration. The space measures about 6' x 13' with a very slight grade from front to back. Here is some very initial planning:
IMG_20210615_194809843.jpg

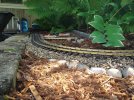
It quickly became clear that this spot was way too plant-dense. Luckily there were other places they could be used, so some space was made and some more serious track work could begin. I've been poking at it every day since, but I'm not done yet so for now here's day 1's progress:
IMG_20210618_165950903.jpg

I know the track isn't perfectly level from one rail to the other, but that will be finalized once all the track is laid. Also, once all the track is in place I will be adding additional gravel between and around the ties. My main concern is making sure I make things as level as possible from the front to back and left to right across the entire area, since it is so small that I'd like to avoid inclines. Overall this has been a lot of fun and I really look forward to finally seeing my train run around the loop!

Any tips you all have for me will be openly welcomed, as I am new to G scale and running trains outdoors in general. I hope to be able to update this thread with some more trackwork by the end of the coming weekend.
 
  • Like
Reactions: 2 users

Paul M

Registered
25 Oct 2016
11,875
1,696
60
Royston
Best answers
0
Country flag
Welcome to the forum. Have you a proper name or do you want to use your handle? Looks like you have made a good start, your connectors certainly look sturdy enough for many years or outdoors use. Are the rail connections actually screwed into the track? If not you may have issues with expansion of the plastic. Some small inclines are fine on a line, they can add interest to running, but,as you say, you really need to make it as level as you can across the tracks
 

PhilP

G Scale, 7/8th's, Electronics
5 Jun 2013
33,561
3,521
Nottingham
Best answers
0
Country flag
Good start - you seem to be doing all the right things..

Keep it level, to start with. If you have moved dirt about, it will settle, and you will need to revisit with the spirit level..
A small amount of 'Copaslip' (half a pea) smeared onto the ends of the rails, will keep your joints conducting. - LGB do a tube of 'conductive grease' (which doesn't conduct). What it does do, is keep moisture and oxygen out of your joints, so they stay low resistance.

A strip of weed membrane (not plastic, it will puddle water, and collect sediment) will keep the gravel cleaner. Stop it disappearing into the dirt, and make it easier to pull weed seedlings..

Have fun!
PhilP.
 

Gavin Sowry

Garden Railroader and Raconteur
27 Oct 2009
7,841
2,490
70
Hutt Valley, NZ
Best answers
0
Country flag
Mothers with gardens, come highly recommended.
Mothers who let their kids build railways in their gardens, come even more recommended.

Welcome to the forum. Good to see you got your train running. If I remember rightly, it is in Year 5 Engineering where they tell you that 'if all else fails, read the instructions'.
Meanwhile, over in Year 6 Philosophy, they are telling them not to 'believe everything you read'.

OK, a few tips to get you going. Get a small spirit level, preferably a plastic one (so it won't short out the rails if there is still power running). The major cause of derailments is poor/uneven superelevation across the track. Although real trains need it, our models don't. For ballast, avoid using rounded peebles, they'll just move about like jelly. Sharp angular stone chips do a swell job. Aim to get a continuous oval of track down, and running, it offers inspiration. Avoid kinks at the rail joints (you will soon find out why). If you do get derailments, ALWAYS check the track first, and eliminate the fault, before you rush in and pull your models apart, order new parts, reinstall them backwards, and still it derails (you think I'm joking, no, seen that too often). Within the next 6½ posts, someone will tell you to use DCC or battery power, consider it after you get your engineering doctorate (and perhaps have been made a partner in your firm).
 
Last edited:
  • Like
Reactions: 1 user

Gavin Sowry

Garden Railroader and Raconteur
27 Oct 2009
7,841
2,490
70
Hutt Valley, NZ
Best answers
0
Country flag
Oh, a good engineer's tool to get is the Aristocraft wheel and track gauge, comes with built in spirit levels, as well as track and wheel gauges.
Aristo has gone out of business, but you may pick up one on the evil bay (or even here.... we do swaps and sales).

ART - 11906 is the part number.
 
Last edited:

dunnyrail

DOGS, Garden Railways, Steam Trains, Jive Dancing,
Staff member
GSC Moderator
25 Oct 2009
26,164
4,989
75
St.Neots Cambridgeshire UK
Best answers
0
Country flag
Welcome to the forum, yes it is much easier for us if you have a real name!
 

JimmyB

Now retired - trains and fishing
23 Feb 2018
6,946
921
69
Weston-super-Mare
www.tumble-down-falls.co.uk
Best answers
0
Country flag
Welcome to the forum, lots of good advice already, however if you don't "understand" some of the advice due to language differences, don't be shy come back and ask :)
 

mjotrainbrain

Registered
19 Jun 2021
22
4
25
Michigan, USA
Best answers
0
Country flag
Welcome to the forum. Have you a proper name or do you want to use your handle? Looks like you have made a good start, your connectors certainly look sturdy enough for many years or outdoors use. Are the rail connections actually screwed into the track? If not you may have issues with expansion of the plastic. Some small inclines are fine on a line, they can add interest to running, but,as you say, you really need to make it as level as you can across the tracks

I go by Matt or Matthew, got that in the thread title but I should have said it explicitly to be clear. I am making sure to screw all the track connections together. I had some issues with the teeny tiny philips screws that came with the track, so I swapped them out for some stainless M2x3 socket head cap screws from McMaster-Carr. Pair that with a quality 1.5 mm hex driver and assembly is going great except for one or two holes the previous owner stripped out. I definitely did have concern for expansion due to temperature, especially with the big range we get up in Michigan.

About how much of an incline should the train be able to handle, realistically? I know inclines on curves will be harder for the train than those on straight sections, but I'm also not running long trains so it shouldn't be too much of a problem. I read 4% somewhere, which would give me an allowable 3" of rise along my main front straight which is 7' long between curves. I don't think I'll have any issues at all keeping within that.
 

mjotrainbrain

Registered
19 Jun 2021
22
4
25
Michigan, USA
Best answers
0
Country flag
Good start - you seem to be doing all the right things..

Keep it level, to start with. If you have moved dirt about, it will settle, and you will need to revisit with the spirit level..
A small amount of 'Copaslip' (half a pea) smeared onto the ends of the rails, will keep your joints conducting. - LGB do a tube of 'conductive grease' (which doesn't conduct). What it does do, is keep moisture and oxygen out of your joints, so they stay low resistance.

A strip of weed membrane (not plastic, it will puddle water, and collect sediment) will keep the gravel cleaner. Stop it disappearing into the dirt, and make it easier to pull weed seedlings..

Have fun!
PhilP.

Thanks for the advice Phil. I've done my best not to move any more dirt than necessary due to that exact issue, and any that I do I've tried to compact. I'll definitely keep a level and some spare gravel handy for any additional leveling that the right of way will inevitably need. I was actually considering using some kind of copper paste/antiseize type of compound on the joiners, but I was concerned with the tradeoff between maintaining good contact vs. dirt sticking to the grease. If it's worth the tradeoff and will save me electrical headaches I'm more than willing to unscrew things and reassemble with some kind of copper conductive paste. Regarding weed membrane, already have that covered! There's some of that across the entire area I'm building in about 2-3" below the surface, and I'm digging right down to it (being careful not to tear it up) to fill in with roadbed.

Definitely having fun, thanks!
 

mjotrainbrain

Registered
19 Jun 2021
22
4
25
Michigan, USA
Best answers
0
Country flag
Mothers with gardens, come highly recommended.
Mothers who let their kids build railways in their gardens, come even more recommended.

Welcome to the forum. Good to see you got your train running. If I remember rightly, it is in Year 5 Engineering where they tell you that 'if all else fails, read the instructions'.
Meanwhile, over in Year 6 Philosophy, they are telling them not to 'believe everything you read'.

OK, a few tips to get you going. Get a small spirit level, preferably a plastic one (so it won't short out the rails if there is still power running). The major cause of derailments is poor/uneven superelevation across the track. Although real trains need it, our models don't. For ballast, avoid using rounded peebles, they'll just move about like jelly. Sharp angular stone chips do a swell job. Aim to get a continuous oval of track down, and running, it offers inspiration. Avoid kinks at the rail joints (you will soon find out why). If you do get derailments, ALWAYS check the track first, and eliminate the fault, before you rush in and pull your models apart, order new parts, reinstall them backwards, and still it derails (you think I'm joking, no, seen that too often). Within the next 6½ posts, someone will tell you to use DCC or battery power, consider it after you get your engineering doctorate (and perhaps have been made a partner in your firm).

Well said Gavin, definitely feeling blessed to have a mother who is willing to put up with this! I'll have to buy her a train to run on the layout around the holidays once I move out I think.

You'd think I'd have learned by now to read instructions, ha! I had no idea even a G scale train like this, which to me initially looked like a cheap starter loco, would have any features at all, let alone one which allows you to disable the drive motors so the train can sit at idle smoking with the lights on...great feature! ...now that I know how to turn it off and make the train run. :rofl:

I'm just working with a long level for now to get the overall right of way level, but I will absolutely be going back with a small level to get the superelevation evened out. (Thanks for that term by the way, I was struggling with how to describe it...of course real railways would have come up with a word for it!) Good tip about the gravel. What I've used does have a fair bit of roundness to it, although about 25% of the pieces are angular. I suppose for now I'll just have to see how that works out. Kinks at rail joints are a big thing I've been trying to avoid, especially in the middle of this already tights bends. I'd imagine a derailment due to that would be easy and frustrating. DCC is a big "one-day" item for me, especially when I eventually build a larger railroad, but for the purposes of this little loop it'll likely stay simple DC. I think adding nice sound to my loco is something higher on my list at the moment.

Your comment about making sure to use a plastic level got me thinking; I know already I can't make a direct short with something like a metal level, but is it possible to run a train in wet conditions? I'm not talking about standing water over the tracks, but perhaps a few hours after it rains, or in the snow. I know I've seen large scale model trains plowing snow before, but it's possible they were battery powered.
 

mjotrainbrain

Registered
19 Jun 2021
22
4
25
Michigan, USA
Best answers
0
Country flag
Oh, a good engineer's tool to get is the Aristocraft wheel and track gauge, comes with built in spirit levels, as well as track and wheel gauges.
Aristo has gone out of business, but you may pick up one on the evil bay (or even here.... we do swaps and sales).

ART - 11906 is the part number.

Good advice on that tool, thanks! That will definitely be useful for trouble shooting, I'll try to track one down.

One of the first things I learned after buying this train was REA=Aristrocraft, and shortly afterwards Aristocraft=out of business. Bit of a bummer. On that note, I think it may be challenging to standardize everything I buy to Aristocraft couplers since they'll eventually get hard to find. What's a good alternative for an operating knuckle coupler? Bachmann perhaps? I know Kadee is popular, but honestly I'm not a huge fan; I like the operating knuckle like you find on a Lionel train.
 

mjotrainbrain

Registered
19 Jun 2021
22
4
25
Michigan, USA
Best answers
0
Country flag
Welcome to the forum, lots of good advice already, however if you don't "understand" some of the advice due to language differences, don't be shy come back and ask :)

Thanks for the welcome Jimmy! It definitely seems like quite the global crowd here, so I'm sure language differences will come up eventually, and even more so technical jargon that I've yet to learn. All good so far!
 
8 Mar 2014
7,806
972
San Diego
Country
Armenia
www.elmassian.com
Best answers
0
Country flag
I may have missed it, but put some automotive wheel bearing grease in the joiners before fitting, or you will have conduction problems, those joiners don't fit that well. A bit under the screw heads helps a lot, where the majority of the contact is by pressure.

If that track has never been outside, spray it with Armorall, will protect the track from crumbling in the sun, a few batches of track were made that did not have the UV protection.
 

mjotrainbrain

Registered
19 Jun 2021
22
4
25
Michigan, USA
Best answers
0
Country flag
I may have missed it, but put some automotive wheel bearing grease in the joiners before fitting, or you will have conduction problems, those joiners don't fit that well. A bit under the screw heads helps a lot, where the majority of the contact is by pressure.

If that track has never been outside, spray it with Armorall, will protect the track from crumbling in the sun, a few batches of track were made that did not have the UV protection.

I was a little uncertain about using any kind of grease on the connections due to not wanting to attract dirt, however I did notice that the joiners didn't fit super well so I suppose I should use something. I'll use it sparingly in the contact points.

I am not sure if the track has never been outside, but I assume it hasn't. Thanks for the tip about that, it would be a real drag if all my ties disintegrated.
 
8 Mar 2014
7,806
972
San Diego
Country
Armenia
www.elmassian.com
Best answers
0
Country flag
Actually, filling it with grease keeps dirt out of the joint as well as moisture... it is what you want. Don't use sparingly, it will have no effect.

When dirt gets in, as opposed to grease, the grit will work it's way in and slowly push the joint apart (grease will squish), if you understand how frozen water expands and cracks rocks, you will understand how dirt and grit will work it's way in with expansion and contraction.

Greg
 
  • Like
Reactions: 1 user

Gavin Sowry

Garden Railroader and Raconteur
27 Oct 2009
7,841
2,490
70
Hutt Valley, NZ
Best answers
0
Country flag
superelevation (Thanks for that term by the way, I was struggling with how to describe it...of course real railways would have come up with a word for it!)
Welcome to the English language..... Superelevation is the American term, the old British Empire term is Cant.
Being somewhat fluent in K1, Strine, Cain, Queens, and Skooch, I often 'translate' on this forum.
 
8 Mar 2014
7,806
972
San Diego
Country
Armenia
www.elmassian.com
Best answers
0
Country flag
Actually, superelevation is the term for intentional raising of the outer rail. Not recommended on our layouts but CAN be used. Perhaps cant has the same meaning. Does not matter.

The term you want is "track warp" or "crosslevel" and I will bet that is universal between the UK and here in the USA.

You want to eliminate it. Period.

Greg
 

Gavin Sowry

Garden Railroader and Raconteur
27 Oct 2009
7,841
2,490
70
Hutt Valley, NZ
Best answers
0
Country flag
Actually, superelevation is the term for intentional raising of the outer rail. Not recommended on our layouts but CAN be used. Perhaps cant has the same meaning. Does not matter.

The term you want is "track warp" or "crosslevel" and I will bet that is universal between the UK and here in the USA.

You want to eliminate it. Period.

Greg
Translations.

Track warp - Twist.
Crosslevel - Cant