Making of Old Joe

Bill Barnwell

Registered
30 Sep 2017
786
549
79
Ormond Beach, Fl
Best answers
0
Country flag
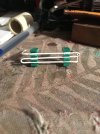
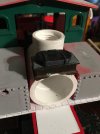
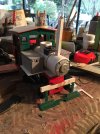
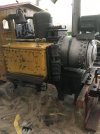
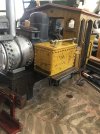
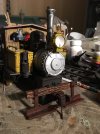
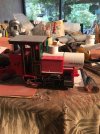
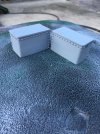
While waiting on some Mason Bogie parts I have decided on using the left over parts to build a small side tank industrial tank engine. Took the two cab sections and mated them together and glued the two pieces of leftover roofs together. Found the side tanks from a LGB 2017 engine that came off of Rosy, cut off the tab and started filling in some of the holes. Found that the width of the two coupled with a 1" PVC coupling was the same width as the cab. Added the wood bunker from the original Lionel 0-6-0 to the back and shortened a left over frame from a previous butcher job after modifying it to match the motor housing of a newer 2017 block. Still working on a water filler saddle for the side tanks and but did come across a smoke box front of a 2010 which I added to a plastic hole plug and fits nicely into the 3/4" coupling, Added the fire box left over from the sacrificed Spreewald (Mason Bogie drive) and it starting to com together. Today I added rivet detail to the 2 side tanks and gave a light coat of primer. Rivets are actually 1/2 round 2 mm plastic beads glued to the side of the tanks, thanks to [U]ge_rik[/U], time consuming but not near as bad as individual holes for each rivet. Still have to find a motor for the motor block as I bought it without but it was new and unused and in great shape and has all the looks of American valving. Think I'll call this engine "old Joe" will post more as the build moves along.
 

Attachments

  • old Joe begining.JPG
    old Joe begining.JPG
    275.4 KB · Views: 0
  • old Joe.JPG
    old Joe.JPG
    327.9 KB · Views: 0
  • old Joe tank rivets.JPG
    old Joe tank rivets.JPG
    459.3 KB · Views: 0
Last edited:

Paulus

Registered
13 Jan 2012
136
17
Best answers
0
using the left over parts to build a small side tank industrial tank engine
Somehow only a sentence like this can give so much inspiration... ;-)
It is great to see how you use left overs and bits and pieces from all around to build an engine. Looking forward to see the progress!
 

Bill Barnwell

Registered
30 Sep 2017
786
549
79
Ormond Beach, Fl
Best answers
0
Country flag
Got a little done on Old Joe, first set of rivets for the boiler, cut the boiler to the to be length, finished the smoke box door, was able to find a rectangle box for the water reservoir and caped it with the hatch cover from an old Bachmann tender. The reservoir will feed the side tanks via some rubber tubing, actually the outer sheath from an electrical cord, this will allow the engine to take on water from the water tank rather than filling each tank separately via a hose. Started size fitting the front bolster and step cowcatcher, I have a LGB cow catcher I could use but being as this suppose to be a small industrial engine I opted for the former. Was able to stumble across so old plastruct vinyl cover wire and a grooved bracket to mount it with so I made some air piping for under one of the running boards. No the smoke stack isn't going to be square just trying to get an idea on height and that tubing was handy. Found the top to the steam dome just have to cut it to size. Sort of on off building this week trying to get the house ready for guest for thanksgiving of which there will be some little ones, so thought is out of site out of mind, just hope I can remember where I have hidden stuff after wards, more to come, Bill
 

Attachments

  • old joe air piping.JPG
    old joe air piping.JPG
    237 KB · Views: 0
  • old joe water hatch reservior lid.JPG
    old joe water hatch reservior lid.JPG
    168.8 KB · Views: 0
  • old joe with tall stack.JPG
    old joe with tall stack.JPG
    298.5 KB · Views: 0

Bill Barnwell

Registered
30 Sep 2017
786
549
79
Ormond Beach, Fl
Best answers
0
Country flag
Moving along, decided I would try the rust look using rock salt, didn't quite go like the youtube but good enough. Used an oil base rattle can and think it would have probably worked better using acrylic air brush paint. The problem I had with the oil base was it stuck down the salt too well and wound out having to soak it in water for about 1/2 day and still had to scrape some of it off but it gave the result I was looking for so live and learn, using individual rivets, although a pain to install worked out well , had bought some self stick ones thinking I could bypass the gluing step but that didn't work out either. Found that the beads wouldn't come off the shipping paper and left gooey mess around them and found it very hard to position correctly. Got a little paint on the cab and trying to get it to look like old faded wood, and still have a ways to go. Will up date when I get something else done, Billold joe rusty starbord side.JPGold joe wood bunker rear with rust.JPG
 

Paul M

Registered
25 Oct 2016
11,875
1,696
60
Royston
Best answers
0
Country flag
For us lazy toads, how did you do the rust?
 

Bill Barnwell

Registered
30 Sep 2017
786
549
79
Ormond Beach, Fl
Best answers
0
Country flag
Thought I answered ? on how I made the rust but can't find my reply anywhere so I'll do it again, first started by painting areas that I wanted the rust with colors that look like rust, then misted the area with water and sprinkled sea salt on areas that I wanted the rust, let dry and then sprayed with top coat then let dry and brushed the salt off. I used a rattle can for the top coat and being as it is basically yellow and translucent I had to us quite a bit of paint and after drying had a lot of trouble brushing the salt off as the top coat had sealed the salt in place, soaked in water for about 4 hours and even then had to do a lot of scraping, think next time I will try and use acrylic paints and spray with an air brush, Bill
 
  • Like
Reactions: 1 user

Bill Barnwell

Registered
30 Sep 2017
786
549
79
Ormond Beach, Fl
Best answers
0
Country flag
still piddling with Old Joe, been cold here in central Florida east coast and being as my work area is on an open porch I haven gotten a lot done, but things that I have done are time consuming taking planning and thought. Finally figured out how to secure the lead weight in the engine and at the same time secure the boiler to the frame and that was using a furniture fitting that screws into wood an provides machine screw threads in the middle. Put it in the hole that the factory smoke stack went thru and will be held in place with a 1/4 X 20 SS bolt. Then at the same time I secured the cab with 2/56 screws on either side of the side cab openings after building up the area with styrene, in the picture that are a bright silver but will be changing them out for black hex head ones. Found some old steps from a LGB European coach and added them to the cab under the doors openings. The wood bunker is clipped on to the back of the cab and is secured from underneath with screws just like the factory one was so the cab will hold the rear of the boiler and the SS screw will hold the front. Little inside work, I painted on the wood load to give it more of a real appearance and it came out pretty good also dabbed some on the cab to give it a faded wood look. Think I'm going to try some cloth on the cab roof to give it a canvas look. Still have the side tanks to secure and a front bolster with coupler and coupler in the rear, more to come, Bill
old joe brass weight insert.JPGold joe cab screw.JPGold joe wood load.JPG
 

Bill Barnwell

Registered
30 Sep 2017
786
549
79
Ormond Beach, Fl
Best answers
0
Country flag
Little more done today, got the cribbing for the wood box finished, painted and installed, but most the time was spent on figuring type, location and mounting of the front coupler. Luckily I found in my collection of Kadee couplers a centerset short gear box # 835 couple which enabled me to mount it to a wood beam and both secured to a small flat protruding plate that is on 2010 engines, there were some angled supports molded in underneath which I had to remove but a sharp chisel made short work of them. The wood beam is actually PVC board that I had ripped sometime ago to make supports for my water tower. The wantabe cow catcher is one left over from a Bachmann Big hauler tender that has excellent forgiveness in the crash department and is great for bending without breakage and gives the build the appearance of a working yard engine. I then secured every thing with 2/56 screws and nuts which can be seen in the picture as silvery dots but will get covered with grimy paint soon. Still trying to find a suitable material to make my canvas roof with, suggestion are welcome. Will post when further achievements are made, Billold joe coupler.JPGold joe cribbing.JPG
 

Paul M

Registered
25 Oct 2016
11,875
1,696
60
Royston
Best answers
0
Country flag
Still trying to find a suitable material to make my canvas roof with, suggestion are welcome
How about anext (or wifes) handkerchief, suitably cut to size and dyed with tea?
 

Bill Barnwell

Registered
30 Sep 2017
786
549
79
Ormond Beach, Fl
Best answers
0
Country flag
I found a piece of material my wife had with a nice small showable weave but it had a print on it so I had to paint it, I’ll post pictures when it dries, thanks for the suggestion, Bill
 

Bill Barnwell

Registered
30 Sep 2017
786
549
79
Ormond Beach, Fl
Best answers
0
Country flag
After several good suggestions from several readers, I found some material that my wife had that had a nice weave and was thin enough to show the groves that I had scribed in the top. Selecting a suitable sized piece I glued it with some titebond glue and allowedold joe canvas roof with wood box.JPGold joe canvas roof.JPG to dry. I was going to dye the material with coffee or tea but it had a print on it so I wound up painting it and will probably put some tar patches on it where a ember from the stack landed and caused a burn hole. still more to come, Bill
 

Bill Barnwell

Registered
30 Sep 2017
786
549
79
Ormond Beach, Fl
Best answers
0
Country flag
Adding details to engine, got air piping along with the air compressor attached to the starboard side water tank + a bell attached to the vertical front of the engine cab and on the port side a air tank, tied the air piping and the air tank together with a pine made from metal wire covered vinyl, also added some hand rails on top of the water tanks for workers that came off and old aristo 0-4-0. Ran across a couple of head lights that I could incorporate into the engine but initially I was not going to put any headlights because it was thought engine only worked during the day, still thinking about that. Also started weathering the engine but a lot left to do, more to come, Bill. Since originally posting I have come to understand that by law the must have a head light so I guess I just have to pick a style.
 

Attachments

  • old joe starboard side air cooling piping.JPG
    old joe starboard side air cooling piping.JPG
    247.5 KB · Views: 0
  • old joe port side air tank.JPG
    old joe port side air tank.JPG
    292.7 KB · Views: 0

Bill Barnwell

Registered
30 Sep 2017
786
549
79
Ormond Beach, Fl
Best answers
0
Country flag
Finally decided on a headlight for Old Joe, had a selection of Bachmann, toy train and stanza, and I selected stanza basically because of size and style, but I did cut down the stanza one, removed the side board on the stock one so that the head light stood alone without a back board. Mounted it to the boiler using 2/56 black Allen head screws that are taped into the boiler, painted the one for the front to match the machine yellow that the tank is painted in, just because I waned it to show up more than a drab black or plain one, have a matching vertical one for the rear of the wood tender vertical back but painted that one silver for the same reason as I didn't want it to disappear into the back ground., also modified it in the same manner removing the back board behind the stanza light, think I will paint the reflector bright silver instead of leaving it factory white. more to come, Bill
 

Attachments

  • old joe new head lite.JPG
    old joe new head lite.JPG
    261.6 KB · Views: 0
  • Like
Reactions: 1 user

Paul M

Registered
25 Oct 2016
11,875
1,696
60
Royston
Best answers
0
Country flag
Looks just the part
 

Bill Barnwell

Registered
30 Sep 2017
786
549
79
Ormond Beach, Fl
Best answers
0
Country flag
Got a little more done today been tuff cause I'm taking meds for a lung infection and so now I shake more than usual, the Kadee springs were a blast to do. Used my last beam of cut down PVC board from the pillars of my water tower for the rear beam, found a step in my junk collection off a aristo slope back tender and a new Kadee #779 coupler. Being as there is no rear section left on the engine deck, cut it off some time ago, I mounted the beam, coupler assy to the motor block using 2/56 screws taped into the housing and secured with lock tight. Hopefully the meds will be over soon and I can get to some finish assy and wiring, now looking for a usable motor to make it run, more to come , Bill old joe rear coupler from rear.JPGold joe rear coupler from side.JPG
 
  • Like
Reactions: 1 users

Bill Barnwell

Registered
30 Sep 2017
786
549
79
Ormond Beach, Fl
Best answers
0
Country flag
Had a comment that the cab on old Joe looked very shallow so I compared it to an aristo craft 0-4-0 switcher cab it might be 1/16" less not enough to matter
old joe cab comparision.JPGold joe cab comparision.JPG
 

Madman

Registered
25 Oct 2009
17,132
2,949
Pennsylvania, USA
Best answers
0
Country flag
Great kit bash.....:clap:
 

lyctus

Registered
12 Dec 2019
35
1
73
Duncraig, Western Australia
Best answers
0
I can hardly believe the transition from an 'outshopped' clean bunch of parts to work/weather worn yard loco . Great work Bill !