LGB 2015D STEAMER & MOTORIZED TENDER - DCC SOUND CONVERSION

LGB333

Active Member
TRADER
15 Feb 2015
689
43
McLean Virginia
www.olddominionrailways.com
Best answers
0
Country flag
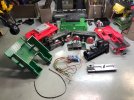
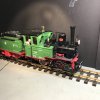
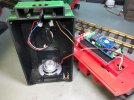
I just completed converting an LGB 2015D Steamer and its matching motorized tender to DCC sound, both with clam shell motor blocks. I had to cut half of the lead weight in the boiler and relocate the two pieces to the cab's water and coal compartments to fit an ESU LokSound 5L DCC sound decoder inside. A 40mm speaker was placed into the firebox. For the tender's decoder, I first tried installing an ESU LokPilot 5L locomotive/function decoder but even after matching the settings on the locomotive's decoder, I could not get the tender's starting and stopping momentum to behave like the sound decoder. So, I then installed another LokSound 5L sound decoder into the tender..........success, the tender behaves almost exactly like the locomotive even though the locomotive is heavier than the tender. Next, I decider to take advantage of the tender's sound decoder and installed a speaker shown below. Now, the deeper sound in the tender really enhances the sound quality, although I had to reduce a few of the locomotive's decoder sounds to prevent echo such as the station announcements, bell, and chuff. Otherwise, the dual sound decoders sound fabulous. In the future, for this type conversion with a matching motorized tender, I'd probably just run a cable from the locomotive to the tender for the DCC conversion, including the second speaker in the tender. I'll post a link latter to a video of this set operating on my DCC Test Stand Roller Wheels so you can hear the sound quality.
LGB 2015D.JPGLGB 2015D ESU 5L - Speaker.jpg
 
  • Like
Reactions: 1 user

LGB333

Active Member
TRADER
15 Feb 2015
689
43
McLean Virginia
www.olddominionrailways.com
Best answers
0
Country flag
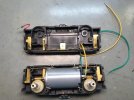
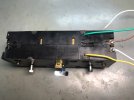
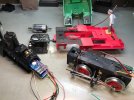
For those interested in more photos of this project, see below. You can see where I relocated the two pieces of the boiler's lead weight in the last photo. You must also reconfigure the wiring connections for the smoker to the decoder. For preventative maintenance and long reliability, I also installed two new LGB Buhler motors even though the existing ones were operating okay........you don't want to ever have to reopen these clam shell motor blocks to replace a failed motor.....well worth the extra $53 per motor.
LGB 2015D ESU 5L DCC Sound Install - 1.jpgLGB 2015D ESU 5L DCC Sound Install - 2.jpg
LGB 2015D ESU 5L DCC Sound Install - 3.jpgLGB 2015D ESU 5L DCC Sound Install - 4.jpg
 
  • Like
Reactions: 1 user

Dan

Registered
28 Jan 2010
663
52
Eastern MA, USA
Best answers
0
Country flag
I was able to install a zimo decoder in the engine and it fit in the bottom of the cab of my stainz. I ran speaker and rear light, motor cable to the tender. This is not something that most will try to do but it did work for me.
 

curtis

Registered
27 Nov 2018
442
117
34
Jersey
Country
Jersey
hsbagardenrailway.com
Best answers
0
Country flag
Clever idea to cut the weight in the boiler. What did you cut it with? I ask because that would help me with another conversion I'm toying around with.

I've converted of couple of these now. I always opted for a single decoder in the tender with a connecting lead for the for the track, motor, lights etc which I guess is the inverse of Dan? Can I ask why you opted for two decoders? I fear there is something I've overlooked in my attempts..
 

Cobalt6700

Registered
2 Jul 2020
125
33
UK - Oxfordshire
Best answers
0
Country flag
I recently converted a 21151 which is almost the same.

I initially had one decoder ( ESU LokPilot ) in the engine and the other ( ESU LokSound ) in the tender, but couldn't get them to work together nicely. Ended up with one decoder ( LokSound L ) in the tender doing motors and sound, with a LokPilot FX in the Loco doing lights and smoke unit control, seems to work very well. Like curtis, I have also used connecting wires between the tender and Loco for motor and track power.
My setup is a little different as I also fitted a WiDCC board to allow a RC transmitter to control the loco.

I also 3D printed some new motor block clamp housings to allow me to fit some micro servos for remote couplers. No hook on the front due to the way the chimney holds the front of the Loco, but a plunger is there to uncouple.

1i8kCilh.jpg


8xXJMHeh.jpg


Loco - Tender wiring

ytEDuPZh.jpg


Servos

qCI3ZGPh.jpg


JsL3hH2h.jpg


dsprdXbh.jpg


Couplers:

f90dhU4h.jpg


qM5n3SZh.jpg
 
  • Like
Reactions: 1 users

AustrianNG

Director of my railway
16 Sep 2015
1,397
1,721
Wirral
Best answers
0
Country flag
Some very nice work there to upgrade the various locos to n this thread.
Good to see long serving locos being given such upgrades and improvements.
 

LGB333

Active Member
TRADER
15 Feb 2015
689
43
McLean Virginia
www.olddominionrailways.com
Best answers
0
Country flag
Clever idea to cut the weight in the boiler. What did you cut it with? I ask because that would help me with another conversion I'm toying around with.

I've converted of couple of these now. I always opted for a single decoder in the tender with a connecting lead for the for the track, motor, lights etc which I guess is the inverse of Dan? Can I ask why you opted for two decoders? I fear there is something I've overlooked in my attempts..
Curtis - I have two cordless Robyi saws: Tabletop and Miter. They slice through the lead weights like butter! But for this type of small cutting job, you can just use a hacksaw. Lead is hazardous, however, so wear gloves and eye protectors, and cut it outside. When using my saws, I use a facemask, gloves an apron, and operate them outside so there's plenty of ventalation.

There are various methods for converting this type of locomotive and matching tender to DCC sound: Using one decoder in the locomotive and wired to the tender; or install separate decoders in each unit. There's less wiring required if using two decoders. Another reason to use two decoders is if the motors don't run in sync before converting, then they won't in DCC either, so the tender is likely to run faster with less weight than the locomotive. With only one decoder in the locomotive, you can do any adjustments to slow down the motor in the tender. I always planned to use two decoders but couldn't get the adjustments of the tender's decoder to match the sound-generated momentum in the LokSound 5L. When the locomotive is started, the steam exhaust sound is hear for about 7 seconds or so, and then the wheels start moving. However, the tender starts moving immediately. I've contacted ESU Technical to see if they can give me the adjustments for the LokPilot 5L's momentum to match the LokSound 5L's momentum. But I wanted to get the project completed for my customer last week, so for expediency, I instead installed a second LokSound 5L sound decoder plus a speaker into the tender, and then the two units' movements matched.
 
Last edited:

LGB333

Active Member
TRADER
15 Feb 2015
689
43
McLean Virginia
www.olddominionrailways.com
Best answers
0
Country flag
I recently converted a 21151 which is almost the same.

I initially had one decoder ( ESU LokPilot ) in the engine and the other ( ESU LokSound ) in the tender, but couldn't get them to work together nicely. Ended up with one decoder ( LokSound L ) in the tender doing motors and sound, with a LokPilot FX in the Loco doing lights and smoke unit control, seems to work very well. Like curtis, I have also used connecting wires between the tender and Loco for motor and track power.
My setup is a little different as I also fitted a WiDCC board to allow a RC transmitter to control the loco.

I also 3D printed some new motor block clamp housings to allow me to fit some micro servos for remote couplers. No hook on the front due to the way the chimney holds the front of the Loco, but a plunger is there to uncouple.

1i8kCilh.jpg


8xXJMHeh.jpg


Loco - Tender wiring

ytEDuPZh.jpg


Servos

qCI3ZGPh.jpg


JsL3hH2h.jpg


dsprdXbh.jpg


Couplers:

f90dhU4h.jpg


qM5n3SZh.jpg
Very nice electrical design and installation work! At least you didn't have the old clam shell motor blocks like my two units which had to be converted to DCC functionality........fun ugh!

I see you removed the lead weight from it's position inside the tender and fabricated four posts from some metal material. That a good idea that provides more space for all your boards and the large speaker. I assume you drilled speaker sound exit holes through the tender's base?
 

Cobalt6700

Registered
2 Jul 2020
125
33
UK - Oxfordshire
Best answers
0
Country flag
Curtis, I meant to say, I cut lead with a bacho 244p-xt wood saw. An 18tpi blade on a hacksaw also works, but the lead gets a bit stuck in the teeth. A bit of WD40 on the wood saw blade and the precautions that LGB333 mentioned.


Very nice electrical design and installation work! At least you didn't have the old clam shell motor blocks like my two units which had to be converted to DCC functionality........fun ugh!

I see you removed the lead weight from it's position inside the tender and fabricated four posts from some metal material. That a good idea that provides more space for all your boards and the large speaker. I assume you drilled speaker sound exit holes through the tender's base?

Thanks very much :D

Indeed, the 4 pin plug blocks are much nicer! I had to do the conversion on my 2080 and 2040 and I know which motor blocks I prefer.

The 21151 tender looks different to the 2015D tender - the lead blocks are in thier original position, under the decoder and WiDCC board. The speaker mount was ready and waiting to go :D
 

Dan

Registered
28 Jan 2010
663
52
Eastern MA, USA
Best answers
0
Country flag
I have the American version of the stainz and found I can install a 4 amp Zimo large scale sound decoder on the inside bottom of the cab opposite of the engineer. Sure you have to run extra wires to the tender but I will never have a motor sync issue doing this. Removed tender weight and used the FRS7 speaker.
 

LGB333

Active Member
TRADER
15 Feb 2015
689
43
McLean Virginia
www.olddominionrailways.com
Best answers
0
Country flag
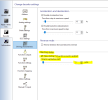
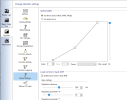
Okay, the Tech Expert at ESU LLC USA advised me how to match the motor movement of the second decoder installed in the tender to the sound decoder in the locomotive: "You need to select the delay starting ans put the time in for the delay using the lok programmer here is the screen shot of where to make this change on a Lok Pilot decoder. Then match the speed curve settings Second photo below."

ESU DCC DECODER Momemtum Adjustment-1.pngESU DCC DECODER Momemtum Adjustment-2.png
 
  • Like
Reactions: 1 user

Cobalt6700

Registered
2 Jul 2020
125
33
UK - Oxfordshire
Best answers
0
Country flag
LGB333 LGB333 This is where I got too. However, there are a number of scenarios where this doesn't work. E.g. The LokSound use of 'drive lock' and 'drive hold'.
The LokPilot has no way of knowing if these logical functions are active. This can cause the following issues:

Steam Sound - If the sound project includes cylinder cocks, the starting delay is mostly different between cocks open and cocks closed - the LokPilot can only have a fixed delay. This causes motors to start at different times.

Diesel / Hydraulic sound - This seems mainly an issue with Drive hold - where the LokSound is holding to change gear or something, and the LokPilot has no way of knowing and either over or under drives. There is also issues with drive lock on brake or direction / shunt mode change, which again the LokPilot cannot see.


I did have a go with interfacing a LokSound and a LokPilot using a digital out on the LokSound to drive an Optocoupler being read on a digital in on the LokPilot. It worked, but required extra wiring between two decoders, and the sound project modifications required to make it work were a bore.

What ESU should do is give the sound programming functionality (or a dummy version) to the LokPilot - from what I have seen the decoders are identical in manufacture (same PCB/ Chip) to the LokSound variant, but without the hardware required to produce sound (the chips are not included on the PCB). This would allow both decoders to run the same project, and allow them to be in sync.
 
  • Like
Reactions: 1 user

LGB333

Active Member
TRADER
15 Feb 2015
689
43
McLean Virginia
www.olddominionrailways.com
Best answers
0
Country flag
LGB333 LGB333 This is where I got too. However, there are a number of scenarios where this doesn't work. E.g. The LokSound use of 'drive lock' and 'drive hold'.
The LokPilot has no way of knowing if these logical functions are active. This can cause the following issues:

Steam Sound - If the sound project includes cylinder cocks, the starting delay is mostly different between cocks open and cocks closed - the LokPilot can only have a fixed delay. This causes motors to start at different times.

Diesel / Hydraulic sound - This seems mainly an issue with Drive hold - where the LokSound is holding to change gear or something, and the LokPilot has no way of knowing and either over or under drives. There is also issues with drive lock on brake or direction / shunt mode change, which again the LokPilot cannot see.


I did have a go with interfacing a LokSound and a LokPilot using a digital out on the LokSound to drive an Optocoupler being read on a digital in on the LokPilot. It worked, but required extra wiring between two decoders, and the sound project modifications required to make it work were a bore.

What ESU should do is give the sound programming functionality (or a dummy version) to the LokPilot - from what I have seen the decoders are identical in manufacture (same PCB/ Chip) to the LokSound variant, but without the hardware required to produce sound (the chips are not included on the PCB). This would allow both decoders to run the same project, and allow them to be in sync.
Monty - It's obvious you did a thorough analysis in unpacking this issue........my compliments! I'm glad I decided to not try to get the two decoders on my project to work in sync and instead installed two LokSound decoders. So, the solution for future projects is to use one decoder to operate both the locomotive and tender's motors, or, as I did, install two LokSound decoders. Using one decoder for both will only work, however, if both motors operate at the same speed.....since I installed two new motors they did operate in sync.