idlemarvel
Neither idle nor a marvel
I've been meaning to get into 3D printing for some time but have been put off by forum chatter (not on here) of users having to fiddle endlessly with settings to get something to print satisfactorily, by many of the affordable 3D printers being self assembly leading to more frustrations, and general concerns about the investment in money and time not paying off in terms of the quality of the end result. I'm sure others had the same and other doubts before they started.
Anyway I spent a month or so doing more serious research into what was involved, what results could realistically be achieved, and where to start - and specifically which printer to start with. (As an aside I found the info provided by @ge_rik to be very useful).
I came up with a list of requirements:
- ready assembled and ready to go printer
- enclosed (thinking of noise, temperature variations, and grandkid's fingers!)
- able to print PLA, ABS and ideally PETG materials
- WiFi capable (didn't want to be copying files on USB sticks endlessly)
- suitable for grandkids to use (touch screen controls)
- sub £300
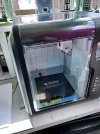
After watching various YouTube reviews I decided on the Flashforge Adventurer 3 which was on special offer on Amazon. At the last minute I went for the Lite version (no camera, no end of filament detection) as it was £70 cheaper.

I've only been using it for a few days but I have to say I am very pleased. Apart from initial trouble with the filament feed into the print head, it has been very easy to use with more than satisfactory results. I printed the example cube within an hour of opening the box.
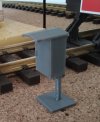
My first real print on day one was an HO scale German lineside phone box downloaded from Thingiverse, which I scaled up by 300% in the slicing software (Flashprint).

 www.thingiverse.com
It didn't come out too badly but it needed to have supports which didn't remove cleanly. I try to avoid using rafts and supports now - took me a while to figure out how to turn those off in the slicing software.

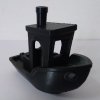
I've printed the inevitable Benchy (benchmark boat) and it came out very well and very close in dimensions.

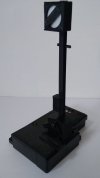
I've started learning TinkerCad (thanks again @ge_rik ) which as some of you will know is very easy to use - even my 7 year old grandson is using it - and quite capable. This is my first foray into design and print - a German Sh 1 signal mounted on an LGB signal point motor:

Once it's past the prototype stage I'll start a separate thread.
To summarise my first thoughts after having just got started, I would say:
- You need to understand how a 3D printer works - laying down horizontal lines of molten plastic on top of previous lines a layer at a time - no printing in mid air! - to appreciate what shapes you can print and in what orientation
- Similarly you need to understand the production process - design (DIY or download existing), slice (turning the design into layers) - print - to understand what you can do to correct or improve the printed result
- You need to treat this as another DIY skill to be learned - it won't be perfect from day one - but it's easier than you think!
Anyway I spent a month or so doing more serious research into what was involved, what results could realistically be achieved, and where to start - and specifically which printer to start with. (As an aside I found the info provided by @ge_rik to be very useful).
I came up with a list of requirements:
- ready assembled and ready to go printer
- enclosed (thinking of noise, temperature variations, and grandkid's fingers!)
- able to print PLA, ABS and ideally PETG materials
- WiFi capable (didn't want to be copying files on USB sticks endlessly)
- suitable for grandkids to use (touch screen controls)
- sub £300
After watching various YouTube reviews I decided on the Flashforge Adventurer 3 which was on special offer on Amazon. At the last minute I went for the Lite version (no camera, no end of filament detection) as it was £70 cheaper.

I've only been using it for a few days but I have to say I am very pleased. Apart from initial trouble with the filament feed into the print head, it has been very easy to use with more than satisfactory results. I printed the example cube within an hour of opening the box.
My first real print on day one was an HO scale German lineside phone box downloaded from Thingiverse, which I scaled up by 300% in the slicing software (Flashprint).
Lineside telephone for model railway (german edition) by LorenzS
This is a german lineside telephone (german: Streckenfernsprecher) for model railway. It is scaled for gauge h0/00.
It didn't come out too badly but it needed to have supports which didn't remove cleanly. I try to avoid using rafts and supports now - took me a while to figure out how to turn those off in the slicing software.

I've printed the inevitable Benchy (benchmark boat) and it came out very well and very close in dimensions.

I've started learning TinkerCad (thanks again @ge_rik ) which as some of you will know is very easy to use - even my 7 year old grandson is using it - and quite capable. This is my first foray into design and print - a German Sh 1 signal mounted on an LGB signal point motor:

Once it's past the prototype stage I'll start a separate thread.
To summarise my first thoughts after having just got started, I would say:
- You need to understand how a 3D printer works - laying down horizontal lines of molten plastic on top of previous lines a layer at a time - no printing in mid air! - to appreciate what shapes you can print and in what orientation
- Similarly you need to understand the production process - design (DIY or download existing), slice (turning the design into layers) - print - to understand what you can do to correct or improve the printed result
- You need to treat this as another DIY skill to be learned - it won't be perfect from day one - but it's easier than you think!
