I am keen to know how this unit installation goes Peter.The SloMo inertia device I ordered for my Katie arrived today. Looks very nicely made. Now I have to figure out how to install it.
After three days of 48 degree centigrade it will be nice to get out in the garden this weekend.
Peter Lucas
MyLocoSoundView attachment 259929
You are using an out of date browser. It may not display this or other websites correctly.
You should upgrade or use an alternative browser.
You should upgrade or use an alternative browser.
Katie and Me
- Thread starter lyctus
- Start date
artfull dodger
Registered
I had one of those in a Roundhouse Billy that I built from a kit. Really transforms the model and if you want to run without it, just loosen the set screw on the axle chain sprocket. Dont count out a small railway. Katie can go round really tight curves. I have seen layouts running a Katie on a balcony of a multi story apartment complex, to very small loops in a tiny UK row house garden. It can be done. Spend some time going thru videos on youtube watching UK style live steamers, that will take you into some really small gardens and some really large ones. Great place to get ideas. I have found that many UK style garden lines are shoehorned into really small gardens, even though sometimes the pictures themselves make it look like a really large railway till one see's an overview or track plan! Katie is an excellent engine and I fancy one myself one day. Maybe even in kit form. I have built a Billy and a Lady Anne from their kit line up. Cheers Mike the Aspie
There are Vids Links on the builders site that I found very useful when installing my SloMo’s.The SloMo inertia device I ordered for my Katie arrived today. Looks very nicely made. Now I have to figure out how to install it.
After three days of 48 degree centigrade it will be nice to get out in the garden this weekend.
Peter Lucas
MyLocoSoundView attachment 259929
My kit built Katie with slomo and a homemade rear cab sheet and bunker. Slomo is really easy to fit and adjust and I wouldn't run without one, as artful dodger says, just loosen the grub screw and compare the performanceThere are Vids Links on the builders site that I found very useful when installing my SloMo’s.
I installed SloMo in my Katie on Boxing Day but hit a problem. Only on Katie, the grub screws on the lifting arms have to be released so that the weigh shaft can be rotated. One grub screw released easily but the other would not shift. Tried doses of WD40 and applied heat but nothing freed it. Next step will be to drill it out and re-tap it but does anyone have other ideas?
Regards
Peter Lucas
MyLocoSound
Regards
Peter Lucas
MyLocoSound
My Jack was an older one without the screws so I had to bend the Weight Bars out of the way with the help of a hammer. Not recommended but perhaps a day or two with Penetrating Oil? WD40 not adequate for that task and the heat will have cooked it away.I installed SloMo in my Katie on Boxing Day but hit a problem. Only on Katie, the grub screws on the lifting arms have to be released so that the weigh shaft can be rotated. One grub screw released easily but the other would not shift. Tried doses of WD40 and applied heat but nothing freed it. Next step will be to drill it out and re-tap it but does anyone have other ideas?
Regards
Peter Lucas
MyLocoSound
What a great video ! Slomo really makes Katie a star. I have virtually completed my Katie ( only the roof and makers plates to fit) , I have ordered my slomo. Katie steams well and runs well on blocks. I don't have a track to run on but I am sure I will sort something out in due course. I have an offer of a run on a fellow West Aussie who lives not so far from me (thanks Geoff ).My kit built Katie with slomo and a homemade rear cab sheet and bunker. Slomo is really easy to fit and adjust and I wouldn't run without one, as artful dodger says, just loosen the grub screw and compare the performance
Hi Peter,I installed SloMo in my Katie on Boxing Day but hit a problem. Only on Katie, the grub screws on the lifting arms have to be released so that the weigh shaft can be rotated. One grub screw released easily but the other would not shift. Tried doses of WD40 and applied heat but nothing freed it. Next step will be to drill it out and re-tap it but does anyone have other ideas?
Regards
Peter Lucas
MyLocoSound
Sorry to hear you had a problem with the grub screw in the lifting arm. Have you sorted this out yet ? I have been busy in recent weeks ( I run a school attendance reward camp for Aboriginal junior high school kids from Derby 2,400Kms from Perth and final preparations and camp have kept me v. busy ! ) so apologise for not seeing or replying to your posts. I had an out of the carton issue with the RH lifter in my kit...the grub screw was cross threaded by the assembler...after RH wanted about 35AUD to supply and post, I had a real crack at it and removed the grub screw - not easy (locking pliers and allen key ) - and miraculously was able to re-tap and get a good bite with the grub screw.
Katie is virtually finished, just the roof and makers plates to fit, and it runs really well on the blocks. I don't have a track to run on.
I am looking forward to scratch building some rolling stock. Do you have a suggestion for reasonably priced , preferably metal, wheel sets ?
What a great video ! Slomo really makes Katie a star. I have virtually completed my Katie ( only the roof and makers plates to fit) , I have ordered my slomo. Katie steams well and runs well on blocks. I don't have a track to run on but I am sure I will sort something out in due course. I have an offer of a run on a fellow West Aussie who lives not so far from me (thanks Geoff ).
One more thing...can you tell me about the couplers on your loco/rolling stock please ? The RH dumb buffer/hook is not conducive to shunting operations and I would like to fit a auto coupler like the ones on your equipment.My kit built Katie with slomo and a homemade rear cab sheet and bunker. Slomo is really easy to fit and adjust and I wouldn't run without one, as artful dodger says, just loosen the grub screw and compare the performance
Hi Peter,I installed SloMo in my Katie on Boxing Day but hit a problem. Only on Katie, the grub screws on the lifting arms have to be released so that the weigh shaft can be rotated. One grub screw released easily but the other would not shift. Tried doses of WD40 and applied heat but nothing freed it. Next step will be to drill it out and re-tap it but does anyone have other ideas?
Regards
Peter Lucas
MyLocoSound
I have fitted the cab/saddle tank assembly to Katie and I am a bit confused about filling the boiler. I have been unscrewing the whole safety valve assembly from the boiler to fill it up till now. This is not easy to do with the saddle tank in place. Should I be only removing part of the safety valve assembly ? it has a number of separation points but they are all fairly tight and I wonder if I need only remove the top part, and tighten the base part into the boiler threaded hole. Your advice will be appreciated.
Looking at the 4th picture on this link there appears to be a nutted screw inside the cab, I think that this could be the water fill up point. Anyone with Katie instructions able to confirm?Hi Peter,
I have fitted the cab/saddle tank assembly to Katie and I am a bit confused about filling the boiler. I have been unscrewing the whole safety valve assembly from the boiler to fill it up till now. This is not easy to do with the saddle tank in place. Should I be only removing part of the safety valve assembly ? it has a number of separation points but they are all fairly tight and I wonder if I need only remove the top part, and tighten the base part into the boiler threaded hole. Your advice will be appreciated.
The boiler should be filled via the safety valve bush. The safety valve and its bush should be removed as one piece. If the safety valve comes away on its own, remove the bush and tighten to two together in a vice. After filling the boiler, the safty valve does not need to be over tightened, just enough to make a good seal on the rubber O ring.Looking at the 4th picture on this link there appears to be a nutted screw inside the cab, I think that this could be the water fill up point. Anyone with Katie instructions able to confirm?
Page 6 of the Roundhouse operating instructions free to view on their website states: - Lift off the brass dome then remove the safety valve by unscrewing the large knurled plug into which it is fitted.
Hi Peter,
I have fitted the cab/saddle tank assembly to Katie and I am a bit confused about filling the boiler. I have been unscrewing the whole safety valve assembly from the boiler to fill it up till now. This is not easy to do with the saddle tank in place. Should I be only removing part of the safety valve assembly ? it has a number of separation points but they are all fairly tight and I wonder if I need only remove the top part, and tighten the base part into the boiler threaded hole. Your advice will be appreciated.
As stated by others, the boiler is filled by unscrewing the safety valve base. I find that I have to use a pair of needle nosed pliers to undo the base otherwise the safety valve just unscrews.
I won my battle with the stuck grub screw eventually but you don't want to know how ... it involved superglue! Anyway the loco is now working.
I'm a bit disappointed with my Paul Bailey whistle. It needs a lot of steam through it before a reasonable sound is generated and it is not as good as two other flute type whistles I have on other locos. I reckon that the best one I have is the factory fitted flute whistle under the tender of my Cheddar Hercules.
Regards
Peter Lucas
MyLocoSound
Thanks Peter. I guess I was concerned at getting the safety valve tight enough to seal the safety valve into the boiler bushing. You say as long as there is a seal on the O ring. I will now fit the cab and saddle tank on to the boiler.The boiler should be filled via the safety valve bush. The safety valve and its bush should be removed as one piece. If the safety valve comes away on its own, remove the bush and tighten to two together in a vice. After filling the boiler, the safty valve does not need to be over tightened, just enough to make a good seal on the rubber O ring.
Page 6 of the Roundhouse operating instructions free to view on their website states: - Lift off the brass dome then remove the safety valve by unscrewing the large knurled plug into which it is fitted.
I am more interested in the Chuffer than a whistle at this stage. Any comments ? Do you have one fitted ?
Next challenge is radio control.....I see the RCS web site has specific RC for live steam. Do the micro servos pack enough punch to operate the regulator, and the reverser ? Obviously they do ! they must be pretty efficient.
Yes servos are suitable for live steam.....but make sure you get a good metal one, mine cost about £17:00, cheapo plastic jobs will not stand up to the task.Thanks Peter. I guess I was concerned at getting the safety valve tight enough to seal the safety valve into the boiler bushing. You say as long as there is a seal on the O ring. I will now fit the cab and saddle tank on to the boiler.
I am more interested in the Chuffer than a whistle at this stage. Any comments ? Do you have one fitted ?
Next challenge is radio control.....I see the RCS web site has specific RC for live steam. Do the micro servos pack enough punch to operate the regulator, and the reverser ? Obviously they do ! they must be pretty efficient.
Yes, I have a chuffer in my Katie. It works very well with the SloMo. You can purchase a chuffer at Argyle Locomotive Works in Victoria.Thanks Peter. I guess I was concerned at getting the safety valve tight enough to seal the safety valve into the boiler bushing. You say as long as there is a seal on the O ring. I will now fit the cab and saddle tank on to the boiler.
I am more interested in the Chuffer than a whistle at this stage. Any comments ? Do you have one fitted ?
Next challenge is radio control.....I see the RCS web site has specific RC for live steam. Do the micro servos pack enough punch to operate the regulator, and the reverser ? Obviously they do ! they must be pretty efficient.
Regards
Peter Lucas
MyLocoSound
Well G Scalers, I have completed the build of Katie. I will say it was a trouble free experience and the few questions I had were generously answered by Forum members. The Roundhouse kit and instruction manuals were superb. I am amazed at how everything aligned so well. Damaged parts ? One cross threaded Lifting Arm was reasonably salvaged and re - threaded and the grub screw took up the repaired thread and locked onto the weight bar.
Once the boiler was installed and fired up, the previously hesitant compressed air driven engine, now with 40psi into the cylinders ran beautifully. A moment of pleasure !
Now complete with body fitted, all I need is a track . ( stand by for contact Geoff in the Perth hills ! )
I will now begin construction of some rolling stock - waiting for some Peter Binnie fittings and wheels.
A SloMo on order, and tackling the R/C fitout to follow.
Thanks for your encouragement G Scalers.
Attachments

Rhinochugger
Retired Oik
A result then 
Looking forward to seeing it running.Well G Scalers, I have completed the build of Katie. I will say it was a trouble free experience and the few questions I had were generously answered by Forum members. The Roundhouse kit and instruction manuals were superb. I am amazed at how everything aligned so well. Damaged parts ? One cross threaded Lifting Arm was reasonably salvaged and re - threaded and the grub screw took up the repaired thread and locked onto the weight bar.
Once the boiler was installed and fired up, the previously hesitant compressed air driven engine, now with 40psi into the cylinders ran beautifully. A moment of pleasure !
Now complete with body fitted, all I need is a track . ( stand by for contact Geoff in the Perth hills ! )
I will now begin construction of some rolling stock - waiting for some Peter Binnie fittings and wheels.
A SloMo on order, and tackling the R/C fitout to follow.
Thanks for your encouragement G Scalers. View attachment 261605
Geoff
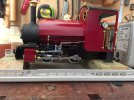
And I have finished the upgrade of my Katie in which I added Slo-Mo, chuff pipe and a whistle.
My garden railway is scenic and I like to run it like a railway with consist changes, shunting, etc. As a result I use Kadee couplings throughout. With the battery and radio gear under the cab floor there was no room to fit a Kadee coupler. I solved the problem by 3D printing a bunker in ABS plastic under which the coupler is fitted.
Regards
Peter Lucas
MyLocoSound
Similar threads
- Replies
- 3
- Views
- 185
- Replies
- 17
- Views
- 737