Hi I’m almost finished with the revamped layout and it’s just occurred to me that now would be a good time to introduce some isolators for my station in/out siding and also my single sidings so that I can have more engines displayed at any one time. I know the principles of what I need to do but any help on what type of waterproof switches I need to use and also whether there is an alternative to soldering as I’ve never used a soldering iron. Thanks
You are using an out of date browser. It may not display this or other websites correctly.
You should upgrade or use an alternative browser.
You should upgrade or use an alternative browser.
Isolator switch
- Thread starter Kev Green
- Start date
If you use the Massoth insulated rail-clamps, they come with 'solder tags'. - ring terminals you solder a wire to.
These can be done away from the track, so easier to work with.
Alternatively, you can get crimp-on ring terminals, but there is a knack to fitting / using these, as well.,
Whatever switches you get, the more protection you can give them, the better..
You can get 'chunky' switches, where the connectors are either push-on blades (we call them 'Lu-Car') or even a screw you can fit a ring terminal to..
It all depends on what you can get locally, and how much you are prepared to spend.
PhilP
That’s a great help thank you. Can you recommend a soldering iron as they seem to come in different power etcIf you use the Massoth insulated rail-clamps, they come with 'solder tags'. - ring terminals you solder a wire to.
These can be done away from the track, so easier to work with.
Alternatively, you can get crimp-on ring terminals, but there is a knack to fitting / using these, as well.,
Whatever switches you get, the more protection you can give them, the better..
You can get 'chunky' switches, where the connectors are either push-on blades (we call them 'Lu-Car') or even a screw you can fit a ring terminal to..
It all depends on what you can get locally, and how much you are prepared to spend.
PhilP
Rhinochugger
Retired Oik
Depending upon the intended siting of the switches, it's worth trying to provide some weather protection by hiding them within, or under a structure that still allows you to get your fingers in there to operate them.
The other key aspect is to make sure that the switch enclosure is sealed against any ingress of moisture / condensation.
You can get rubber waterproof gaiters for standard toggle switches - OK, they're not quite so easy to solder, but I put mine in a sealed box underneath the water tower - just looking for a photo, may come back soon")
EDIT - found one. Now, it's not necessarily as beautiful as some people might like, but it might set some ideas off in your mind. (and the loco has since been made a bit more beautiful as well )
)

The other key aspect is to make sure that the switch enclosure is sealed against any ingress of moisture / condensation.
You can get rubber waterproof gaiters for standard toggle switches - OK, they're not quite so easy to solder, but I put mine in a sealed box underneath the water tower - just looking for a photo, may come back soon
EDIT - found one. Now, it's not necessarily as beautiful as some people might like, but it might set some ideas off in your mind. (and the loco has since been made a bit more beautiful as well
)Depending upon the intended siting of the switches, it's worth trying to provide some weather protection by hiding them within, or under a structure that still allows you to get your fingers in there to operate them.
The other key aspect is to make sure that the switch enclosure is sealed against any ingress of moisture / condensation.
You can get rubber waterproof gaiters for standard toggle switches - OK, they're not quite so easy to solder, but I put mine in a sealed box underneath the water tower - just looking for a photo, may come back soon
EDIT - found one. Now, it's not necessarily as beautiful as some people might like, but it might set some ideas off in your mind. (and the loco has since been made a bit more beautiful as well
View attachment 326777
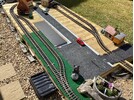
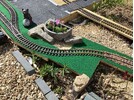
That’s great thank you. I have a small line side hut which would be perfect for covering them. I’ve attached a couple of photos, the first one I would want to isolate the points top left of photo coming from the station siding and the siding on the right. Second photo has a space that would be good for the switches. I assume I only need to isolate one end of the station loop?
Attachments
'It depends..' (on what you want it for)That’s a great help thank you. Can you recommend a soldering iron as they seem to come in different power etc
If you will not be using it a lot, you could do worse than the middle of Lidl, or Aldi. - They occasionally have adjustable temperature soldering irons, and these usually come with a selection of bits, some solder, and a couple of tools..
For general use, a 40 watt temperature controlled iron should suffice.
NOTE:
If you are wanting to solder to LGB track, especially outside, you will need something much bigger. - A soldering 'gun' would probably be a good choice for occasional track-soldering?
Personally, I have a soldering station, which has a soldering iron, and a hot-air reflow tool. Both are individually temperature controlled, and can be on for up to six-plus hours a day. - Overkill for your use, obviously.
Makes like Antex are available, but get a stand, if the iron does not come with one.
40 watts, for general use, and I would advocate temperature controlled / adjustable.
Then practice..
Get an off cut of wood. Knock some fine panel pins into it, and practice soldering wires onto them..
Get a small protype board / stripboard, and practice soldering to just one track. - It is easy to 'bridge' two tracks together.
Try to make a joint in no-more than three-seconds. - Tin the components, hold them together, apply a tiny bit of fresh solder to the iron, and touch the joint..
If the joint does not take in those three-seconds, move away, work out what isn't working, then try again.
Most damage and bad-joints, come from keeping the heat on for too long.
PhilP

.'It depends..' (on what you want it for)
If you will not be using it a lot, you could do worse than the middle of Lidl, or Aldi. - They occasionally have adjustable temperature soldering irons, and these usually come with a selection of bits, some solder, and a couple of tools..
For general use, a 40 watt temperature controlled iron should suffice.
NOTE:
If you are wanting to solder to LGB track, especially outside, you will need something much bigger. - A soldering 'gun' would probably be a good choice for occasional track-soldering?
Personally, I have a soldering station, which has a soldering iron, and a hot-air reflow tool. Both are individually temperature controlled, and can be on for up to six-plus hours a day. - Overkill for your use, obviously.
Makes like Antex are available, but get a stand, if the iron does not come with one.
40 watts, for general use, and I would advocate temperature controlled / adjustable.
Then practice..
Get an off cut of wood. Knock some fine panel pins into it, and practice soldering wires onto them..
Get a small protype board / stripboard, and practice soldering to just one track. - It is easy to 'bridge' two tracks together.
Try to make a joint in no-more than three-seconds. - Tin the components, hold them together, apply a tiny bit of fresh solder to the iron, and touch the joint..
If the joint does not take in those three-seconds, move away, work out what isn't working, then try again.
Most damage and bad-joints, come from keeping the heat on for too long.
PhilP
Rhinochugger
Retired Oik
No, you need to isolate both ends in the loop, but you only need one switched feed to the isolated rail.That’s great thank you. I have a small line side hut which would be perfect for covering them. I’ve attached a couple of photos, the first one I would want to isolate the points top left of photo coming from the station siding and the siding on the right. Second photo has a space that would be good for the switches. I assume I only need to isolate one end of the station loop?
I make sure that the isolation (you can see the yellow plastic rail joiner in my photo) is on the inside rail of the loop, thus there is electrical continuity around the outside pair of rails which doesn't get interrupted by point frogs or blades.
EDIT - missed Phil's sketch - but I would put the isolation on the other (inner) rail
Gizzy
A gentleman, a scholar, and a railway modeller....
It's quite difficult to solder outdoors, so if you can, do it indoors. A 40-50 Watt iron should be fine. I have one of the Aldi soldering stations which are adequate for my needs, but I would use a 200 W iron if I was soldering to brass rail outdoors....
As you say Gizzy, a mild or warm day also helps. No use whatsoever trying to solder to KGB rail in frosty conditions, but who would want to then anyway? Another little help, solder to the thinnest part of the Webb of the rail, less metal to heat up. Have a piece of pre tinned wire ready then when solder starts to flow onto the rail add the wire only taking the iron off when the solder has flowed onto the wire.It's quite difficult to solder outdoors, so if you can, do it indoors. A 40-50 Watt iron should be fine. I have one of the Aldi soldering stations which are adequate for my needs, but I would use a 200 W iron if I was soldering to brass rail outdoors....
playmofire
Registered
Why not drill the rail so that you can attach the wire by screws, then the only soldering (if any) are connections to the switch can, presumably, can bedone indoors?
When soldering I always clean my brass track to make the brass shiny. Next I add a little flux to where I will solder, presolder the end of the wire I am about to attach, the I use a wet rag 8 inches away from where I will solder, then I get my 350 watt Weller gun out and add solder to the rail and add the wire to the rail. Pull the gun away and gently/slowly drag the wet cloth to the new joint to slowly cool the joint so as not to melt plastic ties. Works for me.
I’ve just received some Mammoth rail clamps so thanks for the adviceIf you use the Massoth insulated rail-clamps, they come with 'solder tags'. - ring terminals you solder a wire to.
These can be done away from the track, so easier to work with.
Alternatively, you can get crimp-on ring terminals, but there is a knack to fitting / using these, as well.,
Whatever switches you get, the more protection you can give them, the better..
You can get 'chunky' switches, where the connectors are either push-on blades (we call them 'Lu-Car') or even a screw you can fit a ring terminal to..
It all depends on what you can get locally, and how much you are prepared to spend.
PhilP
Mammoth rail clamps? Blimey how big is your garden?I’ve just received some Mammoth rail clamps so thanks for the advice

Rhinochugger
Retired Oik
Yes, I have mainly Aristo track in the station area, which has the sleeper base screwed to the underside of the rail. This allows you to unscrew it, feed in a screw connector (with the wire already clamped and soldered) screw the sleeper base back on, and then you have a spanking connectionWhy not drill the rail so that you can attach the wire by screws, then the only soldering (if any) are connections to the switch can, presumably, can bedone indoors?
Similar threads
- Replies
- 8
- Views
- 420
- Replies
- 1
- Views
- 214