Help with metalworking skills, or lack thereof.

I’ve inherited all sorts of metalworking tools from my father and this includes pin vices, taps, dies etc. My problem is, as Fred mentioned, is lack of instruction! I can just work away myself, but of course the learning curve will be steep.

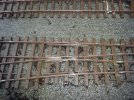
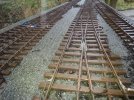
Just to clarify what I’m doing, I’m not spiking rail onto sleepers. I have preformed plastic webbing for the whole turnout. All I’m doing is cutting, filing and then sliding rail into the plastic chairs. I then need to screw, from underneath, the locating screws through the already created holes into the new rail to create the moving parts of the turnout. I’ll post some photos later of what I’m trying to achieve.

It’s all question of making use of some spare bits of kit I had lying around no that electrical continuity of the track is not an issue.
 
Ah, now we understand.
I have had some success using connectors/fishplates for the rail pivots. (Green arrow is connector, red arrows show dimples.)

full


If you drill a dimple in the bottom of the rail, and then center-punch the connector into the dimple,you'll find the rail can pivot (might have to loosen the connector slightly.) But it won't come out.

On the tie rod between the point blades, there's no need to be underneath with screws. I often solder a pin or bolt to the rail (if it is brass or n-s) or drill through the foot to allow a bolt to pass down through the tie rod.

Great suggestions Fred. Thank you.
 
Here is an image or 3 of my home built points. If you can use a hammer and a pair of pliers all it takes is practice. Sleepers are from Tenmille.
 

Attachments

  • 20180128_124935.jpg
    20180128_124935.jpg
    671.2 KB · Views: 0
  • 20180128_124956.jpg
    20180128_124956.jpg
    811.9 KB · Views: 0
  • 20180128_124935.jpg
    20180128_124935.jpg
    671.2 KB · Views: 0
Great looking points Tim.

Here’s what I’m dealing with. Much less skillful than creating the whole thing from scratch.

The first shot is the top of the plastic point webbing. The frog (the original short frog) is in place.
View media item 2698
The next is the underside of the webbing showing the holes already made. If I can drill corresponding holes in the rail, and use self tapping screws (arriving Wednesday) I’m done. If not, I’ll try the suggestion of using old fishplates with centre punched dimples.

View media item 2699
The last one is where I am so far. I have some of the rails cut and have started grinding away where the flat bottomed parts need removing.

View media item 2700
 
Back
Top Bottom