Bombastic
Registered
Hi all, brand-new garden railroader here. I'm excited to share my little railroad, which I built in my backyard in southern Oregon in the US.
My inspiration for model trains was my Opa (grandfather), who had a little LGB set he brought with him from Germany. We ran it every Christmas while I was growing up. As a kid I tried to get into HO scale trains but never could afford to do anything more than plan layouts and dream; but now that I'm in my 30s and finally have a home of my own, I decided to make those childhood dreams a reality. With a modest budget, a small yard, and the full support of my wife, my garden railroad was constructed in February of this year.
My railroad consists of about 70' of LGB track arranged in a very elongated oval. The design was pretty much determined by my budget and the constraints of my yard: R2 curves to fit the narrow space, and the overall length was based on the amount of used LGB flex track I could get for $150. I have, however, arranged my layout in such a manner that I can easily add to it later.
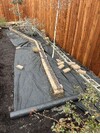
Construction was basic: I dug a deep trench for my track, covered the trench and entire site with landscaping fabric, put gravel in the trench, and finally added level concrete blocks (in the back along the fence) and brick along the trackbed. The track is free-floating atop the brick. I really like the brick as it's relatively affordable, super easy to work with, and looks quite nice as edging. The bricks provide several inches of elevation above ground level, which is necessary to keep the track from being flooded during winter rains. The deep trench also aids with drainage of our thick clay soil, while the gravel foundation keeps the bricks stable but easy to adjust whenever leveling becomes necessary.
I use basic DC track power, supplied by a $20 second-hand Loco-Motion Tech-II controller. It works beautifully for my setup, with the sole downside being that I'm limited to running only one train at a time. Track cleaning has been pretty easy: Usually a quick wipe of the rails with rubbing alcohol on a cleaning cloth is enough to get the train running smoothly, even on my 30-year-old used track. I had planned to run feeder lines to various points along the track, but so far that has not been necessary.
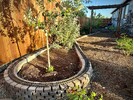
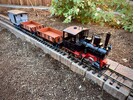
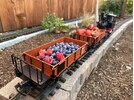
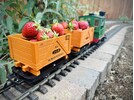
My railroad has no particular theme, aside from being generic "European" steam. I've chosen to run LGB Stainz locomotives on my line, partially because that's the train my Opa had, but also because they are so cheap and reliable. For the price of one professionally refurbished Stainz I bought three off the 'bay,' which I rebuilt into two fully functioning locos. My wife is Aussie and really enjoys the trains, so at some point I'd like to get her something that looks Australian. I'd also like to add a larger, European steam locomotive; but for now that's nowhere near affordable for me and I'd rather get more track and some switches. Currently the only "industry" my line services is our veggie garden, which is why you'll see a couple pictures of loads of produce being shipped from the "farm."
I'm very happy with the current layout, but I still hope to keep expanding it. One option is to simply add a couple switches and extend my line through the roses to the south along my fence-line, potentially doubling the size of my line with minimal engineering difficulties. More challenging would be expanding to the north and then west, which would involve constructing multiple bridges to cross and then follow the steep edge of a large drainage ditch. This later option interests me more, but I need to find inexpensive but weatherproof building materials for the bridges and the significant amounts of elevated track required. Possibly any future expansions may be designed and wired as independent loops so I can run multiple trains. In any case, in the short term I'm looking at adding some simple sidings, building some structures, and starting to turn the existing layout into more of an inviting little world.
Anyway, that's the story of my little garden railroad. My budget was about $550 (for train, track, transformer, bricks, gravel, and a couple small plants), although I have continued to procure rolling stock in the months since which does add up.
Cheers!
Tanner
My inspiration for model trains was my Opa (grandfather), who had a little LGB set he brought with him from Germany. We ran it every Christmas while I was growing up. As a kid I tried to get into HO scale trains but never could afford to do anything more than plan layouts and dream; but now that I'm in my 30s and finally have a home of my own, I decided to make those childhood dreams a reality. With a modest budget, a small yard, and the full support of my wife, my garden railroad was constructed in February of this year.
My railroad consists of about 70' of LGB track arranged in a very elongated oval. The design was pretty much determined by my budget and the constraints of my yard: R2 curves to fit the narrow space, and the overall length was based on the amount of used LGB flex track I could get for $150. I have, however, arranged my layout in such a manner that I can easily add to it later.
Construction was basic: I dug a deep trench for my track, covered the trench and entire site with landscaping fabric, put gravel in the trench, and finally added level concrete blocks (in the back along the fence) and brick along the trackbed. The track is free-floating atop the brick. I really like the brick as it's relatively affordable, super easy to work with, and looks quite nice as edging. The bricks provide several inches of elevation above ground level, which is necessary to keep the track from being flooded during winter rains. The deep trench also aids with drainage of our thick clay soil, while the gravel foundation keeps the bricks stable but easy to adjust whenever leveling becomes necessary.
I use basic DC track power, supplied by a $20 second-hand Loco-Motion Tech-II controller. It works beautifully for my setup, with the sole downside being that I'm limited to running only one train at a time. Track cleaning has been pretty easy: Usually a quick wipe of the rails with rubbing alcohol on a cleaning cloth is enough to get the train running smoothly, even on my 30-year-old used track. I had planned to run feeder lines to various points along the track, but so far that has not been necessary.
My railroad has no particular theme, aside from being generic "European" steam. I've chosen to run LGB Stainz locomotives on my line, partially because that's the train my Opa had, but also because they are so cheap and reliable. For the price of one professionally refurbished Stainz I bought three off the 'bay,' which I rebuilt into two fully functioning locos. My wife is Aussie and really enjoys the trains, so at some point I'd like to get her something that looks Australian. I'd also like to add a larger, European steam locomotive; but for now that's nowhere near affordable for me and I'd rather get more track and some switches. Currently the only "industry" my line services is our veggie garden, which is why you'll see a couple pictures of loads of produce being shipped from the "farm."
I'm very happy with the current layout, but I still hope to keep expanding it. One option is to simply add a couple switches and extend my line through the roses to the south along my fence-line, potentially doubling the size of my line with minimal engineering difficulties. More challenging would be expanding to the north and then west, which would involve constructing multiple bridges to cross and then follow the steep edge of a large drainage ditch. This later option interests me more, but I need to find inexpensive but weatherproof building materials for the bridges and the significant amounts of elevated track required. Possibly any future expansions may be designed and wired as independent loops so I can run multiple trains. In any case, in the short term I'm looking at adding some simple sidings, building some structures, and starting to turn the existing layout into more of an inviting little world.
Anyway, that's the story of my little garden railroad. My budget was about $550 (for train, track, transformer, bricks, gravel, and a couple small plants), although I have continued to procure rolling stock in the months since which does add up.
Cheers!
Tanner
")