Funicular Modeling

John Carmichael

Registered
16 Dec 2019
33
3
69
Tucson Arizona USA
Best answers
0
Country flag
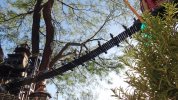
This is a rare two rail G-Scale Model Funicular with the ingenious and revolutionary ABT Passing switch. (the only railroad switch without moving parts!) It took seven months to design and build. See video of the first full system test here:

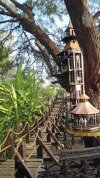
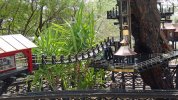
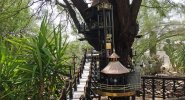
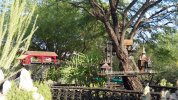
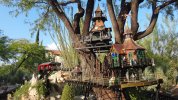
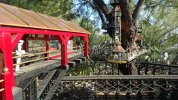
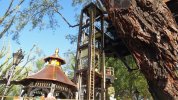
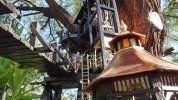
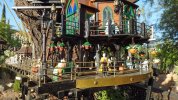
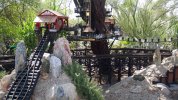
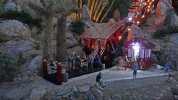
I moved it to my garden railway for permanent installation where I'll build a mountain around it. My funicular features automated station stops, delay, and reverse- all programmable. Speed is adjustable with a throttle. It also has an automatic warning bell just like the real ones, and extensive cabin and structural lighting. Controls are conveniently located outside of the rear of the Gear Room. Everything is weather resistant for outdoor use. The track slopes upwards at 30 degrees and is 72 inches long. I created the track and passing switch using LGB brass Flex track.
I believe this is the first G-Scale fully functional garden funicular railway in the United States with the ABT Passing Switch.
See ABT Switch Info: Abt Switch - Giessbach
And see this VERY interesting article: Giessbach Funicular.pdf (2.1 MiB)

To make a fully functional G-Scale model I had to teach myself everything about it since there is almost no information on modeling a funicular on the internet or in railroad magazines. Everything, including the crazy tracks, had to be designed by just using old photographs of real funiculars. It is the biggest railroading challenge I have ever undertaken. Precision in all parts of the design and construction was imperative. The split-level cars had to stop exactly in line with the boarding platforms. The cars had to travel at 3 inches/sec. so I had to teach myself all about gears and gear ratios and how to do the calculations knowing the motor's RPM. Difficult but lots of fun!

I’m making the full design drawings, electrical diagrams and construction photos available to everybody hoping that more will be built. This way, future modelers won’t suffer the learning pains and design errors I had to solve teaching myself how to make it. See here: G-Scale Funicular Garden Railway

My Funicular was inspired in part by a G-Scale demonstration model of the Horseshoe Curve funicular that was made in Barcelona Spain. I don’t know the maker’s name. Although his model is a little “rough around the edges”, it proved to me that an ABT Passing Switch was possible on a G-Scale track. I took his idea and made several improvements.

My thanks go out to the man in Barcelona and to Mr. Steve Worack, the person who designed and sold me the Circuitron AR-2 auto reverse & delay controller. His helpful connection advice was critical to the success of the project. It works perfectly. Thank you Steve.

If anybody has any questions, just ask.

Good luck with your funiculars,

John Carmichael
Tucson Arizona
email: jlcarmichael@comcast.net
 
Last edited:

idlemarvel

Neither idle nor a marvel
13 Jul 2015
3,136
801
Ascot
Country
Mars
Best answers
0
Country flag
Excellent and well done, thanks for sharing the details. It will make a wonderful garden feature, along with perhaps a rack and pinion railway taking a more circuitous route!
 

John Carmichael

Registered
16 Dec 2019
33
3
69
Tucson Arizona USA
Best answers
0
Country flag

G-Scale Funicular Parts Suppliers
This is a partial list of the most important parts used in the construction of the G-Scale Funicular by John Carmichael. I recommend using these parts for ANY type of G-Scale funicular. J.C.

Mean Well LPV-35-12 Power Supply / LED Driver 90-264 VAC Input 35W 3A 12V Output - $15.56 waterproof! Powers the entire system.https://www.amazon.com/LPV-35-12-Sup...ateway&sr=8-16

Circuitron 5401 AR-2 Auto Reverse Circuit with Adjustable Delay- $49.99 requires a 12-18 volt AC or DC power supply. Will work with a reed switch for detection rather than IR detector. The perfect controller for the motor.
https://www.traintekllc.com/circuitr...ustable-delay/
http://www.circuitron.com/index_file...00-5401ins.pdf

uniquegoods 6V 12V 24V 28V 3A 80W DC Motor Speed Controller (PWM) Speed Adjustable Reversible Switch 1203BB Nice compact little throttle with reverse switch. Very good! Item size: 1.3 x 2 x 0.4 inches; Net Weight: 1.13 ounces
Duty Cycle adjustable: 5%-100%, potentiometer with switch function. maximum output power: 80W, maximum continuous output current: 3Ahttps://www.amazon.com/gp/product/B0...?ie=UTF8&psc=1

ITT GL sound module version 2018- $39.95 Requires two reed switches- one on the tracks at each station. A GL sound module is a 1.50" X 2.40" X 0.75" circuit board that consists of a voltage regulator, a pre-programmed sound module trolley bells, a volume control, and a 6 pin terminal strip. (Requires any size 8 ohm speakers.) These modules have a maximum play time of 2 minutes depending on the scenario programmed into them, and can be played one time, or continuous looping until turned off. GL

Nextrox Mini 12V DC 60 RPM High Torque Gear Box Electric Motor- $11.99 60 RPM |Torque: 30 N*cm |Diameter: 37mm |Shaft length: 21mm |Total length: 68mm. All Metal Construction. 100% metal gears, designed with high temperature-resistance, high abrasion resistance, more sturdy and durable. Integral gears make Gear Box design smaller and simpler.
Diameter: 37mm
Length [excluding shaft]: 47mm
Shaft length: 21mm
Total length: 68mm
Shaft diameter: 6mm
Weight: 138g
https://www.amazon.com/gp/product/B0...?ie=UTF8&psc=1

uxcell GA/GB 37mm diameter DC Geared Motor Mounting Bracket Holder- $7.80 + 6mm Hex Coupling. A necessary part for mounting the motor to the Gear Box floor. https://www.amazon.com/uxcell-diamet...HY318RMT45ZTQ3

1/4 inch to 6mm Stainless Steel Set Screw Shaft Coupler - $4.99 303 Stainless Steel. Use to connect motor shaft to a Meccano axle with the small 12 tooth bevel gear. https://www.amazon.com/gp/product/B0...?ie=UTF8&psc=1

Meccano Standard Axle Rods: Standard Stainless Steel and Zinc Coated Steel Axles Axle Rod 16" (405mm). 8 SWG (4.06mm) diameter. Stainless Steel. Reproduction and Pre-Owned Original Meccano. Shorter sizes available. 13c Axle Rod 16" (405mm) Stainless Steel

Meccano 30m Bevel Gear 12 Teeth- L7.80- Solid Brass Bevel Gear. 12 Teeth. ½" (13mm) Diameter. ½" (13mm) Long. Brass. Requires 1 Grub Screw (69a). Only meshes with 30n to give 3:1 ratio and 90 degree drive angle. Cable should move at 2.88 inches/second with this gear ratio and throttle at 9 volts.
30m Bevel Gear 12 Teeth

Meccano 30n Bevel Gear 36 Teeth- L20.50- Bevel Gear 36 Teeth. 13/16" (30mm) Diameter. 7/16" (11mm) Long. Brass. Requires 1 Grub Screw (69a). Only meshes with 30m to give 3:1 ratio and 90 degree drive angle. Cable should move at 2.88 inches/second with this gear ratio and throttle at 9 volts.
30n Bevel Gear 36 Teeth

Marine Grade T316 Stainless Steel Wire Rope Cable, 1/32", 7x7 with 25 PCS Sleeves,100 ft: $24.99. For cable hooks on car. Add eye loops at both ends either by braiding or with included cable crimps.
Minimum Pulley Diameter is 1.25”. Wire Thickness: 1/32” = .03125”= .79375mm.
https://www.amazon.com/Marine-Grade-...gateway&sr=8-3

Meccano Blue Pulley 19b 3" Diameter Original - Used Condition- Ebay- $5.26 all metal. Use for Cable Driver pulley with Meccano Axle.
https://www.ebay.com/itm/Meccano-Blu...8AAOSw~SNbTLof

Bearing Steel V Grooved Wire Pulley Bearing Wheels Roller 5x22x5mm, 5 Pcs- $15.11For pincher and redirection pulleys. Hole: 5mm=.1969”, Diameter: 22mm=.8661”, Thickness: 5mm=.1969”, V-groove width: 3mm= .1181”, V-groove deepness: 1.5mm= .0591”
https://www.amazon.com/Bearing-Grove...13-spons&psc=1

Hard-to-Find Fastener 014973180973 Fender Washers, 1/4 x 1-1/2, Piece-10- $8.89 Use to modify standard wheel by adding another flange.https://www.amazon.com/gp/product/B0...?ie=UTF8&psc=1

Permatex 84109 PermaPoxy 4 Minute Multi-Metal Epoxy, 0.84 oz. - $3.17 Use to attach steel fender washer to steel wheel. https://www.amazon.com/gp/product/B0...?ie=UTF8&psc=1

Make & Take Mini Flat Car Kit 2pcs. HLW15000- Reindeer Pass- $11.50 from Hartland locomotive works. Use for making the cars. Perfect size for small passing switches like mine. Great little kit!
http://www.reindeerpass.com/MAKE-TAK...T-CAR-KIT.aspx

K&S Percision Metals 16408 Brass Sheet Metal Rack, 0.040" Thickness x 6" Width x 12" Length, 18 Gauge, 3 pcs. $21.99 Use to make the Gear Box. Cut with Demel cut-off disk. https://www.amazon.com/gp/product/B0...?ie=UTF8&psc=1

K&S Round Rod 1/16" D X 12" L Stainless Steel - 304 Carded- $5.20 Use this strong thin rod to make cable hooks for cars. Don’t use thicker rod because it might hung up in the ABT switch cable gap. Don’t use brass rods which might bend under load. Cut with Demel cut-off disk. Bend with needle nose pliers and hammer. Insert stem of hook into an attachment bracket (I used ¼” acrylic sheet) at the bottom of the front of each car, slightly off-center on the same side as the double flanged wheels. The hook should be as small as possible and be slightly below the top of the rails so it passes through the gaps in the switch. Amazon.com: K&S Round Rod 1/16" D X 12" L Stainless Steel - 304 Carded: Home Improvement

K & J Magnets, Inc. Neodymium Mounting Magnet MM-D-10 $1.78 The MM-D style is a flat mounting magnet with a female threaded shaft permanently attached. Screw a short piece of threaded rod into the hole under the flat car that was meant to attach a coupler. Screw the small threaded flat magnet in the other end of the rod. The screw allows you to easily adjust the height of the magnet. This is the perfect magnet for a funicular. K&J Magnetics: MM-D-10
 
Last edited:

John Carmichael

Registered
16 Dec 2019
33
3
69
Tucson Arizona USA
Best answers
0
Country flag
G-Scale Funicular Modeling Tips
Updated 1/17/20

Here are a few things that are important to know when designing a functional model funicular that’s driven by a motor. See separate list of Parts Suppliers. Consult design drawings to see where the parts go.

Power Source Selection
: Use a 12V DC constant power source made for outdoor use. Waterproof power sources are available. 12V is more than adequate for the slow moving cable system, controller, sound module, and lights. It stresses the light bulbs less than a 24V source. I used a waterproof 35 watt power source protected in an outdoor electrical box purchased separately.

Motor Selection: Use a small high torque 12V DC motor with integral gears. 60 rpm works great. If motor has integral gears you will be able to use fewer reduction gears for a simpler system. Only use motors that can be securely attached to a motor mount of the correct size. Protect motor in a water-proof Gear Room.

Gear Selection & Calculation: To reduce friction, jamming, excess noise, over-complication, gear box size and headaches, use the fewest number of gears that will give you your desired gear ratio. With my system, only two gears are needed! Beveled gears are the best for loads and even wearing. They are better than sprocket gears and much better than worm gears. Use only metal gears, not cheap plastic. Solid Brass Meccano Gears are the BEST! Keep gears greased and oiled. My bevel gear arrangement has a 3:1 gear ratio (36 teeth/12 teeth). So if the motor is 60 rpm, the main drive pulley will rotate at 60/3 = 20rpm. If the Drive pulley has a 9” circumference, then in theory it will move the cable 9” x 20rpm =180”/minute = 3”/sec at full power. Actual measured speed was slightly higher, but the throttle knob fixes that. At nine volts, the cable moves at 3"/sec. A throttle will give you the exact speed you want.

Pulley Selection and Uses: There are two main types of uses for funicular pulleys:
1) The big Drive Pulley (also called “drive wheel”) moves the cable. You want to maximize friction between the cable and Drive Pulley so that the cable won’t slip which causes jerky movement or no movement at all. It should have a “V” groove and be as large as possible (3” diameter is good). The cable should be in contact with the pulley along as much of its circumference as possible to maximize friction. To do this use two directional pulleys close together and close to the drive pulley. I call these two “pincher pulleys”. Use the Meccano 19b pulley for the Drive Pully. Don’t use plastic pulley.
2) Directional Pulleys change the direction of the cable. You want to minimize the friction of the cable against directional pulleys. To do this, avoid large angle changes to the cable when you design your system. Also minimize the number of pulleys in your design. Pulleys with ball bearings have less friction on the pulley axle. Don’t try to minimize cable friction by using light weight cars! Model funiculars work much better with heavy cars of equal weight because they add friction between the cable and the Drive Pulley. Don’t use plastic pulleys. I used 7/8” steel pulleys with ball bearings. Real funiculars will also use smaller directional pulleys or rollers between the rails along the entire length of the track to hold up the heavy cable which would sag and rub the ties without them. They also use tilted small pulleys to direct the cable around the curves in the passing switch. I found that these directional pulleys along the track were unneeded in my G-scale model since the cable tension provided by my heavy cars prevents the tiny cable from sagging onto the rails. This really simplifies cable management!

Cable Guard Importance and Location: At the top of the track there is a small “U” shaped cable guard made from a bent 1/16” thick brass rod with two pieces of brass tube around the two pins of the guard. It is located close to and below the top set of directional pulleys. After the cables leave the pulleys they pass between the two pins of the guard. Its purpose is to maintain the two cables in exact alignment with the nearby two directional pulleys as the cars move along the upper straight section of track. Since the directional pulleys are in the center of the track and the cable hooks on the cars are off-center, the hooks would move the cable towards the outside rails as the cars ascend. Without the cable guard, the cables would not align with the pulleys and might cause the cables to jump off the pulleys.

Cable Selection and Modification: Carpenters’ string was great for some of the initial testing, but don’t use it on your final model or any string or rope that will stretch over time. DO NOT USE: fishing line, cotton, hemp or nylon string! Stretching will cause the cars to stop and pass incorrectly! Avoid the use of ball chain too. Only use flexible stranded stainless steel cable of the thinnest diameter possible. Thin cable is more flexible than thick cable and will bend around the pulleys better. Also, it is more prototypical. The 1/32” marine cable I used is perfect. To determine cable length, place both cars exactly opposite each other in the exact middle of the ABT passing switch. Keep cars in place using clamps placed on rails. Cut a piece of cable slightly longer than you’ll need (about 8 ft.). Make an eye loop on one end of the cable using the included cable crimps, then thread the rest of the cable through all the pulleys, cable guard, and rail gaps. Connect the eye loop to the hook of one car, then loop the other end through the cable hook of the other car. Pull the cable so it becomes taught, then make another eye. A hemostat works great for holding a cable loop together until you crimp it. Cut off excess cable then test.

Cable Hooks for Cars: Use 1/16” strong thin steel rod to make cable hooks for cars. Don’t use thicker rod because it might hang up in the ABT switch cable gap. Don’t use brass rods which might bend under load. Cut rod with Demel cut-off disk. Bend with needle nose pliers and hammer. Insert and glue stem of hook into an attachment bracket (I used a small triangular piece of ¼” acrylic sheet) at the bottom of the front of each car, slightly off-center on the same side as the double flanged wheels. The hook should be as small as possible and be slightly below the top of the rails so it passes through the gaps in the switch. If set too low, the hook will hit the rail spikes. If set too high, the cable won’t pass through the rail gap. The correct hook height requires great precision and must be determined by testing!. Test the hook before you glue it to the attachment bracket!

Magnet for Car: Only one car has a small neodymium magnet underneath which activates both the Circuitron AR-2 controller and the sound module by tripping two reed switches located between the rails at each station. Use the smallest magnet possible and locate it 1/8” above the top of the rails. A small magnet is more precise because it will let you stop the cars at exactly the right spot. The large magnetic field of a large magnet is less precise. Do not put magnets on both cars! The MM-D-10 style magnet I used is flat mounting with a female threaded shaft permanently attached. Screw a short piece of threaded rod into the hole under the flat car that was meant to attach a coupler. Screw the small threaded flat magnet in the other end of the rod. The screw allows you to easily adjust the height of the magnet. This is the perfect magnet for a funicular!

Car Wheel Selection and Modification: Use the biggest and heaviest steel wheelsets you can find. Remember, heavy cars are a good thing! Don’t use plastic. This helps keep a low center of gravity in the cars. Modifying the wheels is easy and fast. Grind off the flange on one wheel of each set by putting the axle in an electric drill and grinding it off against a disk sander. Epoxy a 1½” steel fender washer to the other wheel of each set to create a double flanged wheel.

Car Design Types: Funiculars, like most vehicles, need nearly horizontal floors and seats for passengers’ comfort and safety. So on steep inclines, funicular car frames have a different angle than the passenger compartments. Usually, small short cars have a single horizontal floor with seating. But long cars often have two or more floors. I call these split-level cars. Split-levels require ramps or stairs for boarding in the stations. Although harder to build, they do have a lower center of gravity which is safer, and they are more interesting I think. (See the adorable Budapest Funicular).

Car Lighting: Don’t electrify the rails! You’ll have a big electrical short between the inner rails in the ABT passing switch. If you want car lighting, you must use onboard 9V batteries. Since these batteries have steel casings, you can save space by attaching to a thin magnetic disc glued underneath the flat bed. You can use electrified rails in a four rail funicular however. Obviously, there would also be a short in a three rail funicular.

Adding and Removing Cars: Before connecting the cables to the cars, make sure that the ends of the cable are next to each other near the middle of the track. After connecting one car, be sure to hold it firmly until you connect the other car. Don’t accidentally let go of it or it will fall down the track and crash! Likewise, before you remove a car, make sure you stop the cars next to each other in the center of the passing switch. (I put two compression contact springs from D-cell flashlights on the wood bumper at the bottom to protect the car in case there is a runaway someday!)

I'll add to this list as I think of other things.
 
Last edited:

John Carmichael

Registered
16 Dec 2019
33
3
69
Tucson Arizona USA
Best answers
0
Country flag
Yesterday, after 10 months, I finished installing the funicular outside within the Cholla Patch Railroad layout. It now has a new mountain range to climb. Most of the iron support structure is buried within the mountain. The entire mountain (except around the plants) is coated in a 2:1 water/Titebond III solution which solidified all the small particle sand and clay. This controls erosion and makes cleaning the leaves off easy with a leaf blower without all the sand blowing away. I use the same Titebond solution on my track ballast- like the HO guys do. I've designed and built a passenger boarding area with lots of anxious travelers and an ornate Victorian ticket booth (modeled after the precious upper tramway station booth at Saltburn Cliff Tramway in England- saltburn cliff tramway - Bing images ). This summer, I'll make a suspension footbridge from the upper station over to the Treehouse behind the mountain.

You can see photos of the installation details here: G-Scale Funicular Garden Railway

G Scale Funicular Boarding Area10.JPGG Scale Funicular Car and Station1.JPGG Scale Funicular Car and Station4.JPGG Scale Funicular Boarding Area17.JPGG Scale Funicular Boarding Area20.JPGG Scale Funicular Boarding Area16.JPGG Scale Funicular Car3.JPGG Scale Funicular Ticket Booth8.JPGG Scale Funicular Car1.JPGG Scale Funicular Overview1.JPGG Scale Funicular Overview2.JPGG Scale Funicular Upper Station4.JPGG Scale Funicular Track2.JPGG Scale Funicular Lighting5.JPG
 

Attachments

  • G Scale Funicular Lighting4.JPG
    G Scale Funicular Lighting4.JPG
    385.3 KB · Views: 0
Last edited:
  • Like
Reactions: 1 user

PhilP

G Scale, 7/8th's, Electronics
5 Jun 2013
33,565
3,521
Nottingham
Best answers
0
Country flag
:clap::clap::clap:

Just waiting for the video.. :);)
 

maxi-model

UK/US/ROW steam narrow gauge railways 1:1
27 Oct 2009
5,673
661
Bucks/Oxon/Northants area
Best answers
0
Country flag
Stunning. Superbe piece of model making, I think the CFR needs one of these. Better let Casey snr know. Max
 

Paul M

Registered
25 Oct 2016
11,881
1,696
60
Royston
Best answers
0
Country flag
Yesterday, after 10 months, I finished installing the funicular outside within the Cholla Patch Railroad layout. It now has a new mountain range to climb. Most of the iron support structure is buried within the mountain. The entire mountain (except around the plants) is coated in a 2:1 water/Titebond III solution which solidified all the small particle sand and clay. This controls erosion and makes cleaning the leaves off easy with a leaf blower without all the sand blowing away. I use the same Titebond solution on my track ballast- like the HO guys do. I've designed and built a passenger boarding area with lots of anxious travelers and an ornate Victorian ticket booth (modeled after the precious upper tramway station booth at Saltburn Cliff Tramway in England- saltburn cliff tramway - Bing images ). This summer, I'll make a suspension footbridge from the upper station over to the Treehouse behind the mountain.

You can see photos of the installation details here: G-Scale Funicular Garden Railway

View attachment 262576View attachment 262577View attachment 262578View attachment 262579View attachment 262580View attachment 262581View attachment 262582View attachment 262584View attachment 262585View attachment 262586View attachment 262587View attachment 262588View attachment 262589View attachment 262590
Wonderful modelling
 

John Carmichael

Registered
16 Dec 2019
33
3
69
Tucson Arizona USA
Best answers
0
Country flag
Hello All:

Thanks to all for your kind comments. I'm so glad that all you experts liked my work. That helps to make it all worthwhile.
I have been keeping sane distracting myself by making several cool G-Scale funicular railway videos including the very first known ONBOARD video of a model funicular!
We’ve really tried to do a good job of filming using the GoPro camera and special lighting effects.

Here is a photo of the little funicular movie camera car that we used for the onboard shots. Note the cable hook and flange-less wheel.
What you can't see are the 453 grams of lead weights underneath the car! The total weight of the camera car exactly equals the 753 gram weight of the passenger cars. (for cable weight balance)

1620192659_GoProFunicularCar2.thumb.JPG.9c195b088d9c3f46ef40536ccfa1aa49.JPG

I published all the funicular videos in SD in a playlist on You Tube located here:

G-Scale Funicular Railway - YouTube

We had a good time making these and hope you enjoy them.

John

p.s. If you listen carefully to the audio of some of them, you can hear the same groans and creaking noises that real funiculars make. I love that!
 
Last edited:

John Carmichael

Registered
16 Dec 2019
33
3
69
Tucson Arizona USA
Best answers
0
Country flag
This is our last and best funicular garden railway video that contains many short clips edited together- some with onboard video. Makes you feel like a passenger!
We worked real hard on getting the perfect angles, lighting and editing.
Filming it was a great quarantine project.

Hope you like it!

Funicular Garden Railway Ride:
 

John Carmichael

Registered
16 Dec 2019
33
3
69
Tucson Arizona USA
Best answers
0
Country flag
Here is a helpful diagram showing three basic types of funiculars. The earliest ones were four rail (two track) funiculars, but they are the costliest to build because rails are expensive, they take up a lot of space, and they need double stations. More advanced three rail funiculars are less expensive but a little harder to build because they require a passing switch. The least expensive is the modern two rail funicular. They use less iron rails, don’t need double stations, and occupy less real estate, but have the harder to build passing switch. This unique type of funicular was invented in 1890 by Swiss engineer Carl Roman Abt (1850–1933) for the Giessbach Hotel funicular which is still in operation. It was made possible by his innovative and revolutionary ABT passing switch - the only railroad switch without any moving parts! Abt called it the “automatic turnout” solution. It became an instant success and most funiculars constructed afterwards use the ABT design to this day.

Funicular Types.jpg
 
Last edited:

John Carmichael

Registered
16 Dec 2019
33
3
69
Tucson Arizona USA
Best answers
0
Country flag
The funicular now has a reason for being. I've connected the upper station to a 104 ft. long (at 1:24 scale) suspension foot bridge that leads to the re-modeled Treehouse Complex. The two supporting cables of the bridge run through holes drilled in each plank, and are attached to steel disks on the station by magnets to prevent any damage to the station from a heavy falling branch or strong winds. If the bridge is overly stressed, it will automatically disconnect and protect the station. The other end of the cables are attached to the elevator boarding platform at the tree house with miniature turnbuckles for adjusting tension and extension springs to allow for slight motions. The stainless steel cables are the same 1/32" stainless steel cable used in the funicular. The tree house along with a restaurant, salon, gazebo and lodge now has a new Victorian elevator to travel between levels, and it really works!

for more photos see: John Carmichael
 

Attachments

  • Garden Railway Treehouse Remodeled-10.JPG
    Garden Railway Treehouse Remodeled-10.JPG
    462 KB · Views: 0
  • Garden Railway Treehouse Remodeled-16.JPG
    Garden Railway Treehouse Remodeled-16.JPG
    720 KB · Views: 0
  • Garden Railway Treehouse Remodeled-17.JPG
    Garden Railway Treehouse Remodeled-17.JPG
    699.7 KB · Views: 0
  • Garden Railway Treehouse Remodeled-21.JPG
    Garden Railway Treehouse Remodeled-21.JPG
    784 KB · Views: 0
  • Garden Railway Treehouse Remodeled-23.JPG
    Garden Railway Treehouse Remodeled-23.JPG
    741.5 KB · Views: 0
  • Garden Railway Treehouse Remodeled-27.JPG
    Garden Railway Treehouse Remodeled-27.JPG
    809 KB · Views: 0
  • Garden Railway Treehouse Remodeled-31.JPG
    Garden Railway Treehouse Remodeled-31.JPG
    591.3 KB · Views: 0
  • Garden Railway Treehouse Remodeled-35.JPG
    Garden Railway Treehouse Remodeled-35.JPG
    638.7 KB · Views: 0
  • Garden Railway Treehouse Remodeled-38.JPG
    Garden Railway Treehouse Remodeled-38.JPG
    485.4 KB · Views: 0
  • Garden Railway Treehouse Remodeled-46.JPG
    Garden Railway Treehouse Remodeled-46.JPG
    660.6 KB · Views: 0
  • Garden Railway Treehouse Remodeled-53.JPG
    Garden Railway Treehouse Remodeled-53.JPG
    335.4 KB · Views: 0
  • Garden Railway Treehouse Remodeled-59.JPG
    Garden Railway Treehouse Remodeled-59.JPG
    636.3 KB · Views: 0
  • Garden Railway Treehouse Remodeled-65.JPG
    Garden Railway Treehouse Remodeled-65.JPG
    738.8 KB · Views: 0

Gavin Sowry

Garden Railroader and Raconteur
27 Oct 2009
7,841
2,490
70
Hutt Valley, NZ
Best answers
0
Country flag
DSC_0203 - Copy.JPG

This is the same system as we have running in downtown Wellington NZ. This system is now 42 years old, it replaced a twin track 3'6" gauge line that was originally set up as a proper grip car line, but the safety regulators got cold feet, and insisted on having a tail rope connecting the two cars. In operation, the downhill car took the grip, and pulled the other car up. That line opened in 1902 on this same formation. Grade is 1 in 5.06. I take the kudos for the design of the 'plain' track..... the car manufacturer specified a certain radius for the rail head (which I managed to find on a brand of Australian rail), the rest was simply 'modifying', or using, standard NZR fastenings.
 
  • Like
Reactions: 1 users

Gavin Sowry

Garden Railroader and Raconteur
27 Oct 2009
7,841
2,490
70
Hutt Valley, NZ
Best answers
0
Country flag
20121226132200_01.jpg

The 'original' Cable Car at Wellington. Grip car, at rear, was classic San Francisco type grip arrangement, except that the rope was only turned on when there was a need for the cars to run. The rope would start, then the Gripman would 'take rope' and the car would take off in the usual manner.
The trailer car is ex horse tram from the streets of Wellington. As I said, very early in the life of this line, a tailrope was connected between the two sets, making it a hybrid funicular/cable car. There was an additional "Fell' centre rail for extra breaking.
 

John Carmichael

Registered
16 Dec 2019
33
3
69
Tucson Arizona USA
Best answers
0
Country flag
How interesting! I love both versions of the Wellington funicular. But the early version is special because of it's hybrid nature. It also wins the "charm" factor category. I assume the early version had normal wheels and was of the simple Four Rail type- without the ABT switch. Is this correct? I need to think it through, but I doubt the hybrid version would work with a two Rail ABT system. Do you have any thoughts on this?
 
Last edited:

Gavin Sowry

Garden Railroader and Raconteur
27 Oct 2009
7,841
2,490
70
Hutt Valley, NZ
Best answers
0
Country flag
How interesting! I love both versions of the Wellington funicular. But the early version is special because of it's hybrid nature. It also wins the "charm" factor category. I assume the early version had normal wheels and was of the Fsimple our Rail type- without the ABT switch. Is this correct? I need to think it through, but I doubt the hybrid version would work with a two Rail ABT system. Do you have any thoughts on this?

The original Wellington system was simply double track, straight line, ordinary flanged wheels. The one quirk of the line, was that the stations were not equidistant apart, so there was need for one car to stop away from a station (and that just happened to be in a tunnel). Great fun riding on the outside seats. At the top of the line was a series of ordinary crossovers to access the car barn, which held the drive machinery, and the 'spare' cable car set. Up there, cars were moved about by hand (there was a stop to prevent accidentally sending a car down the grade).

DSCF0083.JPG

A few years before this closed down for rebuilding, the safety regulator ordered the removal of the trailer cars. Here is #3, restored to as near as original as possible (but with outside seat removed so you can see the grip).


DSCF0084.JPG

Grip car #1, as it was when retired. #2 is in another museum.
 
  • Like
Reactions: 1 user

Gavin Sowry

Garden Railroader and Raconteur
27 Oct 2009
7,841
2,490
70
Hutt Valley, NZ
Best answers
0
Country flag
DSC_0207 - Copy.JPG

Just to prove to the naysayers that this is indeed a 'proper' cable car, here is the grip. The wheel is for the Fell centre rail brake.
Big lever is the grip, the other two are brakes, one acting on the wheels with brakeshoes, and the other is the traditional cable car track brake.
The screw thread thing is the adjustment for the brakes.
 
Last edited:

Gavin Sowry

Garden Railroader and Raconteur
27 Oct 2009
7,841
2,490
70
Hutt Valley, NZ
Best answers
0
Country flag
DSC_0227 - Copy.JPG

Since we are on a roll with cable Cars, here is the one that used to rumble along the street I lived in in Dunedin. Of course, I don't remember it, it closed long before I was born. The car, however, moved to another line a few blocks away. I believe that my mum took me on this one. I certainly travelled on the Mornington cars. But, I digress, these were real cars, not funiculars.
 

Paul M

Registered
25 Oct 2016
11,881
1,696
60
Royston
Best answers
0
Country flag
All nice looking cars. Ii would imagine that if they were built today they'd just be bland plastic boxes
 

Gavin Sowry

Garden Railroader and Raconteur
27 Oct 2009
7,841
2,490
70
Hutt Valley, NZ
Best answers
0
Country flag
All nice looking cars. Ii would imagine that if they were built today they'd just be bland plastic boxes
Currently under way, is the reinstatement of part of one of the lines, as a tourist attraction. Cars are already restored. I'm just waiting for some zealous regulator to come along and stuff up the authenticity by insisting that they install flashing turn indicators on the cars, and that they paint the ends of the cars hi-viz yellow !

DSCF0265.JPG

Mornington car 111 under restoration some 10 years ago, now.
You'd think that Gav has a 'thing' about Cable Cars (I'll save my San Francisco work for another thread drift).