The directional head/tail lights are sorted; using LED’s its easy. I joined mine cathode to anode i.e. + to -. I wanted a less than intense glare from them so I use this “led resistor calculator” when I need to calculate a suitable resistance; http://www.hebeiltd.com.cn/?p=zz.led.resistor.calculator First I used my little LED Tester to see how many mA I wanted to run though the leds then with that I can input the supply voltage, then the voltage the led works at and the current and that then gives me the value of the resistor I needed, in this case 2.7K Ohms. So simple even I can do it.
The internal lights have been fitted, 2 warm white leds in series with a 2.2K Ohm resistor to give a weak glow. The only light that is hopefully seen will be from the doors at each end and the clerestory windows….
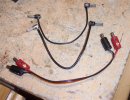
Trolley hooks have been fitted after much consideration as to the placement I decided to put the hooks on the roof rather than the clerestory.
The really really exciting news is that I have the scrubbing block system working. As you can see in the pictures the vibrator or OMD (Oscillatory Motion Device) is held in a small cylinder. The O ring is to provide a “grip” on the OMD the small ring is a very light push fit, it acts as both a depth retainer and a heat sink, these tend to get quite hot, I’m not sure whether they are rated for constant use or not….They are removable and easily replaced if they burn out and they wont break the bank at AU$4.80 a pair, though I’d hate to think what these cost if the one in your phone needs replacing. It tried it out using a small button cell and it does work well. Needed some tweaking the retaining screw had to be loosened so that the thing can run in about a .5mm circular motion. The spring pressure is also important, if there is too much pressure on the scrubbing block then not much happens as there is little rotary motion, it’s the rotary motion does the cleaning not the downward pressure. I will not be using this vibrator though, its 1.3V; I have some similar sized ones on order that are 4.7V which can be powered by the same 5V supply that runs the sound, yes even scrubber cars have gongs. It even sounds realistic from my vague recollections; Let me set the scene, its night, Easter 1968, I, in the company of some of my old cronies are driving a tram from Quarry Hill to Eaglehawk came over the crest of a hill and heard the most unpleasant screeching sound, just ahead was the dim glimmer of the taillights of the Scrubber Car, the motorman was having a wonderful time trying to clean up the tracks anyway we followed till California Gully Loop and the scrubber shunted back into the loop for us to pass. The reason for all the noise was the fact that the rails had over time sunk much lower than the asphalt; this was the cause of a few derailments especially of the Birney cars where the gear casings lifted the wheels off the track when they skidded along the asphalt.
Here is a video of a scrubber car cleaning the tracks, though it would have been quicker to get the concrete skim off the rails with a bucket of dilute Hydrochloric acid and a scrubbing brush; https://www.youtube.com/watch?v=oMT4w2yfuYg and here is a video of the same scrubber car demonstrating why you have to have a “good nerves” to drive a 4 wheel tram at speed on wonky track; https://www.youtube.com/watch?v=xeph2u2zZ8w
I have also made the decals for this car. Red & White safety stripes for the bumpers, NO PASSENGERS signs and some of the new LVS&ET crests which will encircle the car number rampant with a semicircular banner upon which the title of the tramway is emblazoned. Printed in deep gold which should contrast well with the car liveries. Does the design look familiar? It should…especially if you know your Antique Aussie trams. I have found that DIY Decal paper is “patchy’ especially the generic product out of China. The paper sold here is good; http://www.ebay.com.au/itm/5-INKJET-CLEAR-Water-Slide-Decal-PAPER-A4-Sheets-Craft-Transfer-Printable-Glossy-/360695805026?pt=LH_DefaultDomain_15&hash=item53fb253462&_uhb=1 Still a bit of manual tweaking of your printer needed, I crank the intensity up to around 75% and contrast up to 100% to get non transparent image. Has a very long shelf life and good adhesion. All I have to do now is apply the decals and finish the painting, and then final assembly can take place.