French Van scratch built body for Bachmann Bobber Chassis EDIT and another

Work in the last day or so has been concentrating on final details before the Roof goes on. Buffers have been created from left over Playmobil Housings off vehicles that were removed when creating a Centre Buffer, some odd bits of Round Plastic and some LGB RHB/DR Style buffer heads. The basics of construction can be seen below.
E5B19A9C-5323-426E-A7B5-76768D77A3AB.jpeg
I had been pondering the smaller Rivets required for the U Shaped Strapping, I tried with smaller Plastic Strip but the heads were so small that Static Electricity became a real problem. Then I remembered that I had bought some Pins at a Millenery (Sewing) Shop in Hemel Hempstead when I lived in that famed Town. After a minute or two searching in the Workshop they were found and have proved to be ideal. Wish I had found them before I cut all the others up but they can stay now.
1713C262-DC28-4970-9EE8-7DE84CE5FFB1.jpeg
These are shoved into holes drilled with a No.70 Drill which just about holds them in place nicely. Lots of holes. Drill has run out of Battery which is why I am catching up with the post. Oh in a box of old Plastic I found a Wheel and it has been pressed into service as an add on to the Brake Wheel.

I will need to ponder the Air Vents now, Continental NG Railways in generel were not like us insisting on the correct Van for specific circumstances. For instance the W&L had specific Sheep Vans for well Sheep and other Vans for General Goods. Many European NG Lines were quite happy to use the Vans for multiple service, just creating Vents for when the Beasts were being carried. These can be seen to the top of the Prototype Pics.

Finally a couple of pics in the Sunshine Today.
9ECF9858-F791-47A8-BA48-D7C51E5FBA59.jpeg
BA042DD3-62C5-448B-BCDD-D4611E01CD8F.jpeg
You can make out the additional Brakes that have been added to the left in these pics as well.
 
Did very little yesterday after my trip to Nero for Coffee and discovering a couple of new Micro Pubs to investigate, one being on Platform 3b at Doncaster Station, that had to be investigated immediately. Well it is barely 1 and a half hours away by Train. Well worth the trip so only work was some derisory hole drilling for Rivets.

Wednesday was much more productive though having fabricated and fitted all 8 Sliding Air-vents. They were made by cutting 10 thou Black Plasticard for the drop down bit. The x was done first with one using Micro Strip glued acrois the piece then pencil marking the other cross arm and making that from two Strips. The vents were then glued in place. I then used the centre point to mark the pull down Rod using a Set Square on the roof line to ensure that they would all be square. Then with the same Micro Strip that I used for the Plastic Rivets cut out all 8 Rods and the 16 shorter pieces that would make the Y. Finally after glueing all that on 8 shorter pieces were cut for the Hand Holds.
2C5FD007-8261-43B1-BAA2-441E11EF3682.jpeg
 
It has now been in the Paint Shop and is in all over Brown (Halfords Rattle Can Red Primer) which will be the primary Colour. After a day ir two to fully cure I will then be on with Masking Tape to Spray all the Ironwork Black. Then it should just be lettering and the Roof with a little Weathering to finish off.
C68DB714-EE2A-4869-8F01-9FBB3734F280.jpeg
 
I forgot to take a pic of it all taped up for spraying black, but here it is in the spraybooth having just had the Black Spray. I think you will be able to make out the Masking Tape.
D91081B3-6812-4508-83CA-325A91B5F29C.jpeg
Then an underneath pic shows the varying bits that will need to be hand splashed in Black. You should also be able to seesome of the 8 Nylon Washers to stop excessive Side to Side Movement that will help with better running, something that all of my LGB and other makes of rolling stock have had. But this is the only one that has needed as many as 8 washers. Behind in the Plastic Thing are bits that still need to be replaced on Pfiffi!
0BAA048E-8BAE-4345-AE6C-9CE9702DCA4C.jpeg
Finally showing one side, there has been a little bit of bleed through in places. Something quite possibly self inflicted by not being dilligent enough in my pressing down of the Masking Tape. It will be resolved by my normal method of Brush Touching up with some Brown from the Rattle Can. I spray enough to get a small bit of liquid in the Can Lid which lasts OK for this job. I also need to touch up the handrails as Maskol was used behind and inevitably some got on them. I also used some Maskol on the top sudes of the Air Vents which has worked very well, I probably should have used it for all the edges, but an old Brush got trashed using the stuff. Net advice is to wet the brush with water, but next time I think I will use Cocktail Sticks and Coffee Stirrers rather than a Brush.
B85E6EC3-D863-40C0-A5D4-8AA251A72AC6.jpeg
Numbers and Information Plates have been added, just the roof and some subtle weathering to go.
 
Managed to fit the Roof yesterday, just a Plasticard one with a score in the middle to allow it to bend over. A skim with some emery makes it Matt which will do I think for now. Also the Numbers and Labels fitted with a little touching up here and there to sort out the Spray Bleed theough and an odd Plank made to look like a replacement. Now ready for service now that its Orders Card has also been made.
7FE95D21-0F73-479E-9905-C1FCA5C5DCEB.jpeg
 
Excellent bash Jon,well done that man:cool::cool:;)
 
I forgot that I have made a similar van to this on an Aristo Track Cleaning Caboose. This one the 2 Balconies left in place. Part of my now semi redundant Track Cleaning Fleet of Wagons.
image.jpeg
 
Last edited:
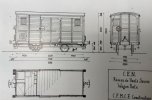
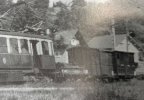
I recently picked up another Bachman Bober chassis so decided on another ‘French’ style van. This one from the CEN Résau de Haute Savoi line being my inspiration. I wanted one without a balcony end so this Wagon Poste fitted the bill being roughly the same length as the Bober. Pic shows one of these vans at the rear of this short consist. I do not intend to use it as a Poste van on my line, just another van. But if I get round to batteryficating a Couple of Corpets and another Railcar it will get used as such when I run my French Timetable in the shed.
IMG_8663.jpegIMG_8664.jpeg
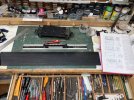
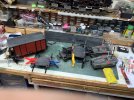
Here is the progress to date, long length of 60 thou plasticard cut in one piece for ends and sides, makes scribing the planks easier. A couple more shorter lengths of this or thinner will be needed for the doors. Much of the build will be on similar lines to the earlier one, again with sloped rather than curved roof as on the prototype. A lazy mans solution to the roof conundrum!IMG_8662.jpeg
 
A bit more derisory work to this project today as workshop is quiet cool and waiting for plumber to do annual boiler service. Sides cut out after scribing wood grain into plasticard with a bit of broken off hacksaw blade. Ends have had some rocket stick glued to the sides using ‘UHU All Purpose Power’ my general glue of choice. After this has dried the sides will be glued thus giving me the basic box.

Famous last words re photo’s, had to retake this after original posted upside down!
IMG_8673.jpeg
 
Back
Top Bottom