Fitting a massoth LS in to the Marklin/LGB U class. An easy one

stockers

Trains, aircraft, models, walking, beer, travel
24 Oct 2009
25,631
3,795
65
Nr. Ashford, Kent. England.
Best answers
0
Country flag
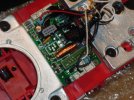
I had a quick look inside the current production U class as soon as I got it. this arrived in as new condition from Ebay.
I ordered a Massoth LS sound decoder from Muns`s Garden Rail outlet, together with a 57mm speaker. Muns sent a slimline one and I think this installation needs it. You need the LS with a 10 pin connector plug attached - its a Massoth option.

This is an easy one - it really is plug and play. the only fiddly bit is getting the loco back together but I`ll get to how I did that.
DSC06002 (Small).JPG
 

stockers

Trains, aircraft, models, walking, beer, travel
24 Oct 2009
25,631
3,795
65
Nr. Ashford, Kent. England.
Best answers
0
Country flag
Turn the loco over. i used a piece of bubble wrap to protect the loco roof. the whistle is removed.
Six screws. 4 in the base and 2 in the rear cab sheet at the lower edge.
DSC06003 (Small).JPG
 

stockers

Trains, aircraft, models, walking, beer, travel
24 Oct 2009
25,631
3,795
65
Nr. Ashford, Kent. England.
Best answers
0
Country flag
Ease the top off of the loco - easy, the top is black and the base is red! ???
DSC06004 (Small).JPG

The lighting and smoke wires will string the two pieces together - no need to try and separate them.
 

stockers

Trains, aircraft, models, walking, beer, travel
24 Oct 2009
25,631
3,795
65
Nr. Ashford, Kent. England.
Best answers
0
Country flag
Here we have the existing board. this deals with the 5Volt lights and smoke. It also contains the socket for the decoder to plug into.
The socket has a plug in it - (shown removed here = lower center of picture, under the reddish brown bit.)


Removing the plug is just an easy wiggle and pull.

DSC06007 (Small).JPG
 

Attachments

  • DSC06006 (Small).JPG
    DSC06006 (Small).JPG
    110.1 KB · Views: 10

stockers

Trains, aircraft, models, walking, beer, travel
24 Oct 2009
25,631
3,795
65
Nr. Ashford, Kent. England.
Best answers
0
Country flag
Take the speaker and fit it in the depression provided in the metal weight. You can fix this with small screws and washers. I just used super glue on the outer edge.
DSC06008 (Small).JPG
DSC06009 (Small).JPG
 

stockers

Trains, aircraft, models, walking, beer, travel
24 Oct 2009
25,631
3,795
65
Nr. Ashford, Kent. England.
Best answers
0
Country flag
Take the decoder and plug the ten pin plug in to the socket. it only goes one way but take a bit of care and have a good look to ensure you dont force it. There are two tiny lugs on one side. one of these goes between two of the three pins on the upper row (as you look at my picture)

DSC06010 (Small).JPG


DSC06012 (Small).JPG
 

stockers

Trains, aircraft, models, walking, beer, travel
24 Oct 2009
25,631
3,795
65
Nr. Ashford, Kent. England.
Best answers
0
Country flag
Plug the speaker into the two pin socket (there is only one two pin sockets. Almost the top left in this pic.
DSC06013 (Small).JPG
 

stockers

Trains, aircraft, models, walking, beer, travel
24 Oct 2009
25,631
3,795
65
Nr. Ashford, Kent. England.
Best answers
0
Country flag
I wrapped the decoder in the thick plastic bag it came in, wrapped it round and secured with a bit of tape. This is just a precaution in case it should touch the weight or the other circuit board.

DSC06014 (Small).JPG
 

stockers

Trains, aircraft, models, walking, beer, travel
24 Oct 2009
25,631
3,795
65
Nr. Ashford, Kent. England.
Best answers
0
Country flag
Now for the fiddly bit. Tucking it all back inside. there is barely sufficient depth in the tanks to hold the weights, speaker, original circuit board and the new decoder. I ended up putting the decoder diagonally behind the chimney , across the tanks, and held it with a bit of tape. Then wiggle the top on and ensure it will fully go down on to the chassis. Replace the six screws.

No pictures here because once it was wiggled back together - it was not coming apart again. Its not difficult but does take more than a moment or two.

Muns has pre-set the decoder so no need to play about with CV settings. Just test. it will be on the default address 3.

Note - the 5 volt lights and smoke do not need setting on the decoder CVs. the original board continues to do this for you.
 

stockers

Trains, aircraft, models, walking, beer, travel
24 Oct 2009
25,631
3,795
65
Nr. Ashford, Kent. England.
Best answers
0
Country flag
A picture from when it was analogue. its raining now so just a quick trip outside to check it works and listen to some of the sounds. Further testing and a new address code tomorrow I think.

An easy one

DSC05939 (Small).JPG
 

stockers

Trains, aircraft, models, walking, beer, travel
24 Oct 2009
25,631
3,795
65
Nr. Ashford, Kent. England.
Best answers
0
Country flag
Today, I noticed that the chuff rate seemed rather slow. I watched the wheels and only got one chuff for every one and a quarter wheel revolutions. It should be 4 chuffs per revolution.
I changed the CV196 (duration of chuff) from 28 to 12. Now sounds much better and at about the chuff rate that I want. Its actually still slow at about 2 chuffs per wheel revolution but sounds right to me for the speed i usually run at.
 

PhilP

G Scale, 7/8th's, Electronics
5 Jun 2013
33,562
3,521
Nottingham
Best answers
0
Country flag
stockers said:
Today, I noticed that the chuff rate seemed rather slow. I watched the wheels and only got one chuff for every one and a quarter wheel revolutions. It should be 4 chuffs per revolution.
I changed the CV196 (duration of chuff) from 28 to 12. Now sounds much better and at about the chuff rate that I want. Its actually still slow at about 2 chuffs per wheel revolution but sounds right to me for the speed i usually run at.
Am sure you know, but for those who don't..
LGB 'factory fitted' tend to run at 2 chuffs per revolution (which is wrong), but looks / sounds about right..
If you set it to 4, then it seems a ridiculously fast rate at all but the slowest speeds..
If you want it 'in sync', then you need a 'cam axle' of some description.
Using CV's 196 and 198, you can get it to be 'about right' for the speed you tend to run at, and a bit either side.. It will definitely be wrong at slow speeds, but if you run it fast, I defy you to be able to tell anyway! ;)