FurkaSOCal
Registered
Hello all,
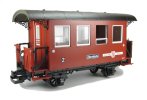
I want to undertake my first kit bashing project but I am hesitant on how to get started. I have scratch built buildings and such out of wood in the past but never done much with plastic. I would like to cut two LGB cars in half and glue them together to make one longer car. I've attached a picture of what I am trying to cut in half for reference. What is the best tool to use to cut the car in half? What types of glues do you recommend for gluing the two sections back together? Can I sand down the uneven surfaces with sandpaper?
Thanks in advance,
Phil


")

