Mobi
Registered
I received immense help from forum members to assist me converting a loco to RC. I summarized my experience here so that it can help someone else in future ")
To have a good quality RC battery powered loco (at a reasonable price), the only available option is to buy a reasonably priced track powered locomotive and convert it to RC battery power yourself.
If you adopt this route, then your total cost would be, cost of loco + £100 to £150, which is considerably cheaper than buying Roundhouse RC loco for £900-£1000.
If you are not confident (although I believe you will become confident after reading this article) you can ask some experts to convert it for you for you (at an agreed cost if it is offered as a service).
Conversion steps
Step 1 - Find a suitable locomotive for conversion
You need a locomotive first! You can use your existing track powered loco if you have it. But the loco needs to satisfy following attributes before you plan conversion.
1. Enough space inside to keep battery pack (at least 8-10 AA size batteries). If you don't have enough space inside of loco to place battery pack, you can always put stuff in a separate wagon/tender. However, then you always need to pull the RC wagon whenever you want to run your loco. The loco should have a socket for connecting wire at the back (many LGB locos will have this connection but not all of them). This may also affect aesthetics of your train as reverse running may look awkward with a leading wagon. The RC receiver circuit boards are usually small - so as long as you can fit battery pack inside, the circuit board should not be a big problem.
2. One motor (if you can convert locos with 2 motors once you are experienced but I would not advise as a first project)
3. The procurement cost is reasonable (if the cost of loco + RC equipment costs in the region of of-the-shelf RC locos except Playmobil then not much point in conversion unless you want to do it for fun)
Step 2 - Open the Locomotive
Note: If you are planning to put RC equipment in a trailing wagon/tender, you can skip this step.
As a beginner, you may find it most daunting step. How to open your loco depends on your loco type. You need to download an exploded diagram of components of loco from manufacturer's website and observe which screws need to be removed to open up the loco.
Some screws may be difficult to access unless you remove the motor block as well. If you do so, you need to be able to re-assemble the loco afterwards.
You are most likely to need following types of screw drivers (usually for LGB locos) - PH0, PH1, PZ1.
It is up to you whether you want to remove all track pickup components. Removing pick up skates may improve hauling power of loco slightly (as it causes some drag). If you are not confident removing all track pick up components, you can leave them as it is.
However, what you must to is to make access to motor terminals. In most LGB locos (if not all) the motor block has 4 pins. The inner 2 pins are for carrying power from track to control board. The outer 2 pins are for carrying power from control board to motors. You should isolate the inner 2 pins. You can leave the pins protruded from motor block but make sure you don't connect anything to these pins.
Leave your loco open (i.e. don't attach screws again until you have converted it to RC battery power).
Step 3 - Choose your remote control electronics
Step 3a - Understanding the circuit
At a very high level, you need something to control the input voltage to motor so that loco speed (and direction) can be controlled. You will issue command from a handset (also known as RC transmitter) which will tell the RC receiver (inside loco) to adjust the voltage.
Strictly speaking, you need at least 2 items inside the loco - the RC receiver and electronic speed controller (ESC). The receiver receives the signal from transmitter and ESC controls the speed. The good news is that many circuit boards have built in receiver and ESC inside them.
This can be diagrammatically represented using following image.

http://riksrailway.blogspot.co.uk/2013/10/getting-started-with-battery-power-and.html
Please note following points:
· Receiver + ESC can often be combined in single circuit board (if you choose in that fashion)
· Switch + Charing Socket can be dispensed with if you use standard rechargeable AA batteries
This will make your circuit very simple! All you need to do is to connect 2 wires from battery pack to circuit board (maintain polarity) and 2 wires from motor (polarity does not matter) to circuit board.
Step 3b - Procuring the RC equipment
You need to buy RC electronics components from market. There are several options and I list only few of them. Depending on where you leave in the world, some options may not be available to you.
This is not an exhaustive list in any way.
Also be aware that while buying these components, if you more likely to deal with individual persons rather than large corporations. So, adjust your expectation (purchase process, communication, payment, warranty etc.) accordingly.

Step 4 - Actual conversion process
Connect relevant terminals of receiver with battery and motor.
Depending on what type of equipment you are using, you can connect wires by
· Soldering
· JST/Tamiya/BEC connectors
· Screw terminals
· Wago connectors or similar
Usually you need to bind receiver and transmitter. For how to do that, refer to your circuit board maker's instruction manual.
Transmitter needs some batteries to power it. Depending on model chosen, it could be via 9 V PP3 or AA/AAA batteries.
Once you have tested the loco for RC, put screws back and enjoy your newly converted RC battery loco.
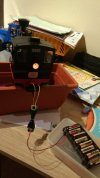
There is an example image of the conversion.

Locomotive: LGB 22620 Kof diesel 0-6-0
Receiver: Deltang Rx65
Transmitter: Tx21
Power source: 10x NiMH AA rechargeable batteries
The batteries are connected to receiver circuit board by a PP3 snap connector (red/black wires) which is screwed to circuit board. The green/yellow wires are connected to motor at one end (via crimp connectors) and to circuit board via screws.

Above diagram demonstrates the basic circuit. Please note that it does not show fuses but you advised to add them. One fuse should be just after snap connector and another one just before motor.
To have a good quality RC battery powered loco (at a reasonable price), the only available option is to buy a reasonably priced track powered locomotive and convert it to RC battery power yourself.
If you adopt this route, then your total cost would be, cost of loco + £100 to £150, which is considerably cheaper than buying Roundhouse RC loco for £900-£1000.
If you are not confident (although I believe you will become confident after reading this article) you can ask some experts to convert it for you for you (at an agreed cost if it is offered as a service).
Conversion steps
Step 1 - Find a suitable locomotive for conversion
You need a locomotive first! You can use your existing track powered loco if you have it. But the loco needs to satisfy following attributes before you plan conversion.
1. Enough space inside to keep battery pack (at least 8-10 AA size batteries). If you don't have enough space inside of loco to place battery pack, you can always put stuff in a separate wagon/tender. However, then you always need to pull the RC wagon whenever you want to run your loco. The loco should have a socket for connecting wire at the back (many LGB locos will have this connection but not all of them). This may also affect aesthetics of your train as reverse running may look awkward with a leading wagon. The RC receiver circuit boards are usually small - so as long as you can fit battery pack inside, the circuit board should not be a big problem.
2. One motor (if you can convert locos with 2 motors once you are experienced but I would not advise as a first project)
3. The procurement cost is reasonable (if the cost of loco + RC equipment costs in the region of of-the-shelf RC locos except Playmobil then not much point in conversion unless you want to do it for fun)
Step 2 - Open the Locomotive
Note: If you are planning to put RC equipment in a trailing wagon/tender, you can skip this step.
As a beginner, you may find it most daunting step. How to open your loco depends on your loco type. You need to download an exploded diagram of components of loco from manufacturer's website and observe which screws need to be removed to open up the loco.
Some screws may be difficult to access unless you remove the motor block as well. If you do so, you need to be able to re-assemble the loco afterwards.
You are most likely to need following types of screw drivers (usually for LGB locos) - PH0, PH1, PZ1.
It is up to you whether you want to remove all track pickup components. Removing pick up skates may improve hauling power of loco slightly (as it causes some drag). If you are not confident removing all track pick up components, you can leave them as it is.
However, what you must to is to make access to motor terminals. In most LGB locos (if not all) the motor block has 4 pins. The inner 2 pins are for carrying power from track to control board. The outer 2 pins are for carrying power from control board to motors. You should isolate the inner 2 pins. You can leave the pins protruded from motor block but make sure you don't connect anything to these pins.
Leave your loco open (i.e. don't attach screws again until you have converted it to RC battery power).
Step 3 - Choose your remote control electronics
Step 3a - Understanding the circuit
At a very high level, you need something to control the input voltage to motor so that loco speed (and direction) can be controlled. You will issue command from a handset (also known as RC transmitter) which will tell the RC receiver (inside loco) to adjust the voltage.
Strictly speaking, you need at least 2 items inside the loco - the RC receiver and electronic speed controller (ESC). The receiver receives the signal from transmitter and ESC controls the speed. The good news is that many circuit boards have built in receiver and ESC inside them.
This can be diagrammatically represented using following image.
http://riksrailway.blogspot.co.uk/2013/10/getting-started-with-battery-power-and.html
Please note following points:
· Receiver + ESC can often be combined in single circuit board (if you choose in that fashion)
· Switch + Charing Socket can be dispensed with if you use standard rechargeable AA batteries
This will make your circuit very simple! All you need to do is to connect 2 wires from battery pack to circuit board (maintain polarity) and 2 wires from motor (polarity does not matter) to circuit board.
Step 3b - Procuring the RC equipment
You need to buy RC electronics components from market. There are several options and I list only few of them. Depending on where you leave in the world, some options may not be available to you.
This is not an exhaustive list in any way.
Also be aware that while buying these components, if you more likely to deal with individual persons rather than large corporations. So, adjust your expectation (purchase process, communication, payment, warranty etc.) accordingly.
Step 4 - Actual conversion process
Connect relevant terminals of receiver with battery and motor.
Depending on what type of equipment you are using, you can connect wires by
· Soldering
· JST/Tamiya/BEC connectors
· Screw terminals
· Wago connectors or similar
Usually you need to bind receiver and transmitter. For how to do that, refer to your circuit board maker's instruction manual.
Transmitter needs some batteries to power it. Depending on model chosen, it could be via 9 V PP3 or AA/AAA batteries.
Once you have tested the loco for RC, put screws back and enjoy your newly converted RC battery loco.
There is an example image of the conversion.
Locomotive: LGB 22620 Kof diesel 0-6-0
Receiver: Deltang Rx65
Transmitter: Tx21
Power source: 10x NiMH AA rechargeable batteries
The batteries are connected to receiver circuit board by a PP3 snap connector (red/black wires) which is screwed to circuit board. The green/yellow wires are connected to motor at one end (via crimp connectors) and to circuit board via screws.
Above diagram demonstrates the basic circuit. Please note that it does not show fuses but you advised to add them. One fuse should be just after snap connector and another one just before motor.