Difference in track?

dunnyrail

DOGS, Garden Railways, Steam Trains, Jive Dancing,
Staff member
GSC Moderator
25 Oct 2009
26,160
4,986
75
St.Neots Cambridgeshire UK
Best answers
0
Country flag
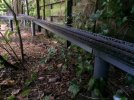
Though this thread os predominantly for track as to be expected there has been a little thread drift into scales. So as I have been running my 16mm scale on 45mm track today I decided to take a couple of pics of it next to PM and LgB Wagons.

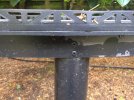
Pic 1 with a PM balcony cabined wagon. Here you can see that the cabin is just a little bit higher than the loco.4B4A8546-892F-48A9-957B-9C429D0A38F9.jpeg
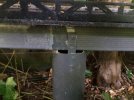
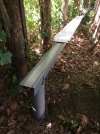
Pic 2 here with an LGB van, almost the same height. Width wise all are pretty similar.
C75EBB32-F8D9-4D4C-ACDC-0435B07DB3E0.jpeg
I think this neatly illustrates why 16mm ers are happy to use LGB stock if they are not being too slavish about scale.
 

Gerard

Registered
26 Mar 2021
126
16
74
Aerdenhout Holland
Best answers
0
Country flag
Let me tell you my experiences with track:
1 I use LGB trains on 45mm track. Outside in the garden everything is R3 or higher. I bought all kinds of trackmarks, LGB Chinees etc.
2 I planned the track by first laying all the track in the garden. I choosed to build the first track at ground level going around the lawn around my house and after that i extended the flower boarders up to the track. Those boarders are now very nice curved with the track and the track now blends in very nice with the garden.
3 Then i put a lot of little marking sticks in the ground in the axis of each track, to mark the trail of the track.
4 I marked all trackparts by number so i could lay them again after having made the track support.
5 I removed all the trackparts and build the track support by digging out about 20x30 cm and replacing with sand. Then i hired a streetstone worker to lay all the 5cm thick 15cm wide and 1 m long concrete slabs with street stones along on both sides. In the curves i used special concrete slabs 5cm thick and 15 cm wide having a round end and front so they can be layed nice as a train in the curve. All the track is at the lawn level so i can easy run my lawnmover over it.
6 Then i installed all track parts back again using the numbering and the original connections.
SO FAR SO NOT SO GOOD!
7 Soon the old rails connections appeared to give an electric problem. I solved that by exchanging nearby all sleeve connections with the screw mounted connections of Massoth. I did this also with the track from other chinese marks. But more important: i used a grease, based on Copper called : Cu7439 Plus Paste from Molykote in tubes of 100g. Since than i had no electric connections problems any more (for me 4 years now and for a friend of my already 10 years no problems!)
8 Corrections in track length can simply be done by using a hand steel saw.
9 Correction of a too low track level can be simply done by using a hand shovel. Put it next to the track in the ground and bend over so the soil is pushed under the slab and the slub comes upwards. Remove the shovel and fill the gap with sand. A too hig level can be corrected by simply bouncing the slab and stoons deeper into the ground.
FIXING THE TRACK TO THE SLABS
10 I started using thin copperstrips accross the slab and pushed in the ground between the slab and the two stones. On top of the strip i soldered two little bumps that fit inside the sleeper. This keeps the track nice at the center of the slab. However it appeared that my grandchildren move the tracks from this contruction. Since there was no need anymore to prevent fixed rail constructions in order to be flexible in case of electric connection problems (point 7) , i started using screws.
11 I use little screws and drilled holes in the slepers and the concrete slabs. A normal drill machine did not the job because the drill couldn't manage the very hard SiO2 stones in the concrete. So i bought a heavy drill hammer and the smallest drill (5mm) they got for that machine . To control the position of this drill (and not destroying the track!) i made a sturdy guiding construction from wood with steel guiding slots for the drill in order to keep the drill exactly in the middle of the sleeper. This works great!
TRACK ABOVE GROUNDLEVEL
12 To build a track above ground level is used 3m long thin steel U-profiles (used in building industry for guiding wires) and put them on top of vertical plastic 80 mm tubes. Each 3 m one vertical tube in a 80 mm hole made by hand drill. The U profile is mounted on top of the tube after cutting of the top of the tube at the disired level.
13 The connection between the U-profiles and between the U-proile and the 80mm plastick pipe i made by using two or three Pop-nails. They are very easy to install (just dril one hole) and make a very sturdy connection. Be aware of the fact that the small expanding end of the pop-nail allways is at the steel plate side! The forces of this expanding nail cannot be held by the plastic pipe.
14 On top of the U-profile i mounted a15 cm wide 1.2 m long TRESPA plate , again using the fast pop-nail method.
15 Finally i mounted the track on the trespa plates (again with popnails!) and i put a small model fence at each side of the trespa plate made from the white plastic corner wall-protection you can buy at the building shop.
16 In the beginning i started with nice curved TRESPA track plates, but in the future i will use a bit wider straight sections at shorter distance that can handle 1 or 2 curved track parts.

Well, it has become a long story and i hope you can use some of the ideas.
I took some pictures for better understanding.
I hope these photos do not take too much kBytes.

Bart van der Schrieck
 

Attachments

  • Concrete slabs with rounded ends.JPG
    Concrete slabs with rounded ends.JPG
    114.1 KB · Views: 0
  • connection by popnails.JPG
    connection by popnails.JPG
    132.8 KB · Views: 0
  • connection by Pop-nails.JPG
    connection by Pop-nails.JPG
    128.5 KB · Views: 0
  • Flexibel rail positioner one under the sleeper and one on top in display.JPG
    Flexibel rail positioner one under the sleeper and one on top in display.JPG
    110.6 KB · Views: 0
  • IMG_7314.JPG
    IMG_7314.JPG
    94.4 KB · Views: 0
  • track follows boarders.JPG
    track follows boarders.JPG
    104.8 KB · Views: 0
  • track on ground.JPG
    track on ground.JPG
    112.1 KB · Views: 0
  • viaducht on 80 mm pipe standing in the terras.JPG
    viaducht on 80 mm pipe standing in the terras.JPG
    160.2 KB · Views: 0
  • viaduct from U-profile steel on 80mm plasticpipe.JPG
    viaduct from U-profile steel on 80mm plasticpipe.JPG
    159.6 KB · Views: 0
  • Like
Reactions: 1 user

PhilP

G Scale, 7/8th's, Electronics
5 Jun 2013
33,558
3,521
Nottingham
Best answers
0
Country flag
Three years you say? - It has blended in nicely with the garden.

Thank you for making the effort and taking the time to explain it all..
I especially like the blocks with the curved ends. I genius!

PhilP.
 

3 minutes of fame

3d printing, electronics and trams
14 Dec 2020
574
154
Lincolnshire
www.mgnr.uk
Best answers
0
Country flag
Let me tell you my experiences with track:
1 I use LGB trains on 45mm track. Outside in the garden everything is R3 or higher. I bought all kinds of trackmarks, LGB Chinees etc.
2 I planned the track by first laying all the track in the garden. I choosed to build the first track at ground level going around the lawn around my house and after that i extended the flower boarders up to the track. Those boarders are now very nice curved with the track and the track now blends in very nice with the garden.
3 Then i put a lot of little marking sticks in the ground in the axis of each track, to mark the trail of the track.
4 I marked all trackparts by number so i could lay them again after having made the track support.
5 I removed all the trackparts and build the track support by digging out about 20x30 cm and replacing with sand. Then i hired a streetstone worker to lay all the 5cm thick 15cm wide and 1 m long concrete slabs with street stones along on both sides. In the curves i used special concrete slabs 5cm thick and 15 cm wide having a round end and front so they can be layed nice as a train in the curve. All the track is at the lawn level so i can easy run my lawnmover over it.
6 Then i installed all track parts back again using the numbering and the original connections.
SO FAR SO NOT SO GOOD!
7 Soon the old rails connections appeared to give an electric problem. I solved that by exchanging nearby all sleeve connections with the screw mounted connections of Massoth. I did this also with the track from other chinese marks. But more important: i used a grease, based on Copper called : Cu7439 Plus Paste from Molykote in tubes of 100g. Since than i had no electric connections problems any more (for me 4 years now and for a friend of my already 10 years no problems!)
8 Corrections in track length can simply be done by using a hand steel saw.
9 Correction of a too low track level can be simply done by using a hand shovel. Put it next to the track in the ground and bend over so the soil is pushed under the slab and the slub comes upwards. Remove the shovel and fill the gap with sand. A too hig level can be corrected by simply bouncing the slab and stoons deeper into the ground.
FIXING THE TRACK TO THE SLABS
10 I started using thin copperstrips accross the slab and pushed in the ground between the slab and the two stones. On top of the strip i soldered two little bumps that fit inside the sleeper. This keeps the track nice at the center of the slab. However it appeared that my grandchildren move the tracks from this contruction. Since there was no need anymore to prevent fixed rail constructions in order to be flexible in case of electric connection problems (point 7) , i started using screws.
11 I use little screws and drilled holes in the slepers and the concrete slabs. A normal drill machine did not the job because the drill couldn't manage the very hard SiO2 stones in the concrete. So i bought a heavy drill hammer and the smallest drill (5mm) they got for that machine . To control the position of this drill (and not destroying the track!) i made a sturdy guiding construction from wood with steel guiding slots for the drill in order to keep the drill exactly in the middle of the sleeper. This works great!
TRACK ABOVE GROUNDLEVEL
12 To build a track above ground level is used 3m long thin steel U-profiles (used in building industry for guiding wires) and put them on top of vertical plastic 80 mm tubes. Each 3 m one vertical tube in a 80 mm hole made by hand drill. The U profile is mounted on top of the tube after cutting of the top of the tube at the disired level.
13 The connection between the U-profiles and between the U-proile and the 80mm plastick pipe i made by using two or three Pop-nails. They are very easy to install (just dril one hole) and make a very sturdy connection. Be aware of the fact that the small expanding end of the pop-nail allways is at the steel plate side! The forces of this expanding nail cannot be held by the plastic pipe.
14 On top of the U-profile i mounted a15 cm wide 1.2 m long TRESPA plate , again using the fast pop-nail method.
15 Finally i mounted the track on the trespa plates (again with popnails!) and i put a small model fence at each side of the trespa plate made from the white plastic corner wall-protection you can buy at the building shop.
16 In the beginning i started with nice curved TRESPA track plates, but in the future i will use a bit wider straight sections at shorter distance that can handle 1 or 2 curved track parts.

Well, it has become a long story and i hope you can use some of the ideas.
I took some pictures for better understanding.
I hope these photos do not take too much kBytes.

Bart van der Schrieck
Very nice. A tidy track system!
 

Gerard

Registered
26 Mar 2021
126
16
74
Aerdenhout Holland
Best answers
0
Country flag
Let me tell you my experiences with track:
1 I use LGB trains on 45mm track. Outside in the garden everything is R3 or higher. I bought all kinds of trackmarks, LGB Chinees etc.
2 I planned the track by first laying all the track in the garden. I choosed to build the first track at ground level going around the lawn around my house and after that i extended the flower boarders up to the track. Those boarders are now very nice curved with the track and the track now blends in very nice with the garden.
3 Then i put a lot of little marking sticks in the ground in the axis of each track, to mark the trail of the track.
4 I marked all trackparts by number so i could lay them again after having made the track support.
5 I removed all the trackparts and build the track support by digging out about 20x30 cm and replacing with sand. Then i hired a streetstone worker to lay all the 5cm thick 15cm wide and 1 m long concrete slabs with street stones along on both sides. In the curves i used special concrete slabs 5cm thick and 15 cm wide having a round end and front so they can be layed nice as a train in the curve. All the track is at the lawn level so i can easy run my lawnmover over it.
6 Then i installed all track parts back again using the numbering and the original connections.
SO FAR SO NOT SO GOOD!
7 Soon the old rails connections appeared to give an electric problem. I solved that by exchanging nearby all sleeve connections with the screw mounted connections of Massoth. I did this also with the track from other chinese marks. But more important: i used a grease, based on Copper called : Cu7439 Plus Paste from Molykote in tubes of 100g. Since than i had no electric connections problems any more (for me 4 years now and for a friend of my already 10 years no problems!)
8 Corrections in track length can simply be done by using a hand steel saw.
9 Correction of a too low track level can be simply done by using a hand shovel. Put it next to the track in the ground and bend over so the soil is pushed under the slab and the slub comes upwards. Remove the shovel and fill the gap with sand. A too hig level can be corrected by simply bouncing the slab and stoons deeper into the ground.
FIXING THE TRACK TO THE SLABS
10 I started using thin copperstrips accross the slab and pushed in the ground between the slab and the two stones. On top of the strip i soldered two little bumps that fit inside the sleeper. This keeps the track nice at the center of the slab. However it appeared that my grandchildren move the tracks from this contruction. Since there was no need anymore to prevent fixed rail constructions in order to be flexible in case of electric connection problems (point 7) , i started using screws.
11 I use little screws and drilled holes in the slepers and the concrete slabs. A normal drill machine did not the job because the drill couldn't manage the very hard SiO2 stones in the concrete. So i bought a heavy drill hammer and the smallest drill (5mm) they got for that machine . To control the position of this drill (and not destroying the track!) i made a sturdy guiding construction from wood with steel guiding slots for the drill in order to keep the drill exactly in the middle of the sleeper. This works great!
TRACK ABOVE GROUNDLEVEL
12 To build a track above ground level is used 3m long thin steel U-profiles (used in building industry for guiding wires) and put them on top of vertical plastic 80 mm tubes. Each 3 m one vertical tube in a 80 mm hole made by hand drill. The U profile is mounted on top of the tube after cutting of the top of the tube at the disired level.
13 The connection between the U-profiles and between the U-proile and the 80mm plastick pipe i made by using two or three Pop-nails. They are very easy to install (just dril one hole) and make a very sturdy connection. Be aware of the fact that the small expanding end of the pop-nail allways is at the steel plate side! The forces of this expanding nail cannot be held by the plastic pipe.
14 On top of the U-profile i mounted a15 cm wide 1.2 m long TRESPA plate , again using the fast pop-nail method.
15 Finally i mounted the track on the trespa plates (again with popnails!) and i put a small model fence at each side of the trespa plate made from the white plastic corner wall-protection you can buy at the building shop.
16 In the beginning i started with nice curved TRESPA track plates, but in the future i will use a bit wider straight sections at shorter distance that can handle 1 or 2 curved track parts.

Well, it has become a long story and i hope you can use some of the ideas.
I took some pictures for better understanding.
I hope these photos do not take too much kBytes.

Bart van der Schrieck
This older picture shows very good the building system during building using the 3m long steel U profile on top of the plastic 80mm tubes and the white TRESPA plate on top of the U-profile.
 

Attachments

  • U-profile on top of pipe and TRESPA on top of U-profile both connected with pop-nails.JPG
    U-profile on top of pipe and TRESPA on top of U-profile both connected with pop-nails.JPG
    404.3 KB · Views: 0

justme igor

Registered
17 Apr 2020
679
64
Netherlands Westwoud
Country
Netherlands
Best answers
0
Country flag
@ gerard
Very nice info, thank you
For others:
Trespa is very durable often used for outside of buildings, very expensive but it will last a life time, often construction workers can get you some "waste" material.
Cheaper alternative would be pvc sheet (for dutchies bought at de vos plastics)
The u profile is more for dry walling it has a zinc coating, if you tread the cuts with a zinc spray it will last decades, again most construction workers have this for free(left overs)
Is not so expensive.
I like the idea of pvc tubing into the ground, i also use this, it will last forever, and if you want to change something, just take out your pvc tubes and relocate them.
Very easy to get your tracks very level

Gerard thanks for your effort and your ideas!
 
Last edited:

Gerard

Registered
26 Mar 2021
126
16
74
Aerdenhout Holland
Best answers
0
Country flag
Igor,
Your idea of the PVC sheet is a good one! Not only price wise but also because the Trespa plate material is very hard so you cannot put screws in it without causing a crack. Thats why i finally only used the pop-nails instead.
 

justme igor

Registered
17 Apr 2020
679
64
Netherlands Westwoud
Country
Netherlands
Best answers
0
Country flag
I thought you where a construction worker in the Netherlands?
Anyway:
if you decide to go with the u or c profile for drywall i suggest foam pvc sheets.
It is not going to be any cheaper compared to wood and durability.
To work with trespa you will need the same stuff as working with "ethernite platen" same stuff but then cement bonded.
Trespa is more resin bonded(mdf and hdf, i think you understand, i dont know the English name sorry), with some high pressure.
Working with trespa and simulair sheets you need different tools to do it properly(cutting discs/saw blades and drill bits) yes those materials are a hassle to work with


But will survive your great great grand children...

Btw if i may ask? where are you located in our "wet" country.(i am in westwoud noord-holland)

With best regards Igor
 
8 Mar 2014
7,806
972
San Diego
Country
Armenia
www.elmassian.com
Best answers
0
Country flag
For those of us who don't know what Trespa is, it is HPL, high pressure laminate..

That still only helps a bit.

Multiple layers of cellulose impregnated with resin.

Similar to our Bakelite, but with a surface finish suitable for cladding a building.
 

Gerard

Registered
26 Mar 2021
126
16
74
Aerdenhout Holland
Best answers
0
Country flag
Igor , i'm living in Aerdenhout near Haarlem. I worked as a Dredging Researcher with HAM now Van Oord and as Lecturer at the Delft University.
You can see my books about dredging on Amazon, search for G.L.M. van der Schrieck and Dredging Technology.
Gerard.
 

Edgar

Registered
13 May 2020
176
9
61
Tennessee
Best answers
0
Country flag
No brans of track has so-called transition curves - you have to make 'em yourself.
Will starting the into a R-3 curve with an R-5 work as a transition when using LGB track? Or is the geometry too severe to function as a transition?
 

tac foley

Registered
11 Apr 2017
4,263
1,008
78
Near Huntingdon, UK
Best answers
0
Country flag
Will starting the into a R-3 curve with an R-5 work as a transition when using LGB track? Or is the geometry too severe to function as a transition?
I can't say for certain, as I have no sectional LGB track, but it looks feasible to my eye. An easement into a curve is a good thing, and that seems to be a good way to do it.
 

PhilP

G Scale, 7/8th's, Electronics
5 Jun 2013
33,558
3,521
Nottingham
Best answers
0
Country flag
You have to watch how many degrees of curve you get, with a R5 versus a R3 section of curve..
It only really works for creating a loop, where you can mirror the 'in' with the 'out', as it throws track-spacing out..

PhilP
 

justme igor

Registered
17 Apr 2020
679
64
Netherlands Westwoud
Country
Netherlands
Best answers
0
Country flag
Lecturer at the Delft University.
Give my best regards and thanks to professor "Dollevoet" If you see him...from a happy satisfied student (that dont want leave the construction...I am stuck there, that is my world.)
Thanks in advance, with best regards Igor
 
8 Mar 2014
7,806
972
San Diego
Country
Armenia
www.elmassian.com
Best answers
0
Country flag
Will starting the into a R-3 curve with an R-5 work as a transition when using LGB track? Or is the geometry too severe to function as a transition?
Transitions into curves is a great idea, used by prototype railroads, much smoother operation, more reliable operation. Clearly with sectional track you have to take into account the different curvatures and different lengths.

Greg
 

Edgar

Registered
13 May 2020
176
9
61
Tennessee
Best answers
0
Country flag
Custom curves are easier to make using the tried and try "belly bend" till a bender is purchased
I’m curious about the belly bend technique. How does it work? Are both rails bent at the same time with the ties installed or are they bent individually? Do the rails try to twist.
 

Paul M

Registered
25 Oct 2016
11,871
1,696
60
Royston
Best answers
0
Country flag
I’m curious about the belly bend technique. How does it work? Are both rails bent at the same time with the ties installed or are they bent individually? Do the rails try to twist.
It means literally bending the track around one's stomach, sleepers attached. The radius or diameter is obvious dependant on one's girth. Not always recommended as it can distort the track, but often used
 

GAP

G Scale Trains, HO Trains, 1:1 Sugar Cane trains
14 Jun 2011
4,057
940
Bundaberg Queensland, Australia
Country
Australia
ringbalin-light-railway.blogspot.com
Best answers
0
Country flag
It means literally bending the track around one's stomach, sleepers attached. The radius or diameter is obvious dependant on one's girth. Not always recommended as it can distort the track, but often used
What he said.
I just bend my track around my belly till I get the radius I want anywhere from a slight bend to a tight one.
 

Gavin Sowry

Garden Railroader and Raconteur
27 Oct 2009
7,841
2,490
70
Hutt Valley, NZ
Best answers
0
Country flag
What he said.
I just bend my track around my belly till I get the radius I want anywhere from a slight bend to a tight one.
The quality of belly bend track is directly related to the quality of the beer you drink.... a good Irish Stout will give you solid track :devil:.
 

phils2um

Phil S
11 Sep 2015
1,522
423
Ann Arbor, Michigan
Country
United-States
Best answers
0
Country flag
Will starting the into a R-3 curve with an R-5 work as a transition when using LGB track? Or is the geometry too severe to function as a transition?
I've done this in most locations where I'm using sectional track. It works great at the speeds I run, a scale 70kph max at 1:22.5. The R5 lead-in eases LGB 4-axle passenger and freight wagons into the curve. They no longer appear to be suddenly jerked into the turn! Note that the appearance of being jerked is lessened by running at slower speeds and running shorter wagons. Below are pics of a couple of examples. In most spots I use a full R5 (15º) section. I used half (7.5º) sections of R5 as a lead-in to the R3s in my tunnel.

R5 to R3 - 1.jpeg.R5 to R3 - 1 (1).jpeg

Edit added - 1 1/2 sections of LGB R5 (15º + 7.5º of circle) are equivalent to one section of LGB R3 (22.5º of circle) if you're doing 45º, 90º,135º, or 180º turns.
 
Last edited: