For the past nine years, I have been using a Bachmann Lyn to test upgrades to our MyLocoSound steam soundcards. In that time it has had two batteries, five different radio controls and endless soundcard changes. Recently, it finally gave up the ghost and started to fall apart. It has therefore been retired and has been replaced by a new Bachmann Lyn purchased from a friend who never got round to taking it out of the box. The following describes how I converted it to battery radio control.
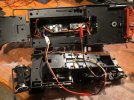
After separating the body from the chassis, I removed the Bachmann electronics PCB. Next, I cut away the three pairs of red and black wires which picked up track power from the wheels; one pair at each end from the bogies and one pair in the middle. That just left two pairs of wires connecting the chassis to the body; the yellow and grey ones for the motor and the thin wires for the chuff trigger.
Bathroom silicon was then used to fix the radio control and speed control to the body inside the boiler. In this instance I used a Fosworks radio control because that was what ended up in the original Lyn and I just transferred it.
Normally I would put the soundcard out of sight inside the boiler as well. However I wanted to be able to download upgrades for testing without having to take the loco apart. Therefore the soundcard ended up on the cab floor where it is hard to spot. If I want to download an upgrade, I just open the cab door and plug in the cable.
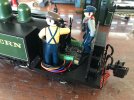
I also replaced the Bachmann speaker in the coal bunker. The original was not the best for a steam chuff so I replaced it with a MyLocoSound two watt speaker behind the fireman.
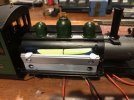
Next, the batteries. I used two flat packs of six AAA rechargeable batteries; one in each side tank. Maximising the weight of the loco is important when, like the Lyn, it has only two driving axles. Therefore I replaced as many of the weights as I could, held them in place with Bluetack and replaced the side tanks.
It was then all connected up using the wiring diagram in the ‘How to Install” section at www.mylocosound.com .
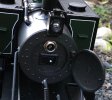
Finally, I replaced the Bachmann switches with a simple on/off switch and battery charging socket behind the smokebox door.
Then it was off for a successful test run. However I do need to add more lead. It is a relatively light locomotive with only two driving axles and will barely pull two bogie coaches up a 1 in 50 curved incline.
Photos attached.
Regards
Peter Lucas
MyLocoSound
After separating the body from the chassis, I removed the Bachmann electronics PCB. Next, I cut away the three pairs of red and black wires which picked up track power from the wheels; one pair at each end from the bogies and one pair in the middle. That just left two pairs of wires connecting the chassis to the body; the yellow and grey ones for the motor and the thin wires for the chuff trigger.
Bathroom silicon was then used to fix the radio control and speed control to the body inside the boiler. In this instance I used a Fosworks radio control because that was what ended up in the original Lyn and I just transferred it.
Normally I would put the soundcard out of sight inside the boiler as well. However I wanted to be able to download upgrades for testing without having to take the loco apart. Therefore the soundcard ended up on the cab floor where it is hard to spot. If I want to download an upgrade, I just open the cab door and plug in the cable.
I also replaced the Bachmann speaker in the coal bunker. The original was not the best for a steam chuff so I replaced it with a MyLocoSound two watt speaker behind the fireman.
Next, the batteries. I used two flat packs of six AAA rechargeable batteries; one in each side tank. Maximising the weight of the loco is important when, like the Lyn, it has only two driving axles. Therefore I replaced as many of the weights as I could, held them in place with Bluetack and replaced the side tanks.
It was then all connected up using the wiring diagram in the ‘How to Install” section at www.mylocosound.com .
Finally, I replaced the Bachmann switches with a simple on/off switch and battery charging socket behind the smokebox door.
Then it was off for a successful test run. However I do need to add more lead. It is a relatively light locomotive with only two driving axles and will barely pull two bogie coaches up a 1 in 50 curved incline.
Photos attached.
Regards
Peter Lucas
MyLocoSound