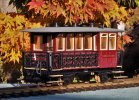
Claptowte Railway – Passenger Coach No 14, Director’s Coach

David1226

Registered
24 Oct 2009
7,892
7,899
74
Abingdon, Oxfordshire
Country
United-States
Best answers
0
Country flag
On 20 March 2016 I attended G-Rail 2016 at Stafford Show Ground. On a layout named Trumper’s Halt I saw the below pictured 4-wheel coach that totally intrigued me and fired my imagination. It was a 4-wheel coach with a balcony running along part of one side. Unfortunately the owner was not present at the time so I was unable to find out anything about it. It has the appearance of being scratch built and of Indian or Asian origins. I have no idea if it was based on a prototype or was just a flight of the builders fancy.

dig 160320013.JPG

It had always been my intention that all of the passenger stock on the Claptowte Railway would be 8-wheel bogie vehicles, albeit some of them being converted from a variety of 4-wheel vehicles mounted back to back on bogies. Over the years I collected the necessary donor vehicles and always collected to a plan, being disciplined, and, not allowing myself any impulse purchases. It was always intended that the coaches, although of different designs and origins, would conform to a corporate appearance and livery. As much as I wanted one, it was difficult to see how I could justify a vehicle such as the one above, in my line up. One day I had a moment of clarity, many private railway companies, whether full or narrow gauge, had special vehicles set aside for the exclusive transport of the railway’s owner and/or company directors. That was the answer, the Claptowte Railway needed a Director’s coach.

I set about scanning the offerings on Ebay for a donor vehicle, suitable in both design and cost. I sourced the below LGB 4-wheeler back in July 2016 but it had to wait until I had finished the bogie coach conversions before I could set to work on it.

dig 160730001.JPG

dig 160730003.JPG

dig 160730007.JPG

dig 160730008.JPG

dig 160730009.JPG

dig 160730004.JPG

dig 160730005.JPG

dig 160730006.JPG

David
 
  • Like
Reactions: 1 user

David1226

Registered
24 Oct 2009
7,892
7,899
74
Abingdon, Oxfordshire
Country
United-States
Best answers
0
Country flag
The coach was a old LGB offering. I only had a vague idea of the look that I wanted to achieve so construction was very much suck it and see, trial and error, as I went along. I will describe its conversion from the ground up.

DIG 190829001.JPG

DIG 190829002.JPG

The hook and loop couplings were moulded as part of the swivelling single axel bogies. I replaced the bogies with more modern versions salvaged from earlier LGB Toytrain conversions, kept in the spares box. Modern hook and loop couplings were similarly sourced. The ancient plastic wheels/axels were replaced with bright nickel plated solid turned brass ones from Al Kramer in the US. These wheels are fitted as standard to all Claptowte Railway rolling stock. They are extremely heavy and provide extra weight low down to reduce the centre of gravity to improve running and road holding.

DIG 190829004.JPG

The end balconies decks, steps and end walls are all moulded as one piece. The plastic is very soft, I would describe it as more polythene than polystyrene. This made cutting out the end walls very easy but it made gluing in the new ornamental scroll panels a nightmare. The new balcony end panels and the same panels used for the side balcony were sourced from dolls house items. As I said, gluing the new balcony ends called for much patience and a lot of superglue. I may not have had blue prints for the construction but the language was pretty blue at times. It was a case of one blob of glue on the plastic and two on my fingers. You know what it’s like getting that stuff off. When I ran my fingers over the still smooth, soft and pliant curves of my wife, she complained quite vociferously about it. I am still convinced that the problem was my rough hands caused by the superglue deposits.

DIG 190829005.JPG

DIG 190829006.JPG

The steps were smooth and black. I was not sure if they were supposed to represent metal or wooden boards, I decided to go the way of wooden boards. To that end I ran the blade of a razor saw sideways along the length of the steps to simulate wood grain. GRS etched brass lamp irons were glued to the new balcony ends and additionally reinforced by the ends of dress making pins to represent rivets. Vacuum pipes, again salvaged from a Toy Train conversion, were fixed to the buffer beams of the underframe.

DIG 190829007.JPG

The body of the coach was assembled with separate window frames and glazing strips. Contrary to more modern offerings, where assemblies are clicked and/or screwed together, this model was glued together, making dismantling the model a bit fraught. Most of the parts were carefully prised apart using the blade of a screwdriver. Some more reluctant joints needed to be sneaked up on from behind and frightened apart by hitting the screwdriver with a wooden block. Eventually all of the component parts were separated out without any damage, which made subsequent painting so much easier. Some moulded handrails and other extraneous bits were carved off the body side and the locations scribed to match the planking. It was then time to attack the bare shell with a razor saw. The end doors and seating were asymmetric so I decided the side balcony was to be on the ‘narrow’ side. The body had six windows down each side so I cut into the side wall to remove a section four windows wide, where the new balcony was to be, leaving two windows in situ. The end wall was then cut to the ‘narrow’ side. The wall sections were then re-glued in the new configuration incorporating the side balcony. It was necessary to slip in a few plasticard filler strips to make the fit complete, as I said the construction was very much trial and error.

DIG 190829008.JPG

The floor of the carriage was smooth. The floor section, now forming the balcony floor, was then scribed to simulate wooden floor boards. Triangular off cuts of plasticard were glued to the outside of the balcony wall as brackets for a narrow scribed plasticard bench seat to run the length of the balcony. The strip of six window frames on the balcony side were then cut four and two to fit the altered sides. The clear glazing strip that fits into the window frames was similarly cut to fit. Brass wire handrails were fitted to the remaining three corners of the coach body, a fourth handrail being attached to the end of the side balcony railing.

DIG 190829009.JPG

The two ends of the narrow seat strip were cut off and glued together to form a pair of seats to fit the newly created alcove. Plasticard strips were glued to the walls of the seat units to support the window end of the tables once everything was painted. The table tops were made from plasticard with cocktail stick legs. The table tops were again scraped over with the side of the razor saw to simulate wood grain.

DIG 190829010.JPG

DIG 190829011.JPG

The roof was adorned with GRS lamp tops and ventilators. You will be aware of the adage of measure twice and cut once, well having carefully marked up the hole locations on the roof, I then proceeded to drill two holes in the wrong place. I had to fill and sand down the holes. As I had to give the roof a spray over with grey plastic primer before painting, it all came good in the end.

DIG 190829012.JPG

David
 
Last edited:
  • Like
Reactions: 1 user

David1226

Registered
24 Oct 2009
7,892
7,899
74
Abingdon, Oxfordshire
Country
United-States
Best answers
0
Country flag
Most components were painted before re-assembly, which made life easier. I could not see the point of transparent curtains on the glazing strips, so the inside of the curtains were painted before assembly.

I have noticed, having reviewed the photographs of the finished model, that there are a couple of redundant roof fixing tabs hanging down above the side balcony. These will be removed in due course.

So here we are, one Director’s coach with outside side balcony. Not identical to the coach on Trumper’s Halt, but it satisfies my desire and conforms to the corporate identity.

dig 190904001.JPG

dig 190904002.JPG

dig 190904003.JPG

dig 190904005.JPG

dig 190904006.JPG

dig 190904008.JPG

dig 190904010.JPG

dig 190904011.JPG

dig 190904012.JPG

dig 190904013.JPG

dig 190904014.JPG

dig 190904016.JPG

dig 190904017.JPG

dig 190904018.JPG

David
 
  • Like
Reactions: 2 users

duncana

Registered
16 Oct 2011
28
4
Bracknell, Berkshire
Best answers
0
Fantastic attention to detail! Especially as very few will notice it. Love the treatment to the tables and seats.
 

ge_rik

British narrow gauge (esp. Southwold and W&LLR)
24 Oct 2009
10,702
1,244
Cheshire
www.riksrailway.blogspot.com
Best answers
0
Country flag
Another masterpiece, David. :clap:
I do think the directors deserve upholstered seats though. :giggle:

Rik
 

Fred2179G

Registered
20 Apr 2017
1,059
186
USA
Best answers
0
Country flag
I hae seen a photo of a model coach with a side balcony, and I believe it was on one of these forums, but I can't recall which. The prototype coach was from Australia, if my memory is correct.
 

David1226

Registered
24 Oct 2009
7,892
7,899
74
Abingdon, Oxfordshire
Country
United-States
Best answers
0
Country flag
Another masterpiece, David. :clap:
I do think the directors deserve upholstered seats though. :giggle:

Rik

Thanks Rik, but it's not a problem, the Claptowte Railway Director's are all a bunch of real hard arses.

David
 
  • Like
Reactions: 1 user

Paulus

Registered
13 Jan 2012
136
17
Best answers
0
:clap: Awesome job! This made a very unique coach!
 

mike

Master at annoying..
Staff member
GSC Moderator
24 Oct 2009
51,806
4,435
Rossendale
www.gscalecentral.net
Best answers
0
Country flag
Master class from a master craftsman
 

David1226

Registered
24 Oct 2009
7,892
7,899
74
Abingdon, Oxfordshire
Country
United-States
Best answers
0
Country flag
The Directors Coach in the Autumn sunshine 16.10.2022.

dig 221016003.JPG

David