Having finalised the track plan for the Claptowte Railway, it occurred to me that train and locomotive movements across the various points and sidings would need to be controlled in some way, the obvious solution would be to construct a number of ground signals.
As with the semaphore signals, already constructed, these would be dummy, non-working signals, for cosmetic appearance only. Given that the Claptowte Railway is a totally freelance British outline, of my own creation, I felt it would be appropriate to design my own style of signal.
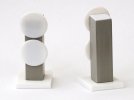
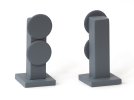
I kept the design simple to speed up construction. The ‘concrete’ base is a 19mm square of 3mm plasticard sheet. The signal body is a 35mm length of 3/8ths” (9mm) of square plastic tube, glued vertically to the base, the open top being blanked off with a square of 0.5mm plasticard. The signal discs are 15mm game/tiddly wink counters, purchased on eBay.

The signals were all given a spray of grey plastic primer, prior to painting.

The base was painted weathered concrete, the signal body was painted LMS Freight Grey, as that was the colour I had to hand. The discs were obviously painted white.
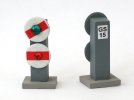
I used red electrical insulating tape for the red bars on the signal discs. On a white piece of paper, using a black ball pen, I drew lines 5mm apart. I lightly pressed a short length of red tape onto a piece of thin scrap glass. Using a steel rule and scalpel, I reduced the width of the tape to 13mm. I then placed the glass over the paper, and using the ruled lines as a guide, I cut the tape into 5mm lengths. These 13 x 5 mm pieces of tape were then peeled off the glass and stuck to the faces of the white painted discs. I then placed a self adhesive jewel at the centre of each disk, green for the ‘off’ disc, and red for the ‘stop’ disc. These jewels were left over from when I had remodelled the semaphore signals for the line.
To finish of the models I created some number plates on the computer, printed them on white paper, cut them out and glued them to the rear of the signals, using white PVA glue.
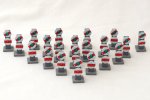
The finished models.


I'm sure my efforts may not be to the liking of the real railwaymen and/or purists among you, for, as stated, the design is out of my own head, but I invoke Rule 8, it's my railway and I'll run it how I like. I think anyone would agree, they will add some interest and a splash of colour, lineside.
David
As with the semaphore signals, already constructed, these would be dummy, non-working signals, for cosmetic appearance only. Given that the Claptowte Railway is a totally freelance British outline, of my own creation, I felt it would be appropriate to design my own style of signal.
I kept the design simple to speed up construction. The ‘concrete’ base is a 19mm square of 3mm plasticard sheet. The signal body is a 35mm length of 3/8ths” (9mm) of square plastic tube, glued vertically to the base, the open top being blanked off with a square of 0.5mm plasticard. The signal discs are 15mm game/tiddly wink counters, purchased on eBay.

The signals were all given a spray of grey plastic primer, prior to painting.

The base was painted weathered concrete, the signal body was painted LMS Freight Grey, as that was the colour I had to hand. The discs were obviously painted white.
I used red electrical insulating tape for the red bars on the signal discs. On a white piece of paper, using a black ball pen, I drew lines 5mm apart. I lightly pressed a short length of red tape onto a piece of thin scrap glass. Using a steel rule and scalpel, I reduced the width of the tape to 13mm. I then placed the glass over the paper, and using the ruled lines as a guide, I cut the tape into 5mm lengths. These 13 x 5 mm pieces of tape were then peeled off the glass and stuck to the faces of the white painted discs. I then placed a self adhesive jewel at the centre of each disk, green for the ‘off’ disc, and red for the ‘stop’ disc. These jewels were left over from when I had remodelled the semaphore signals for the line.
To finish of the models I created some number plates on the computer, printed them on white paper, cut them out and glued them to the rear of the signals, using white PVA glue.
The finished models.


I'm sure my efforts may not be to the liking of the real railwaymen and/or purists among you, for, as stated, the design is out of my own head, but I invoke Rule 8, it's my railway and I'll run it how I like. I think anyone would agree, they will add some interest and a splash of colour, lineside.
David
-
4
-
2
-
1
- Show all

