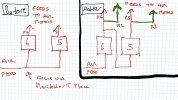
I have long admired these things and a recent read of Bylines showing some GWR ones at Bala Junction promoted me into action. The drawing below was my rough sketch from which I worked to, things never quite work out to plan but a rough basis is a good start..
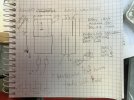
Being that all my Points are worked by Air I had decided to use Del Air Motors, these had been in my “to repair” box for some time having had problems with the original Steel Springs Rusting away, not a good design for outside. I have had for quite a few years now some non rusting spring replacements, as I did not need these motors they sat in a box with the old springs rusting away.
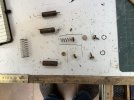
Below you can see a couple of Del Air Motors in their component pieces, note the little pile of rust. The Circlip in this instance is fine, but some of the demics had them rusted away almost to oblivion. Top Tip, oil the external circlips NOW if you use any Del-Air Motors outside. Just a small splash will do, no need to dismantle the Motors.
Now I was not up to speed on Circlips prior to this, just thinking a circlip is a circlip right? No wrong, anyway I searched for what I thought I needed and ended up ordering from Bearingboys external 10mm Circlips. Oh heck, quick service but clearly not right. So I wonder through their site and low and behold there they were, Internal Circlips. But at 10,9 and 8 mm size. Now having been burnt for postage for the wrong thing (not their fault I hasten to add) I decided at less than £1.50 for 10 I would order a packet of each iof the above 3 sizes. At under a tenner this proved to be a sound decision as what fits are the 9mm Internal Circlips (ref 31549) should anyone be in the same position that I was.
Have to say that Bearing Boys Service was superb and very fast, both sets of postings arriving within a couple of days. If any of you have issues with Del Air Motors they may well be worth looking at for the replacement springs as well. Have not needed any so have not done any of the groundwork.
Oh thus far after 14 years external use have had no problems with Easy Air or Sunset Valley Motors with springs as they do not rust, neither do the circlips as they do not use them. This is no critism of Del-Air, they were first in the field and the 10 pack that I bought from Brandbright around 1998 stayed unused till my new line in Hemel got started back in 2000. Then I took the plunge and would never return to point or signal control with anything other than Air Control or Pneumatics if you must.
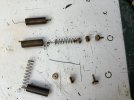
The pic below shows the new spring waiting to go back, this time with an original unrusted circlip. Tricky part of the re-assembly is getting the wire through the thin hole at the other end. Note that the wire needs to be as straight as possible. This needs to be done whilst compressing the spring and then using a set of surgeons gripping pliers to keep in place while stuffing everthing else in, then replacing the circlip completes the job. Note tye second part in with the O ring has the widest part towards the circlip. Not sure what the small bit of tube is for, some sort of rubber to take hammer blow I think. However as I needed some extra throw for the Indicators they were left out.
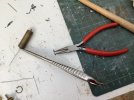
Putting the circlip in can be a bit of a task, this one did a ping over the workshop that prompted me to search for replacements. Note both fine nosed tweezers and pliers being used. Trick is to ensure that the barb end is well in, ping in the cupirclip too far then gently pull it back till it pings into the groove. The barb can then be gently pulled back to rest on it completing the re-assembly.
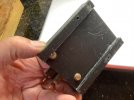
Here is the rear of the Indicator. The holes are to screw it to the end board in the yard, the extra blocking is to allow the screws that hold the air motors in place to sit without being pressed onto the board bending the whole thing out of shape. This is a HIPS piece of work.
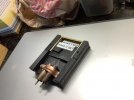
Front showing the basic constructions, U channel for the indicators to slide up and down. The channel has been soldered together (2 lengths each side) then Hafix’d to the HIPS. Note the cutouts to allow clearance from the bent operating wire from the air motors. The sliding indicators have been made from 50 thou Plasticard with lettering from my trusty Dynamo Labeller.
Next post I will show it all in place and how it operates, including how I have used Interlocking of Air Controls to ensure no false indicators.
I have to say that I have great admiration for the masochists that get these things up and working in 4mm scale and possibly less.

Being that all my Points are worked by Air I had decided to use Del Air Motors, these had been in my “to repair” box for some time having had problems with the original Steel Springs Rusting away, not a good design for outside. I have had for quite a few years now some non rusting spring replacements, as I did not need these motors they sat in a box with the old springs rusting away.
Below you can see a couple of Del Air Motors in their component pieces, note the little pile of rust. The Circlip in this instance is fine, but some of the demics had them rusted away almost to oblivion. Top Tip, oil the external circlips NOW if you use any Del-Air Motors outside. Just a small splash will do, no need to dismantle the Motors.
Now I was not up to speed on Circlips prior to this, just thinking a circlip is a circlip right? No wrong, anyway I searched for what I thought I needed and ended up ordering from Bearingboys external 10mm Circlips. Oh heck, quick service but clearly not right. So I wonder through their site and low and behold there they were, Internal Circlips. But at 10,9 and 8 mm size. Now having been burnt for postage for the wrong thing (not their fault I hasten to add) I decided at less than £1.50 for 10 I would order a packet of each iof the above 3 sizes. At under a tenner this proved to be a sound decision as what fits are the 9mm Internal Circlips (ref 31549) should anyone be in the same position that I was.
Have to say that Bearing Boys Service was superb and very fast, both sets of postings arriving within a couple of days. If any of you have issues with Del Air Motors they may well be worth looking at for the replacement springs as well. Have not needed any so have not done any of the groundwork.
Oh thus far after 14 years external use have had no problems with Easy Air or Sunset Valley Motors with springs as they do not rust, neither do the circlips as they do not use them. This is no critism of Del-Air, they were first in the field and the 10 pack that I bought from Brandbright around 1998 stayed unused till my new line in Hemel got started back in 2000. Then I took the plunge and would never return to point or signal control with anything other than Air Control or Pneumatics if you must.

The pic below shows the new spring waiting to go back, this time with an original unrusted circlip. Tricky part of the re-assembly is getting the wire through the thin hole at the other end. Note that the wire needs to be as straight as possible. This needs to be done whilst compressing the spring and then using a set of surgeons gripping pliers to keep in place while stuffing everthing else in, then replacing the circlip completes the job. Note tye second part in with the O ring has the widest part towards the circlip. Not sure what the small bit of tube is for, some sort of rubber to take hammer blow I think. However as I needed some extra throw for the Indicators they were left out.

Putting the circlip in can be a bit of a task, this one did a ping over the workshop that prompted me to search for replacements. Note both fine nosed tweezers and pliers being used. Trick is to ensure that the barb end is well in, ping in the cupirclip too far then gently pull it back till it pings into the groove. The barb can then be gently pulled back to rest on it completing the re-assembly.

Here is the rear of the Indicator. The holes are to screw it to the end board in the yard, the extra blocking is to allow the screws that hold the air motors in place to sit without being pressed onto the board bending the whole thing out of shape. This is a HIPS piece of work.

Front showing the basic constructions, U channel for the indicators to slide up and down. The channel has been soldered together (2 lengths each side) then Hafix’d to the HIPS. Note the cutouts to allow clearance from the bent operating wire from the air motors. The sliding indicators have been made from 50 thou Plasticard with lettering from my trusty Dynamo Labeller.

Next post I will show it all in place and how it operates, including how I have used Interlocking of Air Controls to ensure no false indicators.
I have to say that I have great admiration for the masochists that get these things up and working in 4mm scale and possibly less.

