You are using an out of date browser. It may not display this or other websites correctly.
You should upgrade or use an alternative browser.
You should upgrade or use an alternative browser.
Building a Garden Railway
- Thread starter Colin2897
- Start date
Colin2897
Registered
Will doHi Colin
Sounds like a good plan.
Welcome to the forum. Plenty of good advice here when and if you need it.
Keep us updated as to progress. We like photos.
Rik
My line is 4ft high with in the pictures for inspiration including a lower track. I mostly used Metposts in the ground held in place with Postcrete making sure the wood is out of the ground. Where the post is on flags I drill into the wood centrally, drilling and banging in a big 6” nail with the flat head cut off leaving a few inches proud. Then a hole is drilled in the flag and the nail slipped into the hole.Hi All
Just after some thoughts on building a garden scale garden railway in my back garden i will be raising it up to about 4 feet high as I am not getting any younger probably on wooden poles and boards to lay track on
Many thanks and hello
Have a Look at by ‘New Railway is started’ thread in blue below where you will find ultimately some of my notes.


Northsider
Modelling the Northern half of the Isle of Man
I have used fenceposts and timber framing, then put a sheet of OSB on top. OSB is not the best material -it rots quite quickly if unprotected- so I applied a couple of coats of bitumen paint and then a sheet of roofing felt.


playmofire
Registered
Welcome from the other side of the Pennines.
ge_rik
British narrow gauge (esp. Southwold and W&LLR)
I used pressure treated fence posts and fence rails covered in roofing felt.


 riksrailway.blogspot.com
They lasted 17 years before I needed to replace some of them.
Rik
How I built the extension on timber supports
Narrow gauge large scale model garden railway. Battery powered, radio controlled locomotives, some Bluetooth. Set in Cheshire UK in 1930s
riksrailway.blogspot.com
They lasted 17 years before I needed to replace some of them.
Rik
Yep, free return tickets for forum members!Welcome to the Forum, Colin..
Following on from Rik's post, get a brew, and a comfy chair, then Google and lose yourself in the Peckforton Light Railway...
PhilP.
Welcome to the forum Colin. Start small and give yourself room to grow and refine your techniques. We like photos, but beware of the humour!
Gerard
Co-Author " Our Model Garden Railway" on Amazon
Hello Collin,
Nice to hear you're going to build a new track at 4 ft elevation.
Please allow me to give you some tips that may be prevent a lot of work and disappointments later due to wheather impact when using wooden structures.
Building structure
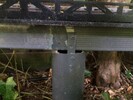
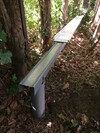
I used a very simple and sturdy method to build a track at a few feet level, using 4-inch PVC posts and 4-inch wide 2 inch high U=profiled galvanized cable tray.
I made the holes in the ground to put the pipes in about 2 feet deep using an earth auger. These pipes go in standard lengths of about 10 feet. After placing one end of the pipe in the hole I stamped the earth to fix the pipe and then i used a saw to get the proper height.
Expanding the track
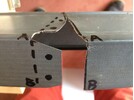
Using the whole length of 10 feet I made the second pole at ca 9 feet distance, so there is an overhang of about 1/2 foot. This overhang is used for the connection to the next cable tray by sliding both trays over each other.
Then I put the 10 feet cable tray on top of both vertical pipes while applying the overhang of 1/2 foot at both sides.
Next i made a connection between pile and cable tray using two small (1/2 x 2 inch) galvanized connection pieces that have allready wholes in it. One piece for the front connection and one for the rear connection between the pile and the cable tray.
Connecting the cable tray to the PVC piles
Next i drilled 4 holes, 2 in the PVC pipe and 2 in the cable tray. I repeated this at the rear.
The holes drilled are for the use of rivets that will create a very long lasting and sturdy connection.
Note 1: dismantling and reusing this construction can be done very simple by drilling the head of the rivets !
Note 2: When applying the rivets in the holes for the connection between the PVC pipe and the cable tray be sure to put in the rivet in in such a way that you allways have the sturdy metal layer at the rear!
This is very important since the rivet has only one side with a nice flat sturdy head while the other side of the rivet will be pulled wider using a large pulling force that will widen the rivet up to the contact point with the metal cable tray and from there will pull both layers very strongly together.
Extending the track
To extend the track you drill the following whole inn the ground and repeat all steps above to add another length of cable tray.
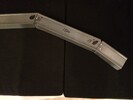
Making bends:
You can make a bend of 30 degrees in the metal cable tray by using tin shears and cut the metal at the end of both sides in a bend of 15 degrees. This will make a total bend of 30 degrees. Make the lenght of the straight section the same as is for a 30 degree bend rail track.
Note : when making these bends using the tin shears (scissor) keep the outside of the U-shaped cable tray as is and only cut the upper and inside part in such a way that there stay steel lips that can be used for a sturdy rivet connection.
Finishing touch
After finishing this basic railway structure you can add all kinds of finishing stuff. When you want a wider double track i advise to use thin wheather proof plate material like TRESPA. When using thin plate material you can fix it to the cable tray by using rivets. Note: top down with the metalplate at the rear in order to prevent damage to the rear plate material by the expanding of the rivet when pulling the rivet.
It has become quite a story! I hope you can follow every detail. If not feel, free to mail me (glm@vanderschriesk) or see my book "Our Model Garden Railway" chapter 2.3.4 available on Amazon.
Best wishes
Gerard (Bart)
Nice to hear you're going to build a new track at 4 ft elevation.
Please allow me to give you some tips that may be prevent a lot of work and disappointments later due to wheather impact when using wooden structures.
Building structure
I used a very simple and sturdy method to build a track at a few feet level, using 4-inch PVC posts and 4-inch wide 2 inch high U=profiled galvanized cable tray.
I made the holes in the ground to put the pipes in about 2 feet deep using an earth auger. These pipes go in standard lengths of about 10 feet. After placing one end of the pipe in the hole I stamped the earth to fix the pipe and then i used a saw to get the proper height.
Expanding the track
Using the whole length of 10 feet I made the second pole at ca 9 feet distance, so there is an overhang of about 1/2 foot. This overhang is used for the connection to the next cable tray by sliding both trays over each other.
Then I put the 10 feet cable tray on top of both vertical pipes while applying the overhang of 1/2 foot at both sides.
Next i made a connection between pile and cable tray using two small (1/2 x 2 inch) galvanized connection pieces that have allready wholes in it. One piece for the front connection and one for the rear connection between the pile and the cable tray.
Connecting the cable tray to the PVC piles
Next i drilled 4 holes, 2 in the PVC pipe and 2 in the cable tray. I repeated this at the rear.
The holes drilled are for the use of rivets that will create a very long lasting and sturdy connection.
Note 1: dismantling and reusing this construction can be done very simple by drilling the head of the rivets !
Note 2: When applying the rivets in the holes for the connection between the PVC pipe and the cable tray be sure to put in the rivet in in such a way that you allways have the sturdy metal layer at the rear!
This is very important since the rivet has only one side with a nice flat sturdy head while the other side of the rivet will be pulled wider using a large pulling force that will widen the rivet up to the contact point with the metal cable tray and from there will pull both layers very strongly together.
Extending the track
To extend the track you drill the following whole inn the ground and repeat all steps above to add another length of cable tray.
Making bends:
You can make a bend of 30 degrees in the metal cable tray by using tin shears and cut the metal at the end of both sides in a bend of 15 degrees. This will make a total bend of 30 degrees. Make the lenght of the straight section the same as is for a 30 degree bend rail track.
Note : when making these bends using the tin shears (scissor) keep the outside of the U-shaped cable tray as is and only cut the upper and inside part in such a way that there stay steel lips that can be used for a sturdy rivet connection.
Finishing touch
After finishing this basic railway structure you can add all kinds of finishing stuff. When you want a wider double track i advise to use thin wheather proof plate material like TRESPA. When using thin plate material you can fix it to the cable tray by using rivets. Note: top down with the metalplate at the rear in order to prevent damage to the rear plate material by the expanding of the rivet when pulling the rivet.
It has become quite a story! I hope you can follow every detail. If not feel, free to mail me (glm@vanderschriesk) or see my book "Our Model Garden Railway" chapter 2.3.4 available on Amazon.
Best wishes
Gerard (Bart)
Attachments
David Halfpenny
Registered
Colin,
Garden railways are like Pensions - very much to be looked forward to - yet getting the right product depends on precisely how long you're going to live
")
None of us want to put our heart, soul, time and cash into a wonderful hobby that crashes to an unexpected end because of a maintenance issue we've become too old to tackle.
I've bookmarked that Rik's method lasted an impressive 17 years before refurbishment, because that's longer than any timber-based garden railway I've ever seen.
Kudos Rik!
Notice that some of the tracks photographed in this thread are already falling apart.
plus a third, dictated by the ever-heaving clay on this particular site:
I've fabricated bolt-together stainless baseboards from 3' to 14' long, each of which I can lift with one hand, rails and all.
They perch on scaffolders' screw-jacks, which level the whole track in minutes (at twilight, so I can see the cheap DIY laser-level clearly).
Garden railways are like Pensions - very much to be looked forward to - yet getting the right product depends on precisely how long you're going to live
None of us want to put our heart, soul, time and cash into a wonderful hobby that crashes to an unexpected end because of a maintenance issue we've become too old to tackle.
I've bookmarked that Rik's method lasted an impressive 17 years before refurbishment, because that's longer than any timber-based garden railway I've ever seen.
Kudos Rik!
My experience (in Middle England) is that timber railways typically need significant remedial work after 10 years.
Then again, I've also seen felted OSB in Sheffield crumble in less than 2 years !
But what really counts isn't the number of years - it's how fit you'll be when unexpected work is needed.
Notice that some of the tracks photographed in this thread are already falling apart.
And that some (like my own track) adjoin garden fences with shorter life expectancy than the railway.
My first garden railway is still running after 35 years, but not one shred of original timber remains.(Fortunately the baseboards are masonry and the fencing is steel.)
My second was made entirely from interchangeable wooden modules that I swapped out as they rotted.All now gone.
Therefore my current garden railway is being built on two non-negotiable fundamentals.No Timber Products in any Form (beyond decorative trim)
Readily Demountable Track so that Landscapers can maintain my wooden fence (which paid off the first time a fence-post snapped)
plus a third, dictated by the ever-heaving clay on this particular site:
One-Hand Height Adjustment
I've fabricated bolt-together stainless baseboards from 3' to 14' long, each of which I can lift with one hand, rails and all.
They perch on scaffolders' screw-jacks, which level the whole track in minutes (at twilight, so I can see the cheap DIY laser-level clearly).
My temporary PVC piles are irrelevant to you, Colin, as they're only 2' high, but I galvanised scaffold poles ready to replace them.
To be clear, I've no wish to be doctrinaire - horses for courses.When a local farmer contacted me out of the blue about his first garden railway, he said,
"I have cancer. I need a track that I can get running within weeks, and that'll last me for one or two summers."
I advised him to use timber-fence technology.
David, age 76 and counting . . .Colin2897
Registered
I have actually purchased your book off Amazon and I am realky looking forward to reading the whole book many thanks again for your inputHello Collin,
Nice to hear you're going to build a new track at 4 ft elevation.
Please allow me to give you some tips that may be prevent a lot of work and disappointments later due to wheather impact when using wooden structures.
Building structure
I used a very simple and sturdy method to build a track at a few feet level, using 4-inch PVC posts and 4-inch wide 2 inch high U=profiled galvanized cable tray.
I made the holes in the ground to put the pipes in about 2 feet deep using an earth auger. These pipes go in standard lengths of about 10 feet. After placing one end of the pipe in the hole I stamped the earth to fix the pipe and then i used a saw to get the proper height.
Expanding the track
Using the whole length of 10 feet I made the second pole at ca 9 feet distance, so there is an overhang of about 1/2 foot. This overhang is used for the connection to the next cable tray by sliding both trays over each other.
Then I put the 10 feet cable tray on top of both vertical pipes while applying the overhang of 1/2 foot at both sides.
Next i made a connection between pile and cable tray using two small (1/2 x 2 inch) galvanized connection pieces that have allready wholes in it. One piece for the front connection and one for the rear connection between the pile and the cable tray.
Connecting the cable tray to the PVC piles
Next i drilled 4 holes, 2 in the PVC pipe and 2 in the cable tray. I repeated this at the rear.
The holes drilled are for the use of rivets that will create a very long lasting and sturdy connection.
Note 1: dismantling and reusing this construction can be done very simple by drilling the head of the rivets !
Note 2: When applying the rivets in the holes for the connection between the PVC pipe and the cable tray be sure to put in the rivet in in such a way that you allways have the sturdy metal layer at the rear!
This is very important since the rivet has only one side with a nice flat sturdy head while the other side of the rivet will be pulled wider using a large pulling force that will widen the rivet up to the contact point with the metal cable tray and from there will pull both layers very strongly together.
Extending the track
To extend the track you drill the following whole inn the ground and repeat all steps above to add another length of cable tray.
Making bends:
You can make a bend of 30 degrees in the metal cable tray by using tin shears and cut the metal at the end of both sides in a bend of 15 degrees. This will make a total bend of 30 degrees. Make the lenght of the straight section the same as is for a 30 degree bend rail track.
Note : when making these bends using the tin shears (scissor) keep the outside of the U-shaped cable tray as is and only cut the upper and inside part in such a way that there stay steel lips that can be used for a sturdy rivet connection.
Finishing touch
After finishing this basic railway structure you can add all kinds of finishing stuff. When you want a wider double track i advise to use thin wheather proof plate material like TRESPA. When using thin plate material you can fix it to the cable tray by using rivets. Note: top down with the metalplate at the rear in order to prevent damage to the rear plate material by the expanding of the rivet when pulling the rivet.
It has become quite a story! I hope you can follow every detail. If not feel, free to mail me (glm@vanderschriesk) or see my book "Our Model Garden Railway" chapter 2.3.4 available on Amazon.
Best wishes
Gerard (Bart)
korm kormsen
Registered
Colin,...an unexpected end because of a maintenance issue we've become too old to tackle.
i, for various reasons (heat, animals, wife's garden) am indoors for decades now.
but i am about as old, as your pic tells, that you might be.
so David's point about age and maintenance are very valid.
for years now i plan for my "last" layout.
some things, that i see as "must be":
about as high from the ground as my belt.
not wider, than i can easily reach.
built in segments, that can pass through doors.
not too much spaghetti bowl cabling below.
robust and simple electronics.
less track than the former layouts. (only about 100')
in short: easy to use, maintain, move and to dismantle (by the widow)
and in your case, in the garden, try to build part of it under roof, or as a "train-shed", that you don't have to carry everything out and back in, every time you want to play with trains.
Similar threads
- Replies
- 26
- Views
- 2K
- Replies
- 13
- Views
- 953
- Replies
- 17
- Views
- 843