Boxcar to long caboose.,READY FOR SERVICE

Riograndad

Model Railroading, boats and oil painting,
6 Jul 2013
2,161
639
69
Northampton UK
Best answers
0
Country flag
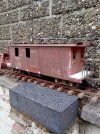
After revamping the caboose fleet to make them a little more presentable a small matter of a Bachmann bobber that really had seem better days from the Durango and Silverton freight set,in the same set there is a box car and as I never use it and its stuck in the garage maybe just maybe I could blend the two together and end up with a long caboose.Inspiration came from the Colorado types although this is not a copy but hopefully will end up looking something like.First step was to cut the donor cars after some measurements taken to see if they would go together,ends of the box car taken off with a razor saw using the boards as a guide together with the ends of the caboose,the end platforms and platform roof sections,the plan was to use the windows from the caboose but the boarding is slightly different so would`nt blend so just used the end walls.
Next step was to glue some plasticard sheet onto the internal walls and to cut down the doors to fit the doorway and to make the car sides flush,some filler,saw and files will sort a proper job later,next step was to mark the windows,just counted the boards along the sides and a that`ll do decided the positions,after marking out and in the cutting stage I made the openings slightly larger and two more windows to do,one on each side,these all to be squared up later as only rough cut for now,the end windows will stay "as is"
I wanted to keep as much of the old cars as possible so the end platforms were widened and had to be modified to allow the truck swing as the steps were fouling the wheels on the turn,so some of the window cut out boarding cut to size and made the side extentions under the platforms,handrails,brakewheels and ladders will be used and some grab irons from the boxcar ends will also come in useful.
The roof line on the ends need some work too as the curved roof on ends of the old caboose will need to be changed to suit the apex style of the boxcar,the tapered cupula will be discarded in favour of a custom item more in line with the Colorado style.May go for an interior and lighting,see how it all shapes up,at the moment it looks a wreck but i`m optomistic:p:D;)CABOOSE BASH 1 002.jpgCABOOSE BASH 1 003.jpgCABOOSE BASH 1 005.jpgCABOOSE BASH 1 004.jpg
 

Attachments

  • CABOOSE BASH 1 002.jpg
    CABOOSE BASH 1 002.jpg
    483.8 KB · Views: 0
  • Like
Reactions: 5 users

Riograndad

Model Railroading, boats and oil painting,
6 Jul 2013
2,161
639
69
Northampton UK
Best answers
0
Country flag
A little progress as a few days off and the weather kept me inside and wrecked my plans for some trackwork relaying,:banghead:.The 3rd windows cut and cupula hole in the roof cut also,the cupula is slighty smaller than i wanted as any bigger it would appear to be a end type and I wanted the offset appearance.rough cut at the moment but enough to carry on with...boxboose 2 004.jpg...next job was to start the cupula,plasticard sheet marked out for size and the window openings,strip then used to make the boarding,the nearest size to match the car sides,once done the window frames added,at the moment the base of the item is just square an sits on the edges of the appature but will be fixed properly when done,lots more to do on it to finish,(the roof is scrap plasticard for effect only).The start of letterboard fixed to the car sides so the external window frames could be postioned,,,,boxboose 2 006.jpg,,,,,,then the internal window frames marked and fitted,just interference fit for the time being as they need to come out for finishing,,boxboose 2 008.jpg,,,,gradually all taking shape:clap::clap:,the plan is to do an interior,not sure how yet as more thought needed but get the outside done and then know what I`m working with;);););)
 
Last edited:
  • Like
Reactions: 4 users

Eaglecliff

Registered
19 Jul 2010
1,501
121
Derby, England
Best answers
0
Country flag
A little progress as a few days off and the weather kept me inside and wrecked my plans for some trackwork relaying,:banghead:.The 3rd windows cut and cupula hole in the roof cut also,the cupula is slighty smaller than i wanted as any bigger it would appear to be a end type and I wanted the offset appearance.rough cut at the moment but enough to carry on with...View attachment 245321...next job was to start the cupula,plasticard sheet marked out for size and the window openings,strip then used to make the boarding,the nearest size to match the car sides,once done the window frames added,at the moment the base of the item is just square an sits on the edges of the appature but will be fixed properly when done,lots more to do on it to finish,(the roof is scrap plasticard for effect only).The start of letterboard fixed to the car sides so the external window frames could be postioned,,,,View attachment 245322,,,,,,then the internal window frames marked and fitted,just interference fit for the time being as they need to come out for finishing,,View attachment 245323,,,,gradually all taking shape:clap::clap:,the plan is to do an interior,not sure how yet as more thought needed but get the outside done and then know what I`m working with;);););)

I’m impressed, as I like a bit of kitbashing. I have been thinking about converting a battered Bachmann JS observation car into some sort of MOW, or internal service, vehicle. Anyone got any suggestions? The thing needs a respray and I was wondering what it might look like in red oxide primer, perhaps with some windows boarded up... possibilities...
 

Riograndad

Model Railroading, boats and oil painting,
6 Jul 2013
2,161
639
69
Northampton UK
Best answers
0
Country flag
What about an old Bachmann combine into a drover caboose,old pic and now car withdrawn from service since the Piko item arrived,a roundtoit job to be rebashed probably into some sort of diner/kitchen car,problem is something comes along and this hits the bottom of the list,been about for at least 6 months and have even got some dolls house food items to go in,colour is Humbrol no 73 wine with sand lettering(sign written on,no decals).The baccy cars are nice to work with in my experience as normal polystyrene glue works fine and plastic easy to work,good luck with the project if you decide to do it!;);)DROVERS 1 002.jpg
 

dunnyrail

DOGS, Garden Railways, Steam Trains, Jive Dancing,
Staff member
GSC Moderator
25 Oct 2009
26,171
4,993
75
St.Neots Cambridgeshire UK
Best answers
0
Country flag
All you now need to do is work out what to do with that left over side of the Bobber Caboose. Sure there will be some magic you can do to it when the current job is completed.
 
  • Like
Reactions: 1 user

Riograndad

Model Railroading, boats and oil painting,
6 Jul 2013
2,161
639
69
Northampton UK
Best answers
0
Country flag
A little further on with the bash,the cupola roof line raised a little to give it some more height and a trim to go around the bottom at the roof line to trim it off,the letter boards now in place and the roof now is plain as after some experimentation I couldn`t get a reasonable representation of the wood graining on the car roof to suit the cupola,so the easy way out was to match the car roof and the cupola,the walk boards on the roof will have to be modified to be refitted and the side walk boards cut off and change sides to match the ladder location, basic sun shades on and the ends of the window cills removed to give a cleaner look ,some filler applied to the door/car sides to blend them in,all still very rough but I`m getting there;);)sorry but pics a little"misty".I tried to remove the curved grab rails from the old caboose sides but they are too far gone to use and broke so will have to make some new ones.boxboose update 001.jpgboxboose update 006.jpg
 
Last edited:
  • Like
Reactions: 2 users

Riograndad

Model Railroading, boats and oil painting,
6 Jul 2013
2,161
639
69
Northampton UK
Best answers
0
Country flag
All you now need to do is work out what to do with that left over side of the Bobber Caboose. Sure there will be some magic you can do to it when the current job is completed.
Yes ,not going to waste it,2 things in mind,possible work caboose on a flat car or fill the windows in,build some ends,open some of the boarding with a razor saw and and old shed/shack for the yard?I still have the cupola to fit back on if I need it.;)
 
  • Like
Reactions: 1 user

Eaglecliff

Registered
19 Jul 2010
1,501
121
Derby, England
Best answers
0
Country flag
What about an old Bachmann combine into a drover caboose,old pic and now car withdrawn from service since the Piko item arrived,a roundtoit job to be rebashed probably into some sort of diner/kitchen car,problem is something comes along and this hits the bottom of the list,been about for at least 6 months and have even got some dolls house food items to go in,colour is Humbrol no 73 wine with sand lettering(sign written on,no decals).The baccy cars are nice to work with in my experience as normal polystyrene glue works fine and plastic easy to work,good luck with the project if you decide to do it!;);)View attachment 245382
That looks good. I’ve got a baggage car I might manage without, so might be able to do a cut-and-paste/splice whatever, two for the price of one... trouble is, New Year’s resolutions list last Jan came to thirteen, done two, added four...
 

Bill Barnwell

Registered
30 Sep 2017
786
549
79
Ormond Beach, Fl
Best answers
0
Country flag
What about an old Bachmann combine into a drover caboose,old pic and now car withdrawn from service since the Piko item arrived,a roundtoit job to be rebashed probably into some sort of diner/kitchen car,problem is something comes along and this hits the bottom of the list,been about for at least 6 months and have even got some dolls house food items to go in,colour is Humbrol no 73 wine with sand lettering(sign written on,no decals).The baccy cars are nice to work with in my experience as normal polystyrene glue works fine and plastic easy to work,good luck with the project if you decide to do it!;);)View attachment 245382
Did mine out of a Kalamazoo combine and a Bachmann cupola, ladders are 1/16" brass rod soldered and stanchions for roof rail is 1/8" hollow brass rod with cotter pins soldered in and taped at the bottom for insert into the roof. Passenger sections sports blinking LEDs in stove and lights up the compartment at night also install bunks on 1 side and seats on the other, baggage area has conductor sitting in the cupola with a white light and the 2 sections are shielded from each other with a bulkheaddrover side view.JPGdrover long end cat walk w-railing.JPGdrover caboose lit stove.JPGdrover at night.JPG drover side view.JPG
 
  • Like
Reactions: 2 users

Riograndad

Model Railroading, boats and oil painting,
6 Jul 2013
2,161
639
69
Northampton UK
Best answers
0
Country flag
Nice one Bill:cool::cool:
A little further on with the bash,the cupola roof line raised a little to give it some more height and a trim to go around the bottom at the roof line to trim it off,the letter boards now in place and the roof now is plain as after some experimentation I couldn`t get a reasonable representation of the wood graining on the car roof to suit the cupola,so the easy way out was to match the car roof and the cupola,the walk boards on the roof will have to be modified to be refitted and the side walk boards cut off and change sides to match the ladder location, basic sun shades on and the ends of the window cills removed to give a cleaner look ,some filler applied to the door/car sides to blend them in,all still very rough but I`m getting there;);)sorry but pics a little"misty".I tried to remove the curved grab rails from the old caboose sides but they are too far gone to use and broke so will have to make some new ones.View attachment 245538View attachment 245539
 

Riograndad

Model Railroading, boats and oil painting,
6 Jul 2013
2,161
639
69
Northampton UK
Best answers
0
Country flag
I have hit the caboose bash hard over the weekend as a few days off and not much or many SWMBO duties to do so managed to get some modeling in,window frames now in,more details on the cupola roof line and cupola roof laminated and ready to go on,roof walkboards been modified to suit the roof and to use the original fixing screws,some grab rails done but some more still to do,smoke jack fitted, the flue goes all the way to the floor so the stove for the interior when I get around to it will be in the right position on the floor,the flue tube was filled with balsa dowel to give it extra strength,(nothing worse than breaking chimneys off!!)the end platforms/steps finished off and with castings that I have had for ages that I got from Steve at Back to Bay 6 finish the end beams nicely,knuckle couplings now on and the first coat of spray red oxide primer as I needed to see how the box car doors/sides of the car had blended and actually not bad although some more re graining on the boards needed as some removed when filing smooth,easy fix,some little nicks and dinks also shown up but nothing major that a hint of filler will sort.Still a few more items to sort on the outside such as the corners at the end platform roof ends and the letterboard join but will have to be loose to allow roof removal,then heading inside i suppose,few pics on progress so far;);)The water marks on the cupola roof.rain shower just after spray while drying!!!will cover on second coat;);););)BOXBOOSE PAINT 009.jpgBOXBOOSE PAINT 007.jpgBOXBOOSE PAINT 011.jpgBOXBOOSE PAINT 010.jpg
 
Last edited:
  • Like
Reactions: 3 users

beavercreek

Travel, Art, Theatre, Music, Photography, Trains
24 Oct 2009
17,704
705
Colchester, United Kingdom
www.facebook.com
Best answers
0
Country flag
Luvely jubbly.
That will do you nicely Rio
 
  • Like
Reactions: 1 user

Riograndad

Model Railroading, boats and oil painting,
6 Jul 2013
2,161
639
69
Northampton UK
Best answers
0
Country flag
Still plenty to do on the exterior but started work on the interior as one has to relate to the other,the plan was to build the cupola interior in one piece floor to roof but problem,the roof needs to come off and so no room for leverage to pop off,so I made it in two parts splitting at the roof line,the glazing is in the cupola but some strip needed around the "glass" to flush the internal panels with the outside walls and square it all up and to hold the glaze in place as experience has found that if just glued in the glue gives up after a period of time .I decided that due the size of the cupola only one seat one way would do and thinking of a figure to go inside ridin` the cupola,possibly reworking the Indy 2-6-0 engineer as he would make a presentable freight conductor,will need more thought.The seats are balsa as easy to shape and with a rough file gives a decent texture,the whole thing then given a spray coat of mid green,the pic shows from the top,none of the upper panels fitted in yet only dry run but when pushed home the window frames inside and out match up and the base section matches with the roof cut out,before all fitted in properly the air gauge assembly to be made and attached to the upper panels and seats/hand and grab rails need painting,then onto the main car bodyinterior1 007.jpginterior1 009.jpg to the bunks,cupboards,WC,conductors desk,sink,etc all to be made and interior car sides,so far so good but a long way to go to the finish:clap:
 
Last edited:
  • Like
Reactions: 1 users

Bill Barnwell

Registered
30 Sep 2017
786
549
79
Ormond Beach, Fl
Best answers
0
Country flag
Still plenty to do on the exterior but started work on the interior as one has to relate to the other,the plan was to build the cupola interior in one piece floor to roof but problem,the roof needs to come off and so no room for leverage to pop off,so I made it in two parts splitting at the roof line,the glazing is in the cupola but some strip needed around the "glass" to flush the internal panels with the outside walls and square it all up and to hold the glaze in place as experience has found that if just glued in the glue gives up after a period of time .I decided that due the size of the cupola only one seat one way would do and thinking of a figure to go inside ridin` the cupola,possibly reworking the Indy 2-6-0 engineer as he would make a presentable freight conductor,will need more thought.The seats are balsa as easy to shape and with a rough file gives a decent texture,the whole thing then given a spray coat of mid green,the pic shows from the top,none of the upper panels fitted in yet only dry run but when pushed home the window frames inside and out match up and the base section matches with the roof cut out,before all fitted in properly the air gauge assembly to be made and attached to the upper panels and seats/hand and grab rails need painting,then onto the main car bodyView attachment 246072View attachment 246073 to the bunks,cupboards,WC,conductors desk,sink,etc all to be made and interior car sides,so far so good but a long way to go to the finish:clap:
Very nice looking interior, now you have to run it as a convertible, LOL
 
  • Like
Reactions: 1 user

PhilP

G Scale, 7/8th's, Electronics
5 Jun 2013
33,567
3,521
Nottingham
Best answers
0
Country flag
Very nice looking interior, now you have to run it as a convertible, LOL

Hmmmmmm...... :think::think::think:

Another receiver, a servo, and voila! Radio-controlled 'sunshine roof'!! :)
:rofl::rofl::rofl:
 
  • Like
Reactions: 1 user

Riograndad

Model Railroading, boats and oil painting,
6 Jul 2013
2,161
639
69
Northampton UK
Best answers
0
Country flag
Mmmmmmmmmm,Rio thinking and after some considerable thought you guys just may have hit on an idea,,soft top caboose cupola,now if we do roll down side panels,after that I would have to brace the front panel for strength,then a possible wind deflector above the front windows,,,,,,,,,,,,,,just might work:clap::clap::clap::clap::clap::clap::clap::clap::clap::clap::clap::clap::clap:,something like this?WELL YOU LOT STARTED IT!!!!!!!!!!:rofl::rofl::rofl::rofl::rofl::rofl::rofl::rofl::rofl::rofl::rofl::rofl::rofl::rofl::rofl::rofl::rofl:MIGHT JUST WORK.png
 
  • Like
Reactions: 1 user

Riograndad

Model Railroading, boats and oil painting,
6 Jul 2013
2,161
639
69
Northampton UK
Best answers
0
Country flag
To bad your not including a smoke unit.. Looks great !
Not considered a smoke unit,biggest problem would be powering it as only a 3v lighting circuit is planned,i have a few Sierra cars with units in but never use them;););)
 

Riograndad

Model Railroading, boats and oil painting,
6 Jul 2013
2,161
639
69
Northampton UK
Best answers
0
Country flag
A few days off and hit this quite hard,pushed on with the interior and now taking shape,bunks/seats in with balsa seat padding,folding table,sink,conductors station,various cupboards and lockers and a square stove,I wanted a round stove with square hot plate but space would not allow as some sort of detail to go on top such as a coffee pot.The sides are one piece and slide in and out to work on but will be glued in properly when all done and the interior car sides have been modified to take internal panels flush when they go in and the glazing will slide in from the top in their recesses(no messy glue).One window will have to be left open to allow a finger in the pull the car side out so the roof can be removed for battery replacement,the plan is to use 3v system with a switched battery box in the end behind the cupola where the WC would be and some sort of oil lamps made from peanut bulbs(still thinking about those) to light the car,marker lights to knock together too,all the electrics hidden by a curtain across the back of the cupola doorway,air gauge and gate valve up in the cupola now in to finish that off.still loads to do and paintwork to tidy up as lots of rough edges and end walls need doing, the exterior still needs some more work,grab rails and so on but gradually getting there:clap::clap:interior 001.jpginterior 002.jpginterior 003.jpginterior 011.jpginterior 006.jpginterior 004.jpg
 
Last edited:
  • Like
Reactions: 5 users