I have made a start on this for my new line and thought that some of my progress may be of interest.
Firstly I find that Ballasting Track is a fairly therapeutic activity, I have noted in the past that many articles in Mainstream Modeling Magazines suggest this to be too tedious for words. Interesting. Wonder what you guys think?
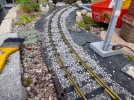
Back to the business of Ballasting though. First Pic Up to show a part of the finished effect. Here there is Peco Track ballasted with Chipping`s that are the same as used on Roofing Felt. Now sadly I cannot give you a supplier for these as they were obtained by Andy Rush. However if you can find a Company that makes Roofing Felt, they ought to be able to sort you out with the right stuff. I have used two sizes, approx Screened 2-4mm and 1-2mm. The larger is used on the Main Line and the smaller in Sidings. I have also been using some Block Paving Filler that is somewhat Ballast Like, this I got from B&Q. It is used as a Starter Filler for my Ballasting now, as I do not have a massive amount of Ballast left to do my line.
I tend to do my Ballasting in the Morning on a Fine Warm Hot Sunny Day, this is so that the Glue has a good chance to dry off before any Rain or Cold. Sometimes it has gone pretty well off within an Hour.

Here are the items of my Trade, Ballast, Trowel, Green Flock, Garden Spray and Glue. The Spray is just Water with a Touch of Washing Up Liquid. Glue is Wicks External Grade PVA, mixed 50/50 with Water and a little Washing Up Liquid. The Washing Up Liquid is for Wetting the Water, effectively helping to destroy Surface Tension. This helps get the Glue into all the Ballast.

To Work.
I use the Tubs to roughly place the Ballast in Place and the next two Pics show a Section before and after some of the Fill was put in place. Note in the First Picture the section Ballasted is where I am Joining on for this demonstration piece. As you can see I have used the finer Ballast as a filler. But I am now using the B&Q Block Paving Filler for this. You could use Fine Sand, but any loss of Ballast would show the Sand. The Block Paving Filler being Gray looks much better if there is any loss over time. After the Rough Fill I use the Brush to Tamp the fill down so that there is space for a fine layer of the Finished Ballast. You should finish with a clear Track with none of the fill on the Sleepers.


Next is the layer of Ballast that will be the finish effect. As you can see this is slightly over the Sleepers and Rail. Next the Brush again to Tidy up, sweep the Ballast into the Sleeper Gaps and Tidy the Edges of the Ballast. This may sound tedious but it takes but a few minutes to get a neat and tidy effect for the 3 or 4 Yards that I do at a time. If there are points in the section, I tend to leave the Moving Part Free of Ballast for obvious reasons. Any that gets slopped here should be removed either with the brush or perhaps a Coffee Stirer. Note the effect after tidying up. Finally a bit of Green Flock can be added here and there just for effect.
"PIC 1 and 2 Message see pics in next post"

Now to the messy bit, First give the Track a Complete Soaking with the Garden Spray, next the Glue. Now I tend to use the Small Glue Bottle Shown. I just pour it all over the new Ballast. The first Pic shows how it goes on. IMPORTANT try not to get any on the Rail, if you do clean off with a Finger Immediately. I Find that 2 or 3 passes on each side and the Middle will put enough Glue in place. The next two Pice show the application and just after effect.
Note that the residue on the Track is just Water.
Do not worry about the Glue on the Sleepers, this will dry clear.


Finally for this post you can see the effect after the section has dried. The Flock is also now seen to its best effect.
[attachimg=10]
JonD
Firstly I find that Ballasting Track is a fairly therapeutic activity, I have noted in the past that many articles in Mainstream Modeling Magazines suggest this to be too tedious for words. Interesting. Wonder what you guys think?
Back to the business of Ballasting though. First Pic Up to show a part of the finished effect. Here there is Peco Track ballasted with Chipping`s that are the same as used on Roofing Felt. Now sadly I cannot give you a supplier for these as they were obtained by Andy Rush. However if you can find a Company that makes Roofing Felt, they ought to be able to sort you out with the right stuff. I have used two sizes, approx Screened 2-4mm and 1-2mm. The larger is used on the Main Line and the smaller in Sidings. I have also been using some Block Paving Filler that is somewhat Ballast Like, this I got from B&Q. It is used as a Starter Filler for my Ballasting now, as I do not have a massive amount of Ballast left to do my line.
I tend to do my Ballasting in the Morning on a Fine Warm Hot Sunny Day, this is so that the Glue has a good chance to dry off before any Rain or Cold. Sometimes it has gone pretty well off within an Hour.
Here are the items of my Trade, Ballast, Trowel, Green Flock, Garden Spray and Glue. The Spray is just Water with a Touch of Washing Up Liquid. Glue is Wicks External Grade PVA, mixed 50/50 with Water and a little Washing Up Liquid. The Washing Up Liquid is for Wetting the Water, effectively helping to destroy Surface Tension. This helps get the Glue into all the Ballast.
To Work.
I use the Tubs to roughly place the Ballast in Place and the next two Pics show a Section before and after some of the Fill was put in place. Note in the First Picture the section Ballasted is where I am Joining on for this demonstration piece. As you can see I have used the finer Ballast as a filler. But I am now using the B&Q Block Paving Filler for this. You could use Fine Sand, but any loss of Ballast would show the Sand. The Block Paving Filler being Gray looks much better if there is any loss over time. After the Rough Fill I use the Brush to Tamp the fill down so that there is space for a fine layer of the Finished Ballast. You should finish with a clear Track with none of the fill on the Sleepers.
Next is the layer of Ballast that will be the finish effect. As you can see this is slightly over the Sleepers and Rail. Next the Brush again to Tidy up, sweep the Ballast into the Sleeper Gaps and Tidy the Edges of the Ballast. This may sound tedious but it takes but a few minutes to get a neat and tidy effect for the 3 or 4 Yards that I do at a time. If there are points in the section, I tend to leave the Moving Part Free of Ballast for obvious reasons. Any that gets slopped here should be removed either with the brush or perhaps a Coffee Stirer. Note the effect after tidying up. Finally a bit of Green Flock can be added here and there just for effect.
"PIC 1 and 2 Message see pics in next post"
Now to the messy bit, First give the Track a Complete Soaking with the Garden Spray, next the Glue. Now I tend to use the Small Glue Bottle Shown. I just pour it all over the new Ballast. The first Pic shows how it goes on. IMPORTANT try not to get any on the Rail, if you do clean off with a Finger Immediately. I Find that 2 or 3 passes on each side and the Middle will put enough Glue in place. The next two Pice show the application and just after effect.
Note that the residue on the Track is just Water.
Do not worry about the Glue on the Sleepers, this will dry clear.
Finally for this post you can see the effect after the section has dried. The Flock is also now seen to its best effect.
[attachimg=10]
JonD


")


