Bachmann Southern 2-4-2T 762 SOLD

Buy now for 125.00 GBP - Expired
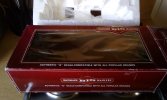
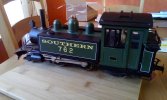
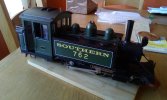
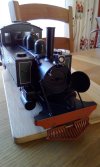
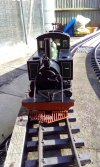
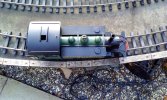
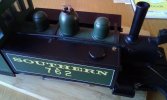
Another surplus item. Scale is a little too big to go with my (mostly) 1/24 stuff. Due to current diabolic weather I haven't had a chance to give it a run, but will do so in the next day or two. It was fine when I put it back in it's box nearly three years ago! Loco is analogue and is fitted with chopper coupling. Will also take more pics to show overall condition in more detail. £125 plus P&P which I need to research - it's over the PM medium parcel weight of 2kg so Hermes may be a better proposition than Parcelfarce.bachmann lyn.jpg
 
Mike PM sent
 
Asking as I have one I’m considering selling, is this a first or 2nd generation one?

Dan
Not entirely sure Dan. I've had this for quite a number of years. The style of the box points more towards 1st generation, but having done a little research on-line the bodywork details may suggest a later issue. Will post some more piccies soon to help viewers if not sold in the meantime.
 
Video taken today:


More photos and further details:

I bought this secondhand over 12 years ago. Having just done a bit of research on the model it may be the first version produced in the 1990s but could have had a bit of extra cosmetics added. There is an on/off switch behind the smoke box door, but I can't see a smoke unit down the chimney. The bodywork is pretty much unmarked. Both cab doors work and it has opening windows and roof vent. Driver and fireman have reported for duty. I suspect there may have originally been some flexi hose on the pipes on the front buffer beam. There is a very small amount of rust on one of the side tank stays which you will see in one of the photos. I have confirmed pick-up on all eight wheels. JimmyB has asked about the gears - they are plastic. You can just make them out through the join in the base of the motor block.
 

Attachments

  • bh1.jpg
    bh1.jpg
    295.1 KB · Views: 0
  • bh2.jpg
    bh2.jpg
    323.2 KB · Views: 0
  • bh3.jpg
    bh3.jpg
    312.3 KB · Views: 0
  • bh4.jpg
    bh4.jpg
    196.7 KB · Views: 0
  • bh5.jpg
    bh5.jpg
    364.6 KB · Views: 0
  • bh6.jpg
    bh6.jpg
    642 KB · Views: 0
  • bh7.jpg
    bh7.jpg
    287.3 KB · Views: 0
  • bh8.jpg
    bh8.jpg
    309.6 KB · Views: 0
Last edited:
I reckon it is an early one.. - I think they light-greyish 'bolts' holding the motion to the drivers give it away.
 
Yep! It's an oily one indeed. The flat pressed rods... :nod:
You might want to tighten up the motor casing. It's spreading apart in the last image. I can see the gears through the split!
 
Yep! It's an oily one indeed. The flat pressed rods... :nod:
You might want to tighten up the motor casing. It's spreading apart in the last image. I can see the gears through the split!
I think those are the splines on the axles that the wheels and half shafts are pressed into. What I think you are referring to is right through the centerline of the axles.

Greg
 
I think those are the splines on the axles that the wheels and half shafts are pressed into. What I think you are referring to is right through the centerline of the axles.
Greg

Are you referring to the last image Greg?
I can't remember what the insides of the first model is like now.
 
Yes, your comment was:
"You might want to tighten up the motor casing. It's spreading apart in the last image. I can see the gears through the split! "

Yes, now I have a larger brighter monitor, I agree with you, those are the gears, I could not make out the bottom case, and it looked different in the darkness.

I concur with your assessment, my mistake.. I was about to copy the picture last night and then increase the contrast, as the entire bottom was black and featureless on my monitor.

Enhanced:
142478_deca1d4b76cd72edaf0ed5782b76d092.jpg

Greg
 
Yes, your comment was:
"You might want to tighten up the motor casing. It's spreading apart in the last image. I can see the gears through the split! "

Yes, now I have a larger brighter monitor, I agree with you, those are the gears, I could not make out the bottom case, and it looked different in the darkness.

I concur with your assessment, my mistake.. I was about to copy the picture last night and then increase the contrast, as the entire bottom was black and featureless on my monitor.

Enhanced:
View attachment 261681

Greg
How about giving Mike a chance, he’s trying to sell this!!
 
So I bought this Lyn, and is as described by Mike. Yes you can see the gears as per post #10, however, the two halves do not seem to screw closer together, as this stage I have not stripped the loco (it hard to justify to SWMBO why your latest purchase is in bits), but it will be stripped when I do a battery conversion. As per the photos and informed by mike, a couple of items are missing mainly the vacuum/steam pipes, I don't suppose anybody has any spare, though I am sure I can make some.
 
Old trick for making vacuum/steam heating hoses - take a long chipboard self tapper screw, coat with something like WD40/silicone, place heat shrink of appropriate size over screw thread and apply heat. Allow to cool then just wind it off. Et voila - you have your ribbed hose. Max
 
Perhaps something like the axles or bearings etc. are not seated correctly within the case.
Edit: The wheels and gears may be spread apart slightly from it's last disassembly and not been pushed all the way back together properly. The wheels and gears may need clamping together to get them all the way home.
See comment #7 New Bachmann Lyn - G Scale Central
Bachmann spare parts website only have an exploded diagram for the most recent model which is constructed quite differently.
I'd be asking around for an exploded diagram for the first model of the Bachmann Lyn. Nothing came up on a Google search and the model doesn't seem to be listed on gbdb.info
Going by memory, the steam pipes on the front were attached by a short length of rubbery tube similar to what you would find on a pushbike tire valve. They are often missing on this model so finding some may be difficult.
The shrink tube suggestion above is probably your best option.
 
Last edited:
My normal method of making Vac/Air Pipes is to use some recovered Brass Mains Wire, wind steel flower arranging wire (very thin) round. Solder off each end then bend to shape. Wound Wire does not need to be full length only for the curve.
 
It's definitely the first version. My first train was a secondhand first version Bachmann Lyn bought exactly 10 years ago. It lasted 4 years and was replaced by the second version which was much easier to convert to battery remote control. The 2nd one is still running but I did have to change the motor assembly last year. I have the exploded diagram of the original model (see below) if you are interested and also a box containing most bits from the original one.

P1000688.JPG

Michael
 
Michael,
A scan of the exploded diagram, would be appreciated, if possible?

TIA,
PhilP.
 
Back
Top Bottom