Bachmann D&RGW Coach bashing

Tim Brien

Registered
29 May 2011
2,991
281
Best answers
0
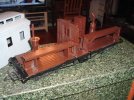
With renewed energy I have recommenced some long stalled projects. Today I progressed on these cars, cleaned them up and undercoated them. First off is D&RGW #211. This combine stood out for me with its seven only windows (usually eight), its single side door to the guard compartment and its duckbill end canopy on the roof. The modified canopy was built from styrene. The car apparently still exists today rotting away as a farm shed exposed to the elements.

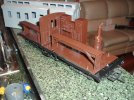
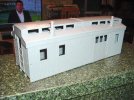
Second car is D&RGW RPO #240. This comprised a passenger section plus a railway post office compartment. The interesting aspect for me is the blanked off end wall on the postal area designed to restrict entry to unauthorised personnel.

drgwa.JPG drgwb.JPG drgwc.JPG drgwd.JPG
 
Last edited:
  • Like
Reactions: 6 users

PhilP

G Scale, 7/8th's, Electronics
5 Jun 2013
33,634
3,532
Nottingham
Best answers
0
Country flag
Excellent!
Not being (much of) a modeller.. I can never 'see' beyond the collection of mixed-colour plastic bits..
Following build-threads, I am always pleasantly surprised when the first unifying coat of 'grey' goes on.. Always amazed at how it pulls the whole thing together..
 

Tim Brien

Registered
29 May 2011
2,991
281
Best answers
0
Phil,
any model is a sum of its parts. This is a photograph from the past showing the parts required to build the RPO.
4za.JPG
 
  • Like
Reactions: 1 user

Tim Brien

Registered
29 May 2011
2,991
281
Best answers
0
More progress. Coaches above now painted green, awaiting paint cure time to mask off and spray the roof. This is combine 212. Major construction work done many years ago (first two photographs) 212.JPG 212a.JPG 212c.JPG 212d.JPG and reflects my first attempt at a duckbill end canopy. Progress today with inserting scribed window panel adjacent stove, building a battery box and cleaning up the joins where the body and roof extended. Tomorrow I will clean and undercoat.
 
  • Like
Reactions: 2 users

Tim Brien

Registered
29 May 2011
2,991
281
Best answers
0
Next, today I progressed the enclosed vestibule coach. I tidied up the extended body and roof joins, cleaned and undercoated the body. Actual construction required several coach bodies just to do the vestibules. Not a very cost effective conversion.

2czaa.JPG 2czab.JPG 2czac.JPG
 
  • Like
Reactions: 3 users

Tim Brien

Registered
29 May 2011
2,991
281
Best answers
0
It was a busy weekend as yesterday I progressed an RPO. While not an exact scale model it follows basically D&RGW practice. Regulations required enclosing the car to prevent unauthorised entry plus in later years the end of the car adjacent the locomotive required strengthening plus the lower edges of the car were reinforced to make the body more rigid.

Photographs show the car as built about ten years ago. It has sat forlornly, neglected since with no improvements done so as part of my new enthusiasm I took it apart, cleaned it up, painted the interior walls and undercoated the exterior. The removable roof was painted green and is awaiting masking off for the black topcoat. The underframe was also painted.

3zf.JPG 3zg.JPG
 
  • Like
Reactions: 4 users

Tim Brien

Registered
29 May 2011
2,991
281
Best answers
0
In the late 19th century wildflower tours were popular in Colorado. Dedicated cars were provided to aid the viewing of the fields of wildflowers when in season. From memory this project was based on a standard gauge "Colorado Midland" coach.

I built this car initially nearly fifteen years ago and unhappy with it I placed it on a high shelf out of sight, out of mind. Alas, about two weeks ago gravity took its toll on it and the sudden impact with the garage floor reminded me of how many pieces were used in its construction.

With the wife off to work very early this morning, I ventured to the garage to recover the pieces and to see what could be done with it. I took a different route with the end vestibule steps, something that had disappointed me with my first version of the coach. Satisfied with the result I will clean the car and place it on the paint line.

Prominent features of the coach are the enclosed vestibule plus the large rear viewing platform. These are what caught my interest initially. I decided to make a narrow gauge version. Overall length 62 cms.

wfc.JPG wfb.JPG wfa.JPG
 
  • Like
Reactions: 3 users

Tim Brien

Registered
29 May 2011
2,991
281
Best answers
0
In days of old when extending undeframe trussrods for lengthened Bachmann coaches I would always use whitemetal castings for the queenposts and turnbuckles. Alas, my supply dried up and I had to improvise. Normally I would have thrown away the stock Bachmann trussrod and made my own but then one day as an experiment I cut the queenposts and turnbuckles from the trussrod sets and drilled through with a 1.5 mm drill bit. These were then threaded onto a length of 1.5 mm piano/spring wire shaped to fit the longer underframe (first photograph).

Normally I would then dispose of the remainder of the trussrod. Today though while making a few sets of queenposts and turnbuckles the idea dawned on me to utilise the end staunchion on the Bachmann trussrod. I cut it off and then drilled the end with a 1.5 mm drill. These could then be used as handrail staunchions on locomotive boilers or to fabricate handrails for other applications. It only took a few minutes to make the pieces.

tba.JPG tbb.JPG l
 
  • Like
Reactions: 1 user

ge_rik

British narrow gauge (esp. Southwold and W&LLR)
24 Oct 2009
10,705
1,244
Cheshire
www.riksrailway.blogspot.com
Best answers
0
Country flag
That's a masterclass in kit-bashing / scratchbuilding. The results look great - thanks for that.

Rik
 

Tim Brien

Registered
29 May 2011
2,991
281
Best answers
0
All the cars so far have been painted with some already decalled and clear-coated. The RPO has been over ten years in the making. For many years it sat neglected on a shelf as I had no urge to finish it as there were so many other projects to commence. Now with no need for further projects it was time to revisit my past creations and complete them.

The RPO is not an exact scale model but I feel it gives the impression of a D&RGW car. The overall length is 60 cms.
drgwza.JPG drgwzb.JPG drgwzc.JPG drgwzd.JPG drgwze.JPG drgwzf.JPG
 
  • Like
Reactions: 2 users

trammayo

Interested in vintage commercial vehicle, trams, t
24 Oct 2009
22,678
4,690
75
Co. Mayo
Country
Ireland
Best answers
0
Country flag
All the cars so far have been painted with some already decalled and clear-coated. The RPO has been over ten years in the making. For many years it sat neglected on a shelf as I had no urge to finish it as there were so many other projects to commence. Now with no need for further projects it was time to revisit my past creations and complete them.

The RPO is not an exact scale model but I feel it gives the impression of a D&RGW car. The overall length is 60 cms.
View attachment 222688 View attachment 222689 View attachment 222690 View attachment 222691 View attachment 222692 View attachment 222693

Nice work - it looks great (as do all your conversions!). The lettering is the icing on the cake too. Will you ever get to run them?
 

Tim Brien

Registered
29 May 2011
2,991
281
Best answers
0
Mick,
alas, I will not see them run. When completed they will be up for sale (hopefully).
 

Tim Brien

Registered
29 May 2011
2,991
281
Best answers
0
Tonight I managed another coach although I still need to source some lengths of piano/spring wire to do the trussrods. The combine should actually be D&RGW #211, however, being a "lazy" modeller I could not be bothered individually placing single numbers to get a car number (life is too short). I compromised with #271.

I like this car prototype as it has no toplights, has duckbill end canopies, single width entry sidedoor and only seven (not the usual eight) windows.

211a.JPG 211b.JPG 211c.JPG 211d.JPG
 
  • Like
Reactions: 3 users

Tim Brien

Registered
29 May 2011
2,991
281
Best answers
0
When doing multiple projects one needs alternatives awaiting paint to cure. Size and window placement were dictated by available parts. The roof was inspired by the Rio Grande water service car, but possible use is a logging camp dining car. I really had no need for such a car, but simply used the available pieces like a jigsaw until I achieved a shape. The chassis combines a shortened Bachmann coach underframe and Bachmann caboose end sills.

The body is composed of over one dozen parts mostly pieces cut from a Bachmann eight window caboose kit plus the Bachmann combine side door. The roof is cut from a Bachmann coach. The car body is painted light grey and am awaiting cure time before applying car numbers and clear coating. The interior is a freelance representation of a logging camp dining car.
 

Attachments

  • loga.JPG
    loga.JPG
    111.3 KB · Views: 0
  • logb.JPG
    logb.JPG
    109.4 KB · Views: 0
  • logc.JPG
    logc.JPG
    118.3 KB · Views: 0
  • logd.JPG
    logd.JPG
    104.2 KB · Views: 0
  • loge.JPG
    loge.JPG
    90.6 KB · Views: 0
  • Like
Reactions: 1 user

Tim Brien

Registered
29 May 2011
2,991
281
Best answers
0
Tomorrow's project. RPO #240 comprises a small passenger section as well as a railway post office compartment. I did not number this correctly as my decal sheet did not have the correct car number and I will not place individual numerals. Afeature of the prototype is the blanked off end wall restricting access as per postal regulations.

240a.JPG 240b.JPG
 
  • Like
Reactions: 1 user

Tim Brien

Registered
29 May 2011
2,991
281
Best answers
0
I was up early this morning so refuelled with a nice cup of tea I set to finish this car. I still need to fit the outer trussrods.

arpoa.JPG arpob.JPG arpoc.JPG arpod.JPG
 
  • Like
Reactions: 1 user

Tim Brien

Registered
29 May 2011
2,991
281
Best answers
0
The logging camp dining car is now completed.

lcda.JPG lcdb.JPG lcdc.JPG
 
  • Like
Reactions: 1 users

Tim Brien

Registered
29 May 2011
2,991
281
Best answers
0
Some more progress on other cars built some years ago but never progressed beyond the almost ready to paint stage. Here we have four underframes painted awaiting matt clear coating.

The first car is D&RG B-1. I had thought that I was building D&RGW B-1 until I compared the length of the B-1 to the D&RGW B-2 that I built shortly afterwards. Unbeknown to me the original B-1 was part of the "millionaire's train" and was destroyed in a fire circa-1918. The "rebuild" B-1 was several feet longer than the original and this confusion lead to my B-1 being several inches shorter than the B-2 as I was basing my measutrements on the wrong B-1. Not intended as a scale model but it does convey the spirit of the original car.

The second car, partially in primer, is D&RGW B-2 business car. Both cars have a full "representation of the interior. I did start to build B-3 "Nomad" and actually had the full length of the car built from Bachmann baggage car sides but then looked at the mindnumbing practicality of inserting numerous single window mouldings into the sides so to save my sanity the car was introduced to the garbage bin so that I would not be tempted to revisit it.


suna.JPG sunc.JPG sund.JPG sune.JPG
 
Last edited:
  • Like
Reactions: 1 users

Tim Brien

Registered
29 May 2011
2,991
281
Best answers
0
I had a little heart starter when I went Googling images for coach B-2. All the returns showed the car on the Durango & Silverton Railway with an open observation end. Further reading though revealed the following information.

The car was renumbered 'B-2' in May 1917 to replace the first 'B-2', which had been wrecked and burned in the 1917 Rockwood derailment. B-2 had closed vestibules added in 1924, and was usually in the middle of the three-car 'Executive Office Train' consist. Burned in the 1953 Alamosa shop fire, it was sold to a private party in 1954. In 1963 the Cinco Animas Corporation purchased the car and restored it to its present appearance, naming it 'Cinco Animas'. This is the condition as seen today.

Thus, my version is current for 1924 up until the 1950's.
 
  • Like
Reactions: 1 user

Tim Brien

Registered
29 May 2011
2,991
281
Best answers
0
Apart from the trussrods this "wildflower observation" car is just about there. Overall length is 62 cms. I still need to remove an mdf spacer in the end observation area (awaiting clear window glue to dry). This is one of the earliest coaches that I lengthened so after ten or more years languishing on the shelf incomplete, I can almost put this one to bed.
wfa.JPG wfb.JPG wfc.JPG wfd.JPG wfe.JPG
 
  • Like
Reactions: 2 users