AJtheTeacher
In Texas
Hello Fellow G Scalers!
As far as my projects go I consider myself to be a "novice" in comparison to most of you. I have much to learn and I appreciate all of your knowledge, support and help. I also appreciate everyone being so polite even if I make a mistake. This has been a learning process especially on how to use styrene and machine Reynobond.
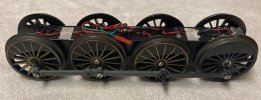
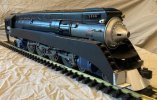
I have always thought that the Southern Pacific Daylight was a beautiful engine and wished that I had a G scale one. I have been working for quite some time on my Aristo-Craft GS-3 4-8-4 that started out out as an Aristo-Craft B&O 4-6-2 Pacific frame with no shell. I had to lengthen the gear box and add a set of drivers plus stretch the frame to match. I found a suitable MTH GS shell that could be modified to fit an Aristo-Craft stretched modified frame. I would have liked to have purchased ready made side panels, steps and front apron from a source but I could not find anybody who could sell me these parts at the time.
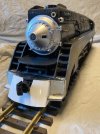
I used line drawings and photographs to give me the best dimensions available. I made the side panels, steps and other parts on the front from styrene. The front apron/'cow catcher" was made from Reynobond aluminum plastic composite panels with a LGB front subframe (that I made adjustable for height) underneath. The Reynobond is SO STRONG that you can lift the front of the locomotive by it. The rear 4 wheel truck also took many hours to modify. I still need to detail the front and side panels by adding rivets/hatches and finish the details on the rear trailing truck before I disassemble for paint.
I searched for a reasonably priced Southern Pacific Daylight locomotive for quite some time before I made the decision to build my own. I am sure that other people may prefer another brand besides Aristo-Craft for the frame but it was my most cost effective choice. I have learned a lot about how to fabricate patterns and parts. (I LOVE my Dremel tool.) This GS-3 is nearing completion and I already have most of the parts for a sister GS-4. (Plus I have an Aristo-Craft 4-6-2 Pacific that I will change into a Sunbeam.) I am aware that this is not perfect but I am sure that the next one will be better.
Enjoy your G scale trains. AJ the Teacher
As far as my projects go I consider myself to be a "novice" in comparison to most of you. I have much to learn and I appreciate all of your knowledge, support and help. I also appreciate everyone being so polite even if I make a mistake. This has been a learning process especially on how to use styrene and machine Reynobond.
I have always thought that the Southern Pacific Daylight was a beautiful engine and wished that I had a G scale one. I have been working for quite some time on my Aristo-Craft GS-3 4-8-4 that started out out as an Aristo-Craft B&O 4-6-2 Pacific frame with no shell. I had to lengthen the gear box and add a set of drivers plus stretch the frame to match. I found a suitable MTH GS shell that could be modified to fit an Aristo-Craft stretched modified frame. I would have liked to have purchased ready made side panels, steps and front apron from a source but I could not find anybody who could sell me these parts at the time.
I used line drawings and photographs to give me the best dimensions available. I made the side panels, steps and other parts on the front from styrene. The front apron/'cow catcher" was made from Reynobond aluminum plastic composite panels with a LGB front subframe (that I made adjustable for height) underneath. The Reynobond is SO STRONG that you can lift the front of the locomotive by it. The rear 4 wheel truck also took many hours to modify. I still need to detail the front and side panels by adding rivets/hatches and finish the details on the rear trailing truck before I disassemble for paint.
I searched for a reasonably priced Southern Pacific Daylight locomotive for quite some time before I made the decision to build my own. I am sure that other people may prefer another brand besides Aristo-Craft for the frame but it was my most cost effective choice. I have learned a lot about how to fabricate patterns and parts. (I LOVE my Dremel tool.) This GS-3 is nearing completion and I already have most of the parts for a sister GS-4. (Plus I have an Aristo-Craft 4-6-2 Pacific that I will change into a Sunbeam.) I am aware that this is not perfect but I am sure that the next one will be better.
Enjoy your G scale trains. AJ the Teacher
Attachments

Last edited:


")