Adding a New Station Eisenfelder Tamüle to the Dunny Rechesbahn

dunnyrail

DOGS, Garden Railways, Steam Trains, Jive Dancing,
Staff member
GSC Moderator
25 Oct 2009
26,169
4,993
75
St.Neots Cambridgeshire UK
Best answers
0
Country flag
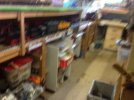
Since June I have been hinting at this when I started thinking about moving my 2 Water Butts to enable this project to go ahead. When I have Operating days there are just too many occasions where 3 bods are trying to marshal Trains in my big Shed at Alexisbad, Harzegerode and Stiege. Stiege being a bit of an issue being effectively just a Fiddle Yard below Alexisbad often causes many problems with bods stooping, difficulties of view and just getting in the way. Thus I hatched a scheme to exit the Shed for another outdoor location. The light bulb moment hit me as when all trains pass my Lindenburg Station they are heading in the Eisenfelder Tamüle (ET) direction anyway so ET it would be.

The picture below shows my initial design work and thoughts about what may be possible. Note the different options pontificated about together with costs for what will be an LGB/Train Line track line. I have kept some Straights feom the great Track Sale last Year and now wish that I had kept a few R3 Curves as well.
image.jpeg
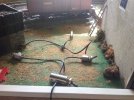
The site of works can be fully appreciated here, but I had decided on the plan to move the Water Butts. I also needed to rais the Butts as the overflow system was not that efficient at moving the Water to a Pond. The flaggs, bricks and blocks for this job were another cheepskate option being scrounged from varying neighbours from their Tip Piles!
image.jpeg
image.jpeg
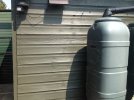
Then it was decided to Repaint the shed, I used the Mix it Up stuff by and from BnQ on old gits day that has a 6 year life. My local Gibbs and Dandy do a similar service with an 8 year life, but the added cost did not really stack up. I rather like the subtle Green that I managed to have mixed up.

Wood wise I have lucked out on this project and manage to salvage the Roof Timbers from next doors ground floor Kitchen that was recently demolished, what is not used will be chopped up for the Log Burner. The Decking was salvaged from a ladies car at the local tip, another money saving stroke of luck.
image.jpeg
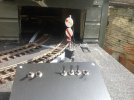
So a month or two back possibly in June I had drilled a small hole in the Shed to see where the line might exit thus. This was used to estimate where the track would exit and my Sideways Electric Saw used to start the hole. This firstly went through the Floor Boarding TnG Chipboard that I have used inside the Shed then from the outside through the TnG Cladding on the Shed. The initial hole can be seen here.
image.jpeg
It will probably need to be enlarged a little as the Track here will be curved but I did not want to do that till I have test laid the Track to see the lie of the land as it were. I have not yet got all the Points that I require. Below you can see how the hole fits into the scheme of things together with all that roofing timber that will be used to make the supports and baseboard. This view also shows the Grey Push Fit Central Heating pipes that are the amended Butt overflow water route to the pond.
image.jpeg
There are many ways of supporting a layout. On Slabs one can use Flat Metposts but my patented way is to embed a Nail in the Support that will fit into the slab and have some Filcris Plastic so that the wood is not where full water can rot it. I also greese the Nail to discourage rusting, here you can see the setup with the hole drilled in the Flag and the greesed up nail. I pencil round the support test fitted, then draw a cross on the support and flag to get a centre.
image.jpegimage.jpeg
Inevitably much use is resorted to Clamps to hold things in place when working on my own. Final job after yesterdays excersions and before the rains forecast for today was to Stain Up the wood with preservative.
image.jpeg
A long tiring but productive day. Note the cutout of the hole replaced temporarily to discourage egress of the forecast downpour which is happening just now as I type up this little start to my project.
 

Attachments

  • image.jpeg
    image.jpeg
    526.8 KB · Views: 0
Last edited:
  • Like
Reactions: 7 users

ColinK

Registered
14 Apr 2017
270
140
67
Lancaster
Best answers
0
Country flag
Interesting development. Looking forward to seeing it develop.
 

a98087

Registered
8 Nov 2009
1,846
199
36
Wiltshire
Best answers
0
Country flag
That’s a very clever idea using the filcris for the bottom part of the post, as it’s always the botton part that’s rots out first

I am looking forward to further updates
Dan
 

Paul M

Registered
25 Oct 2016
11,881
1,696
60
Royston
Best answers
0
Country flag
Looking good
 

dunnyrail

DOGS, Garden Railways, Steam Trains, Jive Dancing,
Staff member
GSC Moderator
25 Oct 2009
26,169
4,993
75
St.Neots Cambridgeshire UK
Best answers
0
Country flag
Work has been ongoing over the last few weeks since Post1. I have put an odd update in the what have you been doing today thingy.

So the boards were topped out with Decking and I discovered at BnQ that they have some nice Black Graveled 16 Year Felt which has been used to top it out. Note the temporary Door made from the cutouts, still to be enlarged for double track exit. The blocks of wood beneath the board are for temporary storage for some old Flooring Boards that I have another job for, though a couple of them came in for the Baseboard at the far end as I was a bit short of decking. They have made a nice drop to the end of the sidings which is always useful to provide if you can.
image.jpeg
At around this stage I ordered some Track from Glendale, the plan was to have Curved Points at the exit of the Shed and R2 Points for the run round and sidings. However that did not work due to space limitations with the curves so a hasty swop to have a couple of points inside the Shed near the exit worked after much cussing. Working under another board can be a bit taxing at times! There is a Trainline R2 and LGB R3 here. The 99-7 note will now have to go! Also the outside Track needed to have a wiggle incorporated, not ideal but I could not make the Boards wider than 2 feet.image.jpegimage.jpeg
The points were all wired up indoors prior to laying so that I could remove any possible failures with LGB Wiring. Clamping up with LGB and Massoth Clamps was also done with all jumper wires for DCC included and the Grey Rat Tail to get into the main power. Makes sence to do this on the workbench as it is easier to test it all out in a less confined space. Note the varying Jumper Wires on the LGB Point.image.jpeg

image.jpegimage.jpeg
Having done that it was time to explore the full width of the Shed Door, R1 Curved Track (ugh) was laid to the inside curve so that I could plot out where the outer R2 (slighly less ugh) could be laid thus allowing measurement for what the dor width sould be. The door was finally made from new wood with a Frame all round and a slot at the bottom for the Rails to pass through. There will be some more work to do here to make things entirely water tight.image.jpegimage.jpegimage.jpegFor Track Laying and testing the door can be propped open with a piece of Celcon Block.image.jpegThus Track Laying was completed yesterday and the obligitory Test Train with the Rollblocks ran, all by Battery as the End Points need their Wiring done plus it all needs wiring in. Though I do test out continuity of each joint as I lay atrack. Also still to do is make a Panel for the Air Switches and define what points inside the existing layout will be advantageous to have double worked outside and in via Shuttle Air Valves.image.jpegimage.jpegimage.jpegimage.jpeg
Doorshown shut at the end of a good days work. Also still to do is a means of holding the door ope better than a Celcon, a Hook and some wire will take care of this and a way of keeping the door locked. I have a rather nice Shed Lock that should take cere of securly shutting the door.
image.jpeg
 
Last edited:
  • Like
Reactions: 6 users

Madman

Registered
25 Oct 2009
17,140
2,955
Pennsylvania, USA
Best answers
0
Country flag
Nice work and narrative !
 

dunnyrail

DOGS, Garden Railways, Steam Trains, Jive Dancing,
Staff member
GSC Moderator
25 Oct 2009
26,169
4,993
75
St.Neots Cambridgeshire UK
Best answers
0
Country flag
Yesterday was exciting work in that I managed to get ET (as it will now be refered to) wired up and air piped up. The Air Points are all working but due to a foul up in planning I have a spare Lever in the Frame. This will probably be used for a Signal. Talking of Signals I have made a repeating Signal that can be seen from the Window. This shows the Status of Point 6 in Stiege within the Shed as it needs to be reverced for Trains to access ET. More on this in a minute.

We ended up showing the door that was in the closed position, this has now had a Lock and Securing strap fitted. A new Wood Bar was required to complete this as the Lock required a thicker frame than I had made. The Silver Screws seen are all Special Head Security Types, I know that this will not stop a determined guy with a Crow Bar but always appears worthwhile to have just one on each piece of visible fixing. An old piece of Chain was lurking in the Shed and this has been used with a hook to secure the door in the Upright position during Operating Sessions.
image.jpeg.
image.jpeg
First thing yesterday morning I did a lot of Soldering and Wiring work to the 3 TrainLine 45 Points in the Workshop Indoors. I have hard wired all the jumpers on the Points and Wired in Feeds with Jumpers to Power all of the Station. You should just be able to make out these jumpers for the points, belt and braces pays off in the Garden. I have also soldered in Rat Tails should I need to put in Micro Switches at some time to Power the Live Frogs.
image.jpeg
image.jpeg
Next up came the Air, I had made up a small Lever Frame the other day and it will control the 5 Points in this Station plus one in Stiege. Due to the previously mentioned foul up (I had forgotten that 4 of the 5 points are in pairs) I have a spare lever. The Frame can be seen here with the Barrell that distributes Air to all of the Switches, a set of T Pieces can also do this Job. The Bottom of each Lever is where the Air goes in, front goes to the Motors. The Lever to the Left with the extra outputs is what will Operate Point 6 in Stiege. This has 2 Levers, the bigger one is used via a Shuttle Valve, this allows Point 6 in Stiege to be Operated either in the Shed (Lever Normal) or in the Garden (Lever Reverced) the Lever next to it actually Operates this Point and has a Repeated Signal as mentioned earlier. Once the Large Lever has been pulled the Point cannot be Operated from the Panel inside the Shed. All pretty simple stuff and goes together so much quicker than the Electrics for Points. Just one connection per simple point, double co-acting points have just one lever and 2 are operated via a T Piece to distribute the Air to a second Point Motor.
image.jpeg
image.jpeg
image.jpeg
image.jpeg
All is tidied up by fitting in Cable Trunking scribed up and sprayed to represent Cable Troughing as can be seen below to show how tidy it all is but how simple access is should any issues or revisions need to be made.
image.jpeg
image.jpeg
Here can be seen the Repeater Signal for the Stiege Point 6, a Playmobil Lever crudely used inside the Shed but with good visibility in the Garden.
image.jpeg
image.jpeg
image.jpeg
This is Operated via a T Piece that connects to Point 6 in Stiege, whatever lever is pulled when in Normal the Signal is Straight to indicate that the Point is set to the Main, when Off that the Route is set to run out to out to ET via a Loop. Crude but effective.
image.jpeg
Finally just to show what a shambles the Shed has been these last few days with stuff for construction all over the place, looking forward to the tidy up which should be completed today!
image.jpegimage.jpegimage.jpeg
 

Attachments

  • image.jpeg
    image.jpeg
    343.9 KB · Views: 0
Last edited:
  • Like
Reactions: 3 users

ColinK

Registered
14 Apr 2017
270
140
67
Lancaster
Best answers
0
Country flag
Very interesting and informative. I like the repeater signal, brilliant idea.
 
  • Like
Reactions: 1 user

dunnyrail

DOGS, Garden Railways, Steam Trains, Jive Dancing,
Staff member
GSC Moderator
25 Oct 2009
26,169
4,993
75
St.Neots Cambridgeshire UK
Best answers
0
Country flag
Yesterdays work was the connection of Electrics to my Massoth System, Track Cleaning, Testing and installation of a Signal. I had put in the Electrical Power links to the Station when laying the Track and today added a new switch to the Master Box so that I could wire it all in. I like each Station and Section to be able to be switched to assist with any Fault Finding, most important on a big line like mine. The new Switch has a White Label.
image.jpeg
Similarly the Master Air Distribution Box has had a new Switch for similar reasons, again Temporarily Labelled with White Sticky Paper.
image.jpeg
Track cleaning was a bit of a Task as some of the Track was very Tarnished, I had attended to the ends for Power Conection Purposes where the Massoth Track Clamps go with a little dressing by a fine file and some LGB Graphite Paste. But the surfaces should not get the file treatment. In truth my normal scrubbing with the LGB Rubber was not having the desired effect so the LGB Track cleaner was given 3 passes over the worst sections which made sufficient progress to enable a final light scrub with the LGB Rubber get a bright shiny finish. Most of this Rail had been left untouched for quite a few years, much of it under an unclipped Conifer Hedge that was loved by the local Bird population.... Well I think you get the idea! This was followed by some testing by the Black Gronk. All works just fine now.image.jpeg
image.jpeg
Finaly as mentioned in another thread the Signal was installed. Though I had previously put all the Air Wires in place except for one Switch, this Signal has two arms that are slaved from another Switch as I will detail below. But first the Signal.
image.jpeg
The Top Arm is also slaved to show the Status of Point 6 in the Shed at Stiege. When off as shown below the route is switched from the Main to a Loop at Stiege that allows access to ET. I just put a T Piece in the Box and pipe to the Motor to achieve this, when Switch 5 and 6 (to the extreme left) are pulled the Point, Window Slave Signal and the Top Arm all reverce in one hit. This is the joy of Air so simple to set these things up. In Operation of ET 6 would normally be off. Thinking a bit further this have beenwould be a way to Air up the complete Station, perhaps another small change may be initiated once the grey matter works out the logic of it.
image.jpeg
Next Arm is the Departure Signal shown off here, Operated from Lever 1 to the Right it is nothing but a straight pipe run from the lever to the arm air motor.
image.jpeg
The bottom arm is also slaved via a T Piece and shows Off when the Crossover (lever 2) which is inside the Shed has been reverced, this helps to stop peering inside to see this. Though a stoop is needed when running round to see that the Loco has cleared the crossover before it can be reverced.
image.jpeg
So ET is now ready to take its place in Operations, some Labelling and a Panel Diagram are required plus some Operating ainstructions before access via the Shed is gained so that visitors know how to deal with the run from Lindenburg to ET via Stiege.,some scenic work will take place in the fullness of time, not least Ballasting of the Track.
 

Attachments

  • image.jpeg
    image.jpeg
    647.2 KB · Views: 0
  • image.jpeg
    image.jpeg
    594.2 KB · Views: 0
  • Like
Reactions: 1 users

dunnyrail

DOGS, Garden Railways, Steam Trains, Jive Dancing,
Staff member
GSC Moderator
25 Oct 2009
26,169
4,993
75
St.Neots Cambridgeshire UK
Best answers
0
Country flag
Yesterday it was a rather nice day so I decided to see how ET would work out with my Train Schedule in practice. The Timetable calls for 6 Trains to visit ET in my Operating Schedule. In real life the Trains would likely all go to Nordhausen but I assume that the Trains Terminate at ET with the Wagons attached to Trans Harz Goods or Mixed Trains later.

The ET service is thus:-
Arrive Down Trains Dep Up Trains
69705 Mixed forms 69702 Ety Hoppers
69713 Fuel Eties Tanke forms 69706 Mixed
69721 Loaded Hoppers forms 69712 Loaded Fuel Tanks

Thus the day starts with the Yard having the Yard containing 5 Empty Hoppers and up to 3 Wagons for Train 69706, these will have been assumed to have been left from Trains form Nordhausen.
This will have resulted in a little set up with the Wagons being stored in the Shed overnight. Thus in the first picture 6001 is seen placing the above Wagons ready for the session.
image.jpeg
I also had to move the Rollwagons to the House for some attention and the working can be seen here.
image.jpeg
image.jpeg
After returning Light 6001 worked the Wagons for this demonstration to Silberhutte where all the working started for the day.

69705 Down Mixed from Harzegerode
image.jpeg
So the service commences with this Train, this service works from Harzegerode thus any Wagons from Gernrode or Mägdesprung will have been worked on other Down Mixed Trains to Alexisbad the previous day. Seen having arrived at ET with the Loco running Round. The three wagons are an Open from Alexisbad, Beer Wagon from Gernrode moved to Alexisbad the previous day and an Empty Flat from the Wood Yard at Silbergutte. These will need to be placed inside the Shed as there is no space to keep them at ET. It had been intended to Shunt them back into the second Road on the right under when planning the Station, but as the design required the RunRound crossover to be inside of the Shed this will be the only move that requires a body to enter the Shed when working ET.

69702 Up Empty Hoppers to Silberhutte Train runs to Gernrode
image.jpeg
These will be worked to Silberhutte and placed underthe Loader for movement later in the day. The picture shows the Loco in the process if geting rid of 69795's Wagons and will then attach to the Train. The Coach Had been marshalled tomthe rear of the Hoppers prior to this move.

69713 Down Fuel Empties from Silberhutte Train from Gernrode
image.jpeg
Seen again with the Loco running Round. These will be placed in the Siding and the Loco will attach the Coach to the 3 Wagons in the centre road to form 69706 Up Mixed.

69706 Up Mixed to Harzegerode
image.jpeg
Seen above departing, the 3 Wagons are a Bogie Ooen with Logs for Gernrode, this will be left at Gernrode as the train is heading for Harzegeride. The next working is a Harz to Gernrode Mixed thus the Wagon will be picked up then for its destination. Next is a Van for Harzegerode and finally an Open for Gernrode which will be dealt with as the Bogie Van. How inconvinient of Nordhausen to not marshal the two Gernrode Wagons together! Tne open load is somewhat interesting consisting of Plastic Pots with bits and pieces of DIY bits that have been sorted out in the Shed and need to be moved to the Shed near the House, who says that I do not use my Railway for proper jobs?

69721 Loaded Hoppers from Silberhutte train from Gernrode
image.jpeg
Picture again shows the loco running round, the Hopers will be swopped for the now loaded Fuel Tanks.

69712 Loaded Fuel Tanks for Silberhutte
image.jpeg
Seen leaving ET under clear Signals. The Loaded Hoppers will be all that is left in ET after 69712 has been departed. They will be emptied and the Loads returned for storage in the Hopper till the next running session.

Thus ends the session. The session only shows 1 loco being used, in a real session each of the 3 Operators with different Locomotives will vist ET during the course of the Session Day.

In all the layout has worked pretty well as expected save still having to store 1 set of Wagons in the shed. Previously all the above would have been sone in the Shed stooping under Alexisbad to get the jobs done. Space just precluded the perfect solution, I could have fitted the points all outside but that would have meant the Run Round Loop being too short for the Fuel Train. This by the way will at some stage be swopped on occasion for the Rollwagens with Coal Loaded.
 
Last edited:
  • Like
Reactions: 2 users

Paul M

Registered
25 Oct 2016
11,881
1,696
60
Royston
Best answers
0
Country flag
Looks fantastic!
 

ColinK

Registered
14 Apr 2017
270
140
67
Lancaster
Best answers
0
Country flag
A nice addition to your layout. The timetable sounds great fun to operate.
 

dunnyrail

DOGS, Garden Railways, Steam Trains, Jive Dancing,
Staff member
GSC Moderator
25 Oct 2009
26,169
4,993
75
St.Neots Cambridgeshire UK
Best answers
0
Country flag
Disaster I have made my track separation too small in my new Station's Runround on the Curve (Troughing and all) and will be needing to add at least 3 inches to the Baseboard width to resolve it. Then the door opening may get side swipe so will also,need to be made wider. At least I know it can be done and for the moment Harz 2-10-2's and my 2-4-4-2 Mallet are banned. In the Timetable all trains will need to be worked to ET by the 2-6-2 and 0-4-4-0 Mallets. Ah the joys of work in haste repent at leisure!
 

Paul M

Registered
25 Oct 2016
11,881
1,696
60
Royston
Best answers
0
Country flag
Disaster I have made my track separation too small in my new Station's Runround on the Curve (Troughing and all) and will be needing to add at least 3 inches to the Baseboard width to resolve it. Then the door opening may get side swipe so will also,need to be made wider. At least I know it can be done and for the moment Harz 2-10-2's and my 2-4-4-2 Mallet are banned. In the Timetable all trains will need to be worked to ET by the 2-6-2 and 0-4-4-0 Mallets. Ah the joys of work in haste repent at leisure!
whoops!
 

ColinK

Registered
14 Apr 2017
270
140
67
Lancaster
Best answers
0
Country flag
Oh dear, but I’m sure you’ll get it sorted.
 

Rhinochugger

Retired Oik
27 Oct 2009
36,715
4,240
North West Norfolk
Best answers
0
Country flag
:oops::oops::oops::oops::oops::oops::oops:

misalignment-of-the-rails-300x238.jpg
 

dunnyrail

DOGS, Garden Railways, Steam Trains, Jive Dancing,
Staff member
GSC Moderator
25 Oct 2009
26,169
4,993
75
St.Neots Cambridgeshire UK
Best answers
0
Country flag
Thanks for your sympathy and encouragement guys. Had a few minutes spare this morning after the streess of Housecleaning for a friend comming round. So took the main offending loco to ET unscrewed the R2 Tracck and had a look to see what the issue is and how I can fix it. This picture shows the amount the Track needs to be spaced out. I made up the LGB Portion of the Track Template after I had relaid the R1/2 Curve in side the Shed forgetting that it was nit standard LGB Geomorty because all the R3 Points in the Shed have been modified to be closer to get more Loops in the Storage Sidings. Doh old git memory strikes again!
image.jpeg
So having made a new slot and using the end of the Template I now have a measurement to get the right spacing for Big Locomotives like that shown in this pic. There is adequate space between the Loco and Coach honest guv![
image.jpeg
image.jpeg
The Signal will need to be moved but I allowed extra on al the Pipe Runs and even the Main Wiring so that can be accomodated when the Trunking has been moved. Phew.
image.jpeg
As expected the Door will need to be widened some as well.

At least in the interim I can still run the Station as expected with Shorter Harz Mallets and 6001 which have all been checked out and have sufficient lack of Kinetic Envelope to be able to run round when Bogie Vehicles are in the R2 Loop.
 

Rhinochugger

Retired Oik
27 Oct 2009
36,715
4,240
North West Norfolk
Best answers
0
Country flag
Some monster overhangs there, Jon - no wonder it needs a bit of careful sorting :tmi::tmi::tmi::tmi: