Since construction on the garden line has been non-existent, I have moved over to trying to expand my abilities in 3D printing..
I had upgraded my FDM printer to a Tarantula RS that gave me all sorts of fits. Eventually, I'd waste more time trying to get it dialed in, but at the end of last year (as a BF deal), I picked up a Photon Mono X SLA style printer (aka Resin Printing). I ran a few test prints in it and was thoroughly satisfied with it's quality and speed, so I got myself comfortable with TinkerCad and started designing some stuff...
Since my main enjoyment comes not from just trains but building towns/structures, I figured I'd start with a single, small basic building. Something that could be a single print for the main structure, but later on could be modified or kitbashed in to something bigger.
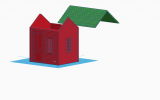
After many evenings I got a basic structure drawn up. Being a n00b with Resin, I designed it all in F scale. Figured that since I don't have a formal layout yet, I can always shrink it to be whatever size I need it to be once I get it into the slicer.

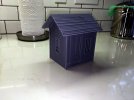
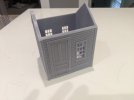
When I said basic and small, I meant basic and small.. The main body is a single object and the roof is another object. It took a few tries to dial in height and proportions (even with using a scale ruler), but the latest test print turned out usable. I shrunk it down to G (1:22.5) Scale for the time being because of all the Bachman cars and Pola buildings I already have.


One lesson learned if you look at the bottom about 7mm up from the lower edge, is if you are printing flat on the build plate, add drain holes, otherwise you can get weird suction anomalies. That caused the last few layers before the model broke the surface to suck inward. Ooops.
I might try to print it one more time on supports or at a 5 degree tilt to stop that from happening, and then paint/weathering.
I had upgraded my FDM printer to a Tarantula RS that gave me all sorts of fits. Eventually, I'd waste more time trying to get it dialed in, but at the end of last year (as a BF deal), I picked up a Photon Mono X SLA style printer (aka Resin Printing). I ran a few test prints in it and was thoroughly satisfied with it's quality and speed, so I got myself comfortable with TinkerCad and started designing some stuff...
Since my main enjoyment comes not from just trains but building towns/structures, I figured I'd start with a single, small basic building. Something that could be a single print for the main structure, but later on could be modified or kitbashed in to something bigger.
After many evenings I got a basic structure drawn up. Being a n00b with Resin, I designed it all in F scale. Figured that since I don't have a formal layout yet, I can always shrink it to be whatever size I need it to be once I get it into the slicer.

When I said basic and small, I meant basic and small.. The main body is a single object and the roof is another object. It took a few tries to dial in height and proportions (even with using a scale ruler), but the latest test print turned out usable. I shrunk it down to G (1:22.5) Scale for the time being because of all the Bachman cars and Pola buildings I already have.


One lesson learned if you look at the bottom about 7mm up from the lower edge, is if you are printing flat on the build plate, add drain holes, otherwise you can get weird suction anomalies. That caused the last few layers before the model broke the surface to suck inward. Ooops.
I might try to print it one more time on supports or at a 5 degree tilt to stop that from happening, and then paint/weathering.
Last edited:
-
6
- Show all

