You are using an out of date browser. It may not display this or other websites correctly.
You should upgrade or use an alternative browser.
You should upgrade or use an alternative browser.
A bit of 1:32 fun
- Thread starter DGE-Railroad
- Start date
DGE-Railroad
The Orchard Line
Talent is something I definitely have in short supply 
That combined with an elderly MacBook Pro which is struggling to move multiple copies of Gauge One sized coaches through 3 dimensions, means it's all taking quite a while!
I should dig out my monster video-editing computer for this sort of stuff but it's buried beneath locos, track etc at the moment...
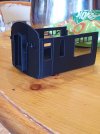
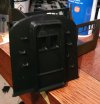
So this was a multi-part SR coach which I have scaled to 1:32 and should be printable and is designed to bolt-together. I've only printed an end so far as I was adding the corridor and steps to see how they looked.
I now have a GWR Collet which is also scaled to 1:32 and has more exterior and interior detail.
I'm just working on sectioning it to fit on a print bed and to allow it to print and I will try printing a few parts. These tend to be quite slow prints as they're big parts with a fair bit of detail. I haven't messed about with my default Cura speeds to see if I can speed things up any, as I quite like the quality I'm getting at the moment. That SR coach was a 13h print from memory.
Once I've ironed everything out, I'll make the STLs public, yep.
The printer is flat out at the moment tackling the 1:29 Big Boy tender, so the coach parts are vying for print time.
Perhaps I need a second printer

That combined with an elderly MacBook Pro which is struggling to move multiple copies of Gauge One sized coaches through 3 dimensions, means it's all taking quite a while!
I should dig out my monster video-editing computer for this sort of stuff but it's buried beneath locos, track etc at the moment...
So this was a multi-part SR coach which I have scaled to 1:32 and should be printable and is designed to bolt-together. I've only printed an end so far as I was adding the corridor and steps to see how they looked.
I now have a GWR Collet which is also scaled to 1:32 and has more exterior and interior detail.

I'm just working on sectioning it to fit on a print bed and to allow it to print and I will try printing a few parts. These tend to be quite slow prints as they're big parts with a fair bit of detail. I haven't messed about with my default Cura speeds to see if I can speed things up any, as I quite like the quality I'm getting at the moment. That SR coach was a 13h print from memory.
Once I've ironed everything out, I'll make the STLs public, yep.
The printer is flat out at the moment tackling the 1:29 Big Boy tender, so the coach parts are vying for print time.
Perhaps I need a second printer
Dagnall
Registered
Fantastic, thanks..
The partial BR Mk 1 coach I did is here: Free CAD Designs, Files & 3D Models | The GrabCAD Community Library
Not very good I'm afraid!.
My plan was to have it behind my Terrier (Terrier Loco by dagnall53) .. but the issues of the bogies and cutting sensibly to make printable defeated me.. (also the realisation that with a R1 track, it was never going to go around the corners!.
DGE-Railroad
The Orchard Line
I think that coach looks great and as for the Terrier..Fabuous. I'm definitely going to have a go at printing that! Thank you for sharing.
I tend to work in TinkerCAD as it's simple enough for my limited skill but powerful enough to still do most of what I need. I happened upon smaller but detailed publically available versions of the BR and GWR coaches I'm playing with. In each case I've had to import and rescale the models in TinkerCAD.
The problem with working in this way being that TinkerCAD is having to work with the STL file rather than a proper CAD one and so it is treated as a single object, which makes the requisite modifications quite messy and convoluted.
I've spent a fair bit of time with the rescaled versions, segmenting and slicing them to get them to print reassemble. Each part is a lengthy old print.
I was planning to print out 1/3 of the Collett coach and interior but a powercut took out the printer overnight! I've printed the end panel of it to compare against the SR and I'm currently printing out the middle section of the SR one.
I must admit I'm not convinced printing is the best medium for something as large as a coach - the parts are so large and the risk of an issue during long prints increases but we'll see how it comes out. Eddy at Kippo models does some fab moulded Gauge 3 BR Mk1 coaches at a very reasonable price. I'm trying to convince him release a 1:32 version If this appeals as an option, do add your voice to the requests and it may spur him to raise it up the priority ladder!
I tend to work in TinkerCAD as it's simple enough for my limited skill but powerful enough to still do most of what I need. I happened upon smaller but detailed publically available versions of the BR and GWR coaches I'm playing with. In each case I've had to import and rescale the models in TinkerCAD.
The problem with working in this way being that TinkerCAD is having to work with the STL file rather than a proper CAD one and so it is treated as a single object, which makes the requisite modifications quite messy and convoluted.
I've spent a fair bit of time with the rescaled versions, segmenting and slicing them to get them to print reassemble. Each part is a lengthy old print.
I was planning to print out 1/3 of the Collett coach and interior but a powercut took out the printer overnight! I've printed the end panel of it to compare against the SR and I'm currently printing out the middle section of the SR one.
I must admit I'm not convinced printing is the best medium for something as large as a coach - the parts are so large and the risk of an issue during long prints increases but we'll see how it comes out. Eddy at Kippo models does some fab moulded Gauge 3 BR Mk1 coaches at a very reasonable price. I'm trying to convince him release a 1:32 version
DGE-Railroad
The Orchard Line
DGE-Railroad
The Orchard Line
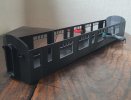
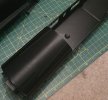
The 1:32 SR coach is pretty much printed. I'll finish the roof in slow time and I wasn't going to bother printing the chassis as it isnt that detailed. It'd be more practical to use a wooden plate and add conventional cast details.
I'm fairly pleased with the overall result, especially how the windows came out as the coach body sections were accidebtally printed horizontally without support!
I'm planning to fill and paint it and to add some Tenmille bogies and details to see how it could look, but i don't know if it could look as decent as a Tenmille or Bowaters kit
Anyway, on to try the more detailed GWR variant next!


Last edited:
DGE-Railroad
The Orchard Line
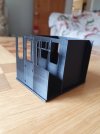
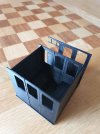
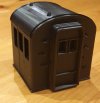
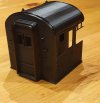
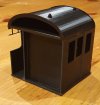
Here's the test print of the GWR Collett style coach at 1:32 scale.
The end panel steps could do with a finer resolution as they are extremely thin and fragile but the rest prints out okay at std. The roof isnt the smoothest and would benefit from improvement.
Ive now resliced it such that it prints in the minimal amount of sections, whilst avoiding the doors and windows. Something I failed to spot on this test one.
As with the SR coach, I think attaching it to a wood or alumium base to which conventional bogies and details could be hung probably makes the most sense


DGE-Railroad
The Orchard Line
The printer has finally printed off the fourth of the four coach body parts and is now rattling off the end sections with the steps and corridors.
I have some Tenmille bogies which I was going to put underneath it on the basis they're GWR too, and the only things I have to hand.
I need to canvas suggestions for the chassis and roof though. Particularly the roof.
Printing this part off just isn't worth it - it's the most obvious part, takes ages to print as it's huge. More so at a very high resolution in order to keep it smooth and well detailed.
Given the shape, I think some balsa or styrene sheet over some formers might be a better approach; certainly a better end result and without days of printing. I can then add detail such as vents and rain strips.
I've scaled some roof formers to accept a 2mm sheet and am wondering which would be best? I'm leaning towards styrene as it'll be more durable I think and require no sealing?
As regards the chassis...maybe 2mm ali plate to epoxy the body sections to, to provide some weight and to allow underside details and the bogies to be attached to?
There are brighter minds than mine on here and having been so close to it, I'd welcome some fresh ideas and a sanity check
I find that roof formers work much better using strips, with a long coach having internal beams to match the profile is a good idea. Sanding smooth and perhaps using filler for the gaps is a good idea. I also like to put fine kitchen roll on the top sealed on with thinned down PVA. Ther resukt can then be painted by your chosen selection of roof colour paint. This very much reflects prototype practice that uses some kind of weatherproof sheeting on roofs, and yes sometimes you can see the joins.The printer has finally printed off the fourth of the four coach body parts and is now rattling off the end sections with the steps and corridors.
I have some Tenmille bogies which I was going to put underneath it on the basis they're GWR too, and the only things I have to hand.
I need to canvas suggestions for the chassis and roof though. Particularly the roof.
Printing this part off just isn't worth it - it's the most obvious part, takes ages to print as it's huge. More so at a very high resolution in order to keep it smooth and well detailed.
Given the shape, I think some balsa or styrene sheet over some formers might be a better approach; certainly a better end result and without days of printing. I can then add detail such as vents and rain strips.
I've scaled some roof formers to accept a 2mm sheet and am wondering which would be best? I'm leaning towards styrene as it'll be more durable I think and require no sealing?
As regards the chassis...maybe 2mm ali plate to epoxy the body sections to, to provide some weight and to allow underside details and the bogies to be attached to?
There are brighter minds than mine on here and having been so close to it, I'd welcome some fresh ideas and a sanity check
Your concept for the chassis is very sound, i always if I can like to have removable bits. This some small L glued inside the coaches where it would not be noticed would allow drilled and tapped say 10ba bolts to secure toe top section.
Hope this gives you some ideas.
DGE-Railroad
The Orchard Line
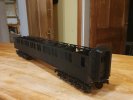
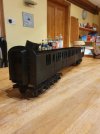
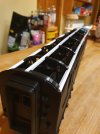
The coach is finally coming together. Just the styrene roof skin to attach and then its on to the details. Phew!
I don't think I'd want to print or own a rake of them, but it's been a fun and rewarding exercise nonetheless
I'm pleased with the roof formers. The styrene box section just snaps into place and holds nicely but can be repositioned if needed
I don't think I'd want to print or own a rake of them, but it's been a fun and rewarding exercise nonetheless
I'm pleased with the roof formers. The styrene box section just snaps into place and holds nicely but can be repositioned if needed


